Post Name


Swirl flaps are a BMW system that has been introduced to help burn the fuel mixture in the cylinder better due to the fact that diesel engines do not have throttle valves and it is not possible to adjust the air-fuel ratio. A diesel engine without vortex valves operates between a poor and a rich fuel mixture, because the only way to regulate it is through fuel injection.

Design of the first generation swirl flaps that are made of made of metal.
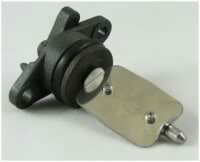


Unfortunately, swirl flaps are responsible for countless damaged engines and costly repairs due to design errors or metal fatigue. Once damaged, the cylinder sucks them in and causes great damage.

This is how damaged valves damage the cylinder.
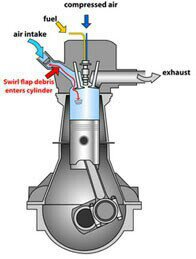


Typical swirl flaps  suction damage.


The vortex valves are positioned in the inlet and are controlled by vacuum (DDE 4.0) or electrically (DDE5.0 / DDE6.4) by the engine ECU.

Effects of malfunctioning valves:

  • Swirl valves are  stuck in open position: Deterioration of exhaust gas performance at lower speeds.
  • Swirl valves are stuck in closed position: Approximate power loss of 10% at high engine speeds.

How swirl flaps work:


Performance characteristics:

The vortex valves are in the closed position, at low engine speeds and small amounts of fuel injected (controlled by the ECU card).

They open under the following conditions:

  1. coolant temperature <14 ° C OR * fuel quantity> 24 mg OR
    2. engine speed 2250 rpm OR
    3. inlet air temperature <-5 ° C.

BMW and Pierburg have decided to produce diesel engines with metal vortex valves. The speed at which the pistons in the diesel engine operate is at least 60 rpm, so a sucked vortex valve will break and cause a number of damages inside the engine.

In most cases, one or more pistons are severely damaged, as a bonus you get valves, in some cases a head or turbocharger. And this combination with a BMW engine is like a cumulative jackpot  🙂

In 2004, BMW began work on the problem and improved the design, however, a number of owners reported ongoing problems in this area.

The solution to this problem is by removing the vortex valves and plugging, which does not affect the performance of the engine and at the same time, you can safely pass the exhaust test.

Engines:

M47 (136hp VP44 fuel pump) has no valves.

M47N common rail engine (including M47N / M47TU / M47TUD20) (150hp. Face lift model from 2001 -) has valves.

M57 engines (M57D) (525d & 187hp. 330d) cars with manual transmission do not have valves, but those with automatic have.

M57N engines (M57TUD) (525d & 330d 204hp) have vortex valves.

Ruined swirl flapss:


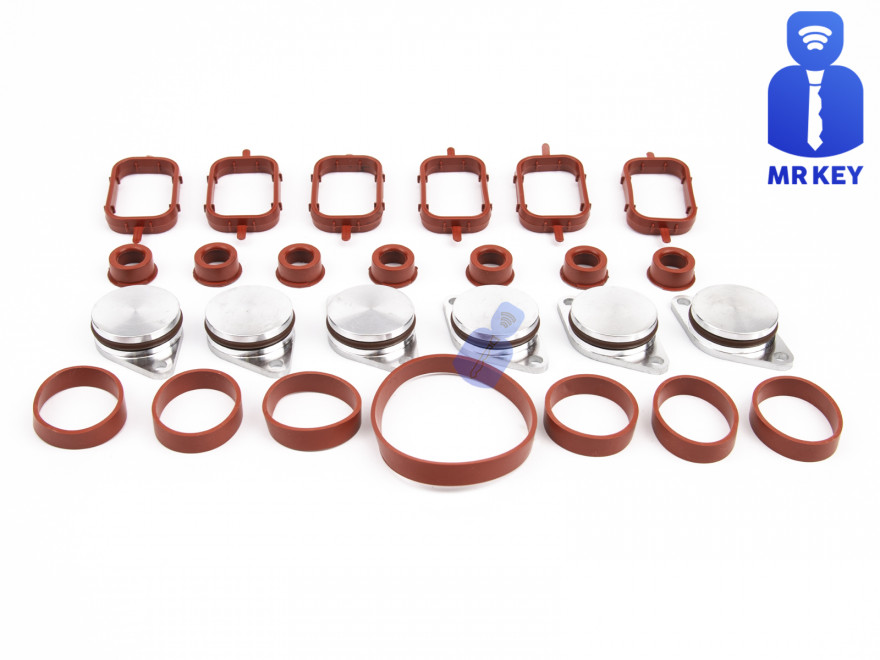
The plugs that replace the vortex valves are easy to find on the internet, but you can also find them here on our website.

Typical plugs:

Disassembly of vortex valves:


The vortex valves can be safely dismantled and in most cases if they are  removed properly no loss of power is felt.

Final list of models for which vortex valves are installed:

Engine: M47N/M47TU/M47TUD20

Applications:

* 110 kW (148 hp) and 330 N·m (243 lb·ft)

o E46 320d 2001-2005

o E83 X3 2.0d (up to end of 2006)

Engine: M47TU2D20

The engine was updated again in 2004 as the M47TU2D20. Still at 1995 cc, it produced more power across the range.

Applications:

* 120 kW (161 hp) and 340 N·m (251 lb·ft)

E60/E61 520d

E87 120d

E90/E91 320d

E83 X3 2.0d (end of 2006 onwards)

Engine: M57/M57D25

M57D25 was introduced in 2000.

Applications:

* 166 PS (122 kW; 164 hp) at 4000 rpm, 350 N·m (260 lb·ft) at 2000-2500 rpm with a 4750 rpm redline, models:

2000-2003 E39 525d *Vehicles With Automatic Transmission ONLY*

Engine: M57N/M57TU/M57TUD25

M57TUD25 was introduced in 2004.

Applications:

* 177 PS (130 kW; 175 hp) at 4000 rpm, 400 N·m (300 lb·ft) at 2000-2750 rpm models:

E60/E61 525d

Engine: M57/M57D30

M57D30, also called M57D29, was introduced in 1998.

Applications:

* 184 PS (135 kW; 181 hp)@4000, 390 N·m (290 lb·ft)@1750-3200 models:

E39 530d *Vehicles With Automatic Transmission ONLY*

E46 330d/330xd *Vehicles With Automatic Transmission ONLY*

* 184 PS (135 kW; 181 hp)@4000, 410 N·m (300 lb·ft)@2000-3000 models:

E38 730d *Vehicles With Automatic Transmission ONLY*

E53 X5 3.0d

* 193 PS (142 kW; 190 hp)@4000, 410 N·m (300 lb·ft)@1750-3000 models:

E38 730d

E39 530d

Engine: M57N/M57TU/M57TUD30

M57TUD30 was introduced in 2002. It originally produced 160 kW (215 hp) at 4000 rpm and 500 N·m (370 lb·ft) at 2000-2750 rpm, but was tweaked for 150 kW (201 hp) at 4000 rpm and 410 N·m (300 lb·ft) at 1500-3250 rpm for 2003 and again for 200 kW (268 hp) at 4000 rpm and 560 N·m (410 lb·ft) at 2000-2250 rpm in 2004.

Applications:

* 204 PS (150 kW; 201 hp)@4000, 410 N·m (300 lb·ft)@1500-3250 models:

E46 330d/330Cd/330xd

E83 X3 3.0d

* 218 PS (160 kW; 215 hp)@4000, 500 N·m (370 lb·ft)@2000-2750 models:

E53 X5 3.0d

E60/E61 530d/530xd

E65 730d

* 272 PS (200 kW; 268 hp)@4000, 560 N·m (410 lb·ft)@2000-2250

E60/E61 535d

* 245 PS (180 kW; 242 hp)@4000, 500 N·m (370 lb·ft)@2000-2250

* 286 PS (210 kW; 282 hp)@4000, 580 N·m (430 lb·ft)@2000-2250

Engine: M57TU2D30

M57TU2D30 was introduced in 2007, making its debut in the facelifted E60 and E61.

* M57TU2D30-UL: 197 PS (145 kW; 194 hp)

* M57TU2D30-OL: 235 PS (173 kW; 232 hp)@4000, 500 N·m (370 lb·ft)@2000-2750

* M57TU2D30-TOP: 286 PS (210 kW; 282 hp), 580 N·m (430 lb·ft)

Applications:

* 197 PS (145 kW; 194 hp), 400 N·m (300 lb·ft) models:

E90/E91/E92 325d

E60/E61 525d/525xd

* 231 PS (170 kW; 228 hp)@4000, 500 N·m (370 lb·ft)@2000-2750 models:

E65 730d

E90/E91 325d

E90/E91 330d/330xd

* 235 PS (173 kW; 232 hp) models:

E60/E61, BMW E70, BMW E71

* 286 PS (210 kW; 282 hp), 580 N·m (430 lb·ft) models:

E60/E61 535d

E70 X5 3.0sd

E71 X6 xDrive35d

E83 X3 3.0sd

E90/E91 335d

The above models are listed for information only if you want to to make sure your engine has valves installed, please contact a competent person.

Please note that the information described above is for informational purposes only and does not claim to be reliable. Mr-key.com is not responsible for any repair work you undertake that is related to the topic described in this article.

Related Posts

The Fascinating History of Car Safety Features: How Far We’ve Come to Keep You Safe

The Fascinating History of Car Safety Features: How Far We’ve Come to Keep You Safe

When you think about cars, what comes to mind? Speed, design, or maybe the feeling of freedom when you hit the open road? But there’s one crucial aspect of driving that you might not think about as much—safety. Cars today are safer than ever, thanks to decades of innovations and advancements. But how did we get here? Let’s dive into the history of car safety features and see just how far we’ve come to protect you and your loved ones on the road. The Early Days: A Lack of Safety Awareness Back in the early 1900s, cars were viewed as luxury items and status symbols. Safety wasn’t really a concern. Cars had no seat belts, no airbags, and certainly no crumple zones. People focused more on making vehicles go faster and look better than on keeping passengers safe. In those days, accidents were far more dangerous, often leading to severe injuries or fatalities. It wasn’t until the rise of car ownership in the 1920s and 1930s that people began to notice just how dangerous cars could be. The growing number of vehicles on the road led to more accidents, and the need for safety features became evident. The Invention of Seat Belts: The First Major Breakthrough Seat belts were one of the first car safety features to be introduced. But they didn’t become standard right away. In fact, the idea of a seat belt first appeared in the late 19th century, designed for use in airplanes, not cars. It wasn’t until the 1950s that the seat belt began to find its way into automobiles, thanks to Swedish engineer Nils Bohlin, who designed the three-point seat belt in 1959. Bohlin’s invention, which you still use today, was a game-changer. It saved countless lives and reduced serious injuries in crashes. Volvo was the first company to introduce the three-point seat belt in their vehicles, and soon after, other manufacturers followed suit. Airbags: A Revolutionary Step Forward As seat belts became more common, automakers started looking for additional ways to protect drivers and passengers. Enter the airbag. The airbag was initially developed in the 1950s, but it took decades of refinement before it became a standard feature in cars. The first production car equipped with an airbag was the 1973 Oldsmobile Toronado, but it wasn’t until the 1990s that airbags became widely available. Today, airbags are a critical component of vehicle safety systems, with front, side, and even curtain airbags designed to protect you from all angles in a crash. Alongside seat belts, airbags are now seen as one of the most effective life-saving technologies in modern vehicles. Crumple Zones: Protecting You in a Collision Crumple zones are another innovation that may not be immediately obvious, but they play a huge role in keeping you safe. In the event of a crash, crumple zones are designed to absorb and dissipate energy, reducing the force transferred to passengers. Introduced in the 1950s by Mercedes-Benz, crumple zones help reduce the impact of a collision by sacrificing the car’s body to protect the occupants. Today, crumple zones are standard in virtually every car, and their design continues to evolve, improving crash safety with each new model year. Anti-lock Brakes: Helping You Keep Control The introduction of anti-lock braking systems (ABS) in the 1970s was another massive leap forward in car safety. ABS prevents the wheels from locking up during braking, which helps maintain steering control during an emergency stop. This system is especially useful on slippery surfaces like rain-soaked or icy roads. Before ABS, sudden braking could lead to skidding, causing drivers to lose control of their vehicles. ABS has significantly reduced the number of accidents caused by loss of control and has become a staple of modern driving safety. Electronic Stability Control: The Technology That Saves Lives Electronic Stability Control (ESC) was a groundbreaking safety feature that hit the market in the 1990s. ESC helps you maintain control of your car during skids or oversteering by automatically applying brakes to individual wheels. Studies have shown that ESC can reduce the risk of a fatal crash by as much as 50%. In fact, the National Highway Traffic Safety Administration (NHTSA) now mandates that all cars sold in the United States come equipped with ESC. This technology has proven to be especially helpful in preventing rollovers, which are among the most dangerous types of accidents. The Future of Car Safety: What’s Next? Car safety features have come a long way, but we’re not done yet. The future of vehicle safety lies in advanced driver-assistance systems (ADAS), which use sensors, cameras, and radar to detect potential hazards and prevent accidents before they happen. Some of the technologies that are becoming increasingly common include lane departure warnings, automatic emergency braking, and adaptive cruise control. And let’s not forget the promise of self-driving cars, which could drastically reduce accidents caused by human error, which accounts for the majority of crashes today. The Importance of Car Safety As we look back on the history of car safety features, it’s incredible to see how far we’ve come. From the early days of no seat belts or airbags to today’s cutting-edge technology, the automotive industry has made safety a top priority. The next time you get behind the wheel, take a moment to appreciate all the safety features designed to protect you. Whether it’s a simple seat belt or a high-tech stability control system, these innovations have made driving safer for everyone. And remember, no matter how advanced your car’s safety systems are, the best protection is still responsible driving. Stay alert, drive safely, and always buckle up!

How to Properly Maintain Your Car Keys and Lubricate Locks: A Complete Guide

How to Properly Maintain Your Car Keys and Lubricate Locks: A Complete Guide

Car keys and locks are everyday essentials that we often take for granted—until they malfunction. From ensuring the longevity of your car keys to properly lubricating locks for smooth operation, maintenance plays a vital role in avoiding inconvenience and costly repairs. In this guide, we explore how to care for your car keys and master the art of lock lubrication. Common Issues with Car Keys and How to Prevent Them Car keys are more than just tools; they’re lifelines to your vehicle. Whether you have a traditional metal key or an advanced smart key, these essential devices are prone to wear and tear. Understanding common problems and their solutions can save you time and stress. 1. Worn-Out Key Blades Over time, the metal blades of traditional car keys can become worn, making it difficult to start your car. This is especially common in keys used frequently or roughly. To prevent this, avoid using your car key for tasks like opening packages or prying objects. 2. Weak Key Fob Batteries For those with remote or smart keys, a weak battery is a common issue. A fading signal or difficulty locking/unlocking your car remotely are signs it’s time for a battery replacement. Replacing the battery every 1-2 years can help maintain consistent performance. 3. Scratched or Damaged Smart Keys Smart keys have sensitive electronics that can be damaged by rough handling or exposure to extreme temperatures. Always store your key in a protective case and keep it away from direct sunlight or freezing conditions. Pro Tip: Always have a spare key on hand. This not only saves time during emergencies but also reduces the wear on your primary key. Why Locks Need Regular Lubrication Locks are intricate mechanisms designed to provide security. However, dirt, grime, and regular use can cause them to stick or malfunction. Lubrication ensures smooth operation and prevents long-term damage. How Locks Deteriorate Locks endure constant exposure to the elements, which makes them vulnerable to dirt, dust, and moisture. Over time, these factors can lead to stiffness, making it difficult to turn the key. If left unchecked, the lock may become entirely unusable, requiring costly replacement. Choosing the Right Lock Lubricant Not all lubricants are created equal, and choosing the right one is crucial for maintaining your locks. Here are the best options: Graphite Powder This dry lubricant is a top choice for locks. It doesn’t attract dust and provides smooth operation without residue build-up. Silicone Spray Silicone-based sprays offer moisture resistance and work well for both interior and exterior locks. Avoid over-applying, as excess lubricant can attract grime. Avoid Oil-Based Lubricants Products like WD-40 may seem convenient but are not ideal for locks. They can attract dirt and worsen the problem over time. Step-by-Step Guide to Lubricating a Lock Follow these steps to keep your locks functioning flawlessly: Clean the Lock Begin by removing visible dirt and debris using a soft brush or compressed air. This ensures the lubricant can reach internal components effectively. Apply Lubricant Insert the nozzle of your lubricant into the keyhole and spray or apply a small amount. If using graphite powder, gently squeeze the bottle to distribute the powder evenly. Insert and Turn the Key Insert your key and turn it several times to distribute the lubricant throughout the lock mechanism. Test the Lock Check the lock’s operation by locking and unlocking it multiple times. If it still feels stiff, reapply a small amount of lubricant. Pro Tip: Lubricate locks every 6-12 months, or more frequently if they’re exposed to harsh weather conditions. Maintenance Tips for Long-Term Performance 1. Protect Outdoor Locks For locks exposed to the elements, such as gates or sheds, consider using a lock cover to shield them from rain and snow. Regularly inspect and lubricate these locks to prevent rust and corrosion. 2. Store Spare Keys Properly Spare keys should be kept in a safe, dry place. Avoid leaving them in areas with high humidity, as moisture can lead to rust on metal keys. 3. Address Issues Early If you notice stiffness or difficulty turning a key, address the issue immediately. Ignoring minor problems can lead to complete lock failure. The Global Perspective on Lock and Key Maintenance Different regions face unique challenges when it comes to maintaining locks and keys. In cold climates, freezing temperatures can cause locks to seize, requiring specialized de-icing sprays. In humid or coastal areas, locks are more prone to rust and may need frequent lubrication to combat corrosion. Meanwhile, digital locks are becoming increasingly popular in urban areas worldwide. These systems require their own maintenance, such as software updates and battery replacements, to ensure optimal functionality. A Little Maintenance Goes a Long Way Caring for your car keys and locks is a small investment of time that can save you from major inconveniences. By taking preventative steps like lubricating locks and protecting your keys, you can ensure their longevity and performance. Take a moment today to inspect your keys and locks. Are they in optimal condition? If not, a quick round of maintenance can make all the difference. For more insights on maintaining your everyday essentials, explore our other articles and unlock the secrets to hassle-free living.

How to Take the Perfect Photo of Your Key for Easy Replacement

How to Take the Perfect Photo of Your Key for Easy Replacement

When you need a replacement key , taking a clear, detailed photo of your key can make the process much faster and more accurate. A high-quality image helps key makers understand the exact specifications, cuts, and dimensions of your key, which is especially important if you don’t have a spare. In this guide, we’ll walk you through the best practices for photographing your key so you can get an accurate replacement with ease. Why a Clear Key Photo Matters Photographing a key might sound simple, but it requires a bit of attention to detail. A well-taken photo captures the key’s grooves and unique cuts clearly, helping the key cutter replicate the exact pattern. Saves Time : A high-quality photo reduces the need for multiple attempts to cut a new key. Ensures Accuracy : Clear images help capture specific details, leading to a more precise fit. Convenient Process : With just a smartphone and a few tips, you can photograph your key from home without needing special equipment. Essential Tools for Photographing Your Key To take a clear photo of your key, you don’t need much beyond a few household items. Here’s what you’ll need: Smartphone or Camera : A phone camera is usually sufficient, but a standard digital camera works well too. Plain Background : Choose a neutral, solid-colored background like a piece of white paper or a smooth table surface. Good Lighting : Natural daylight or a bright room light helps capture details without shadows. Small Object for Elevation : A coin or similar item can lift the key slightly, making it easier to photograph. Step-by-Step Guide to Taking the Perfect Key Photo Follow these steps to take a photo that ensures clarity and accuracy for key replacement. 1. Set Up the Background Place a piece of plain white paper or another smooth, light-colored surface under your key. The solid color helps the details of the key stand out without any visual distractions. Tip : Avoid backgrounds with patterns or textures, as these can obscure the key’s features. 2. Position the Key Correctly Lay the key flat on the background, with the grooves and cuts facing up. The key should be positioned horizontally to allow a clear view of all its details. Side Profile : Make sure to capture the side profile that shows the cuts and grooves. Elevate Slightly : Place a coin or small object under one end of the key to angle it slightly toward the camera. This can help reduce shadows and improve focus on the cuts. 3. Adjust Lighting Good lighting is essential for capturing details. If possible, photograph your key in natural daylight near a window or use a well-lit room. Avoid Shadows : Ensure that no shadows fall across the key, as they can obscure details. Diffuse Light : If using a lamp, consider placing a thin cloth over it to diffuse the light and reduce harsh reflections. 4. Focus and Zoom Make sure your camera or smartphone is focused directly on the key. You may need to tap the screen to bring it into sharp focus. Zoom in Carefully : If you’re using a smartphone, zoom in slightly to capture the details, but avoid over-zooming, which can blur the image. Test Multiple Angles : Sometimes a slight adjustment in angle can capture the cuts more effectively, so take a few shots from slightly different perspectives. 5. Capture Multiple Photos It’s always a good idea to take several photos to ensure you have the best one. Try different angles and lighting adjustments to capture as many details as possible. Close-Up of the Grooves : Take one close-up image focusing on the cuts and grooves of the key. Overall Image : Include one full-length photo that shows the entire key from end to end. Try Different Angles : Slightly tilt the key or move the camera to see which angle best captures the detail of the cuts. Common Mistakes to Avoid When Photographing Your Key To get the best results, steer clear of these common issues that can impact the quality of your key photo: Blurry Images : If your hand shakes, use a small tripod or prop your phone on a stable surface. Poor Lighting : Avoid taking photos in dim rooms; use bright light to ensure the key is clearly visible. Obstructed Details : Make sure the entire length of the key is visible, without any part being cut off or covered. Tips for Ensuring a Smooth Replacement Process Once you have a clear photo of your key, there are a few final steps to make the replacement process as efficient as possible. Check the Photos : Look over your photos before sending them to ensure that they’re clear and detailed. Label the Key : If you’re photographing multiple keys, label each one in the image or add a note to avoid confusion. Include Measurements : If possible, add the measurements of the key’s length and width in your notes for added accuracy. A clear, detailed photo of your key can save you time and effort when seeking a replacement. By following these simple steps, you’ll provide all the necessary details to ensure your new key is an accurate match. Remember, good lighting, focus, and capturing all the unique cuts are essential to achieving the best results. With these guidelines, you’re set to take a photo that will make your key replacement process smooth and hassle-free.

Lost Your Witter, GDW, Thule (Brink) or TowTrust Towbar Key? Here's What to Do.

Lost Your Witter, GDW, Thule (Brink) or TowTrust Towbar Key? Here's What to Do.

Lost your towbar key right before a holiday or towing trip? You’re not alone. Detachable towbar keys are typically used only occasionally – often just before a caravan holiday or when you need to tow – which means they spend most of the year tucked away. It’s all too easy for that lost towbar key to go missing between uses. The good news is that if your key has an ACS-series code (ACS01–ACS10) engraved on it, you can order a precise replacement online in minutes and avoid throwing a wrench in your travel plans. What are ACS towbar keys? The ACS-series keys are a common type of detachable towbar key numbered ACS01 through ACS10 (for reference: ACS01, ACS02, ACS03, ACS04, ACS05, ACS06, ACS07, ACS08, ACS09, ACS10). These keys fit a specific locking system used by multiple towbar manufacturers. In fact, an ACS towbar key could belong to a detachable hitch from ACS itself or from popular brands like Witter, GDW, Thule (Brink) or TowTrust – all of whom use the same ACS lock design. What matters is the code stamped on your key or lock. If it falls in the ACS01–ACS10 range, that code is all you need to get a new key cut and shipped to you. Check Your Key Code (ACS01–ACS10) Before you panic, inspect your towbar’s lock (or any remaining key) for a small engraved code. Most detachable towbar locks have the key number stamped either on the face of the lock barrel or on the original key itself. For the ACS series, this code will start with “ACS” followed by a two-digit number – for example, ACS04 or ACS09. If you see a code in the format ACS## and especially if it’s between ACS01 and ACS10, you’re in luck. That means your towbar uses the ACS key system, and a towbar key ACS01–ACS10 replacement can be ordered without changing the lock. Why is the key code important? This unique code is what key cutting services use to create an exact match for your lock. No original key is required – the code itself tells the cutter how to shape the new key. As long as the code is clearly visible (and within the supported range), you won’t need to replace the entire towbar lock or mechanism. Just supply the code and a new key can be made to fit perfectly, as if it were the original. Tip: Wipe the lock face clean or use a flashlight if needed – dirt and road grime can obscure the tiny engraving. On some keys the code might be on the plastic head or metal shaft of the key. Look for “ACS” followed by numbers. Compatible Towbar Brands for ACS Keys One big advantage of the ACS lock system is its cross-compatibility. These key codes ACS01–ACS10 aren’t limited to a single towbar brand – they’re used across several major manufacturers of detachable towbars. If you have a detachable towbar from any of the following brands, there’s a good chance it uses an ACS-series key: ACS (A50-X) – ACS is the original supplier of this locking system (often referred to as the A50-X class detachable). Keys for ACS detachable towballs will have codes ACS01–ACS10. Brink / Thule – Thule’s towing division (now Brink) uses ACS keys for many of its detachable hitches. If you have a Thule or Brink detachable towbar, check for an ACS code on the lock. (Brink/Thule locks with codes like 1D## or 2D## are a different series – but ACS## codes are common on earlier Thule/Brink models.) Witter – A very popular towbar brand, Witter uses the ACS system on their detachable swan-neck towbars. A Witter detachable with an ACS key will have “ACS” on the key or lock face. Witter towbar key replacements are readily available by code. GDW – This European towbar manufacturer also uses ACS-series keys for many detachables. If you need a GDW towbar replacement key, the process is the same: find the ACS## code and order a matching key. Tow-Trust – TowTrust (Tow-Trust) towbars, often sold in the UK and EU, utilize ACS keys as well. Tow-Trust detachable models with ACS locks will have codes ACS01–ACS10 on the keys. Other brands like PCT Automotive or Towsure have also been known to use ACS locks in some of their detachable towbar systems. The key point is that multiple brands share this ACS key design. So whether your hitch is labeled Witter, Thule, Brink, GDW, or TowTrust, if the key code starts with ACS, you can get the correct replacement towbar key by that code. This compatibility makes it easier to find spares, since one good supplier can cover many brands under the ACS series. Quick Reference: ACS Key Codes and Brands For easy identification, here’s a summary of which detachable towbars use the ACS01–ACS10 key range: Towbar Brand Detachable Key Code Series Example Key Code ACS (A50-X system) ACS01 – ACS10 ACS07 (on key/lock) Brink (Thule Towbars) ACS01 – ACS10 ACS05 Witter ACS01 – ACS10 ACS03 GDW ACS01 – ACS10 ACS09 Tow-Trust ACS01 – ACS10 ACS02 If your towbar brand is listed above and you see an “ACS*” code on the lock, you can order a new key by that code. In the example codes, the number can be any from 01 to 10. How to Order a Replacement ACS Towbar Key Online One of the great things about these keys is how simple it is to get a replacement. You don’t need to visit a dealership or locksmith in person; you can order an ACS towbar key online and have it cut to code and delivered to your door. Here’s how to do it: 1. Locate the ACS key code – As mentioned, find the engraved code on your existing key or the towbar lock barrel (e.g. ACS08). Double-check that it’s in the ACS01–ACS10 range. 2. Visit a replacement key website – Go to a trusted online key supplier that offers keys cut to code. For example, you can order from a specialized service like Mr. Key. They have a product page specifically for spare keys for ACS A50-X / Brink / Thule towbars (codes ACS01–ACS10) – this is where you’ll enter your code to get the correct key. 3. Select your key code – On the product page, choose your exact code (say, ACS04 or ACS09) from the dropdown or list. 4. Place your order – Add the replacement key to your cart and check out. These keys are very affordable (usually only a few dollars or euros each), and you can often choose expedited shipping if you’re in a hurry. 5. Receive and test the key – Shipping is typically quick (a few days within Europe). Once it arrives, test the replacement towbar key in your detachable towbar’s lock. It should turn smoothly and unlock the mechanism just like the original. Problem solved. Product Link: https://mr-key.com/product/spare-key-for-acs-a50-x-brink-thule-towbar-codes-acs01-acs10 You can order the correct replacement key here: Spare Key for ACS A50-X / Brink / Thule Towbar – Codes ACS01–ACS10. Simply select your code from ACS01 up to ACS10 and choose the key with the matching number. The new key will be cut to that code and sent to you ready to use. Ordering online is not only convenient but also ensures you get the precise key you need. These keys are cut by code using professional tools, so you don’t have to worry about tracing an old key or guesswork. As long as the code you provide is correct, the new key will fit perfectly or you can get your money back. Make a Spare Key Now to Avoid Future Stress Once you have your new key in hand (or if you still have your original), it’s time to think ahead. Don’t wait until you’ve lost the only key to take action. Cutting a spare key while you still have a working one is quick and inexpensive, and it can save you a lot of trouble down the road. Here are some benefits of having a spare towbar key: No more last-minute panic: If one key goes missing, you’ll have a backup ready. This means no frantic searches the night before your trip and no postponed travel plans due to a missing key. Avoid costly lock replacements: Losing the only towbar key can be expensive – you might be forced to drill out the lock or replace the entire detachable neck mechanism. A spare key (which typically costs under £10) is far cheaper than a new lock or towbar. Keep your holiday on track: A Thule towbar spare key or Witter towbar spare key tucked in your glove box ensures that a lost key won’t derail your caravan holiday or trailer rental schedule. You can continue towing without delay. Fast & affordable peace of mind: Ordering an extra key by code is both fast and affordable. Many drivers are surprised at how easy it is – often it’s just a couple of clicks online and a short wait for delivery. It’s a small investment for the security of knowing you’re covered. Consider ordering two keys when you get your replacement. Many suppliers even offer a deal on a second key (or include a pair by default), so you can keep one spare at home and one in the vehicle. Having multiple keys means you’re highly unlikely to ever be locked out of your own towbar again. Losing your towbar key can be a frustrating experience, especially when it happens right before you need to use it. But if your detachable towbar uses the ACS lock system (codes ACS01–ACS10), solving the problem is straightforward. With a visible ACS key code and a reliable online key-cutting service, you can quickly get a new replacement towbar key cut to code and delivered. There’s no need for costly new locks or last-minute cancellations of your towing plans. Don’t let a lost towbar key ruin your trip. Take a moment to check your towbar for an ACS code. If it’s there, you can have a new key on the way in no time. And even if your current key is in hand, think ahead – get a spare made now to save yourself stress later. With fast online ordering and prices that won’t break the bank, getting an ACS towbar key replacement is the easiest way to ensure you’re never stuck without the key to your adventures. Safe towing.

Chat with us