Post Name


Swirl flaps are a BMW system that has been introduced to help burn the fuel mixture in the cylinder better due to the fact that diesel engines do not have throttle valves and it is not possible to adjust the air-fuel ratio. A diesel engine without vortex valves operates between a poor and a rich fuel mixture, because the only way to regulate it is through fuel injection.

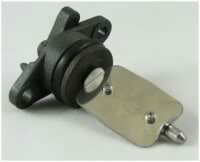
Design of the first generation swirl flaps that are made of made of metal.


Unfortunately, swirl flaps are responsible for countless damaged engines and costly repairs due to design errors or metal fatigue. Once damaged, the cylinder sucks them in and causes great damage.

This is how damaged valves damage the cylinder.


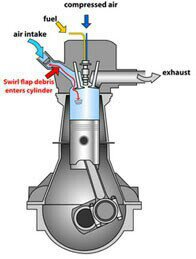
Typical swirl flaps  suction damage.


The vortex valves are positioned in the inlet and are controlled by vacuum (DDE 4.0) or electrically (DDE5.0 / DDE6.4) by the engine ECU.

Effects of malfunctioning valves:

  • Swirl valves are  stuck in open position: Deterioration of exhaust gas performance at lower speeds.
  • Swirl valves are stuck in closed position: Approximate power loss of 10% at high engine speeds.

How swirl flaps work:


Performance characteristics:

The vortex valves are in the closed position, at low engine speeds and small amounts of fuel injected (controlled by the ECU card).

They open under the following conditions:

  1. coolant temperature <14 ° C OR * fuel quantity> 24 mg OR
    2. engine speed 2250 rpm OR
    3. inlet air temperature <-5 ° C.

BMW and Pierburg have decided to produce diesel engines with metal vortex valves. The speed at which the pistons in the diesel engine operate is at least 60 rpm, so a sucked vortex valve will break and cause a number of damages inside the engine.

In most cases, one or more pistons are severely damaged, as a bonus you get valves, in some cases a head or turbocharger. And this combination with a BMW engine is like a cumulative jackpot  🙂

In 2004, BMW began work on the problem and improved the design, however, a number of owners reported ongoing problems in this area.

The solution to this problem is by removing the vortex valves and plugging, which does not affect the performance of the engine and at the same time, you can safely pass the exhaust test.

Engines:

M47 (136hp VP44 fuel pump) has no valves.

M47N common rail engine (including M47N / M47TU / M47TUD20) (150hp. Face lift model from 2001 -) has valves.

M57 engines (M57D) (525d & 187hp. 330d) cars with manual transmission do not have valves, but those with automatic have.

M57N engines (M57TUD) (525d & 330d 204hp) have vortex valves.

Ruined swirl flapss:


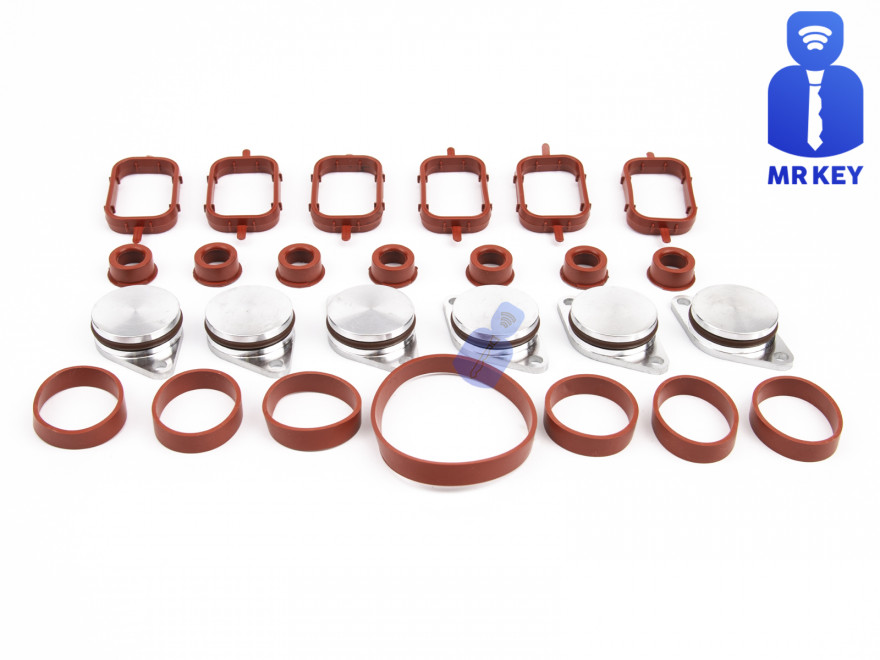
The plugs that replace the vortex valves are easy to find on the internet, but you can also find them here on our website.

Typical plugs:

Disassembly of vortex valves:


The vortex valves can be safely dismantled and in most cases if they are  removed properly no loss of power is felt.

Final list of models for which vortex valves are installed:

Engine: M47N/M47TU/M47TUD20

Applications:

* 110 kW (148 hp) and 330 N·m (243 lb·ft)

o E46 320d 2001-2005

o E83 X3 2.0d (up to end of 2006)

Engine: M47TU2D20

The engine was updated again in 2004 as the M47TU2D20. Still at 1995 cc, it produced more power across the range.

Applications:

* 120 kW (161 hp) and 340 N·m (251 lb·ft)

E60/E61 520d

E87 120d

E90/E91 320d

E83 X3 2.0d (end of 2006 onwards)

Engine: M57/M57D25

M57D25 was introduced in 2000.

Applications:

* 166 PS (122 kW; 164 hp) at 4000 rpm, 350 N·m (260 lb·ft) at 2000-2500 rpm with a 4750 rpm redline, models:

2000-2003 E39 525d *Vehicles With Automatic Transmission ONLY*

Engine: M57N/M57TU/M57TUD25

M57TUD25 was introduced in 2004.

Applications:

* 177 PS (130 kW; 175 hp) at 4000 rpm, 400 N·m (300 lb·ft) at 2000-2750 rpm models:

E60/E61 525d

Engine: M57/M57D30

M57D30, also called M57D29, was introduced in 1998.

Applications:

* 184 PS (135 kW; 181 hp)@4000, 390 N·m (290 lb·ft)@1750-3200 models:

E39 530d *Vehicles With Automatic Transmission ONLY*

E46 330d/330xd *Vehicles With Automatic Transmission ONLY*

* 184 PS (135 kW; 181 hp)@4000, 410 N·m (300 lb·ft)@2000-3000 models:

E38 730d *Vehicles With Automatic Transmission ONLY*

E53 X5 3.0d

* 193 PS (142 kW; 190 hp)@4000, 410 N·m (300 lb·ft)@1750-3000 models:

E38 730d

E39 530d

Engine: M57N/M57TU/M57TUD30

M57TUD30 was introduced in 2002. It originally produced 160 kW (215 hp) at 4000 rpm and 500 N·m (370 lb·ft) at 2000-2750 rpm, but was tweaked for 150 kW (201 hp) at 4000 rpm and 410 N·m (300 lb·ft) at 1500-3250 rpm for 2003 and again for 200 kW (268 hp) at 4000 rpm and 560 N·m (410 lb·ft) at 2000-2250 rpm in 2004.

Applications:

* 204 PS (150 kW; 201 hp)@4000, 410 N·m (300 lb·ft)@1500-3250 models:

E46 330d/330Cd/330xd

E83 X3 3.0d

* 218 PS (160 kW; 215 hp)@4000, 500 N·m (370 lb·ft)@2000-2750 models:

E53 X5 3.0d

E60/E61 530d/530xd

E65 730d

* 272 PS (200 kW; 268 hp)@4000, 560 N·m (410 lb·ft)@2000-2250

E60/E61 535d

* 245 PS (180 kW; 242 hp)@4000, 500 N·m (370 lb·ft)@2000-2250

* 286 PS (210 kW; 282 hp)@4000, 580 N·m (430 lb·ft)@2000-2250

Engine: M57TU2D30

M57TU2D30 was introduced in 2007, making its debut in the facelifted E60 and E61.

* M57TU2D30-UL: 197 PS (145 kW; 194 hp)

* M57TU2D30-OL: 235 PS (173 kW; 232 hp)@4000, 500 N·m (370 lb·ft)@2000-2750

* M57TU2D30-TOP: 286 PS (210 kW; 282 hp), 580 N·m (430 lb·ft)

Applications:

* 197 PS (145 kW; 194 hp), 400 N·m (300 lb·ft) models:

E90/E91/E92 325d

E60/E61 525d/525xd

* 231 PS (170 kW; 228 hp)@4000, 500 N·m (370 lb·ft)@2000-2750 models:

E65 730d

E90/E91 325d

E90/E91 330d/330xd

* 235 PS (173 kW; 232 hp) models:

E60/E61, BMW E70, BMW E71

* 286 PS (210 kW; 282 hp), 580 N·m (430 lb·ft) models:

E60/E61 535d

E70 X5 3.0sd

E71 X6 xDrive35d

E83 X3 3.0sd

E90/E91 335d

The above models are listed for information only if you want to to make sure your engine has valves installed, please contact a competent person.

Please note that the information described above is for informational purposes only and does not claim to be reliable. Mr-key.com is not responsible for any repair work you undertake that is related to the topic described in this article.

Related Posts

How to Clean and Maintain Your Car Key Fob Like a Pro

How to Clean and Maintain Your Car Key Fob Like a Pro

Your car key fob is one of the most used items in your daily life. You press it multiple times a day, carry it in your pocket or bag, toss it on desks, and sometimes accidentally drop it on the ground. But how often do you actually clean or check it? Most people only think about their key fob when it stops working. By then, it's often too late. The good news is, with a little attention and regular maintenance, you can keep your car key fob working perfectly for years to come. In this article, you'll learn how to clean and maintain your car key fob like a pro — so you can save money, avoid frustration, and get the best performance out of your key. Why Cleaning and Maintaining Your Key Fob Matters Car key fobs aren’t just simple remotes. They're packed with sensitive electronics, small batteries, and tiny contact points that can easily get damaged by dirt, moisture, or simple neglect. If you never clean or check your key fob, you might start to notice: Unresponsive buttons Reduced signal range Frequent battery issues Complete failure to unlock or start the car Most of these problems are avoidable with basic maintenance . Cleaning your key fob regularly helps keep it functional, protects its electronics, and ensures it lasts longer. It also saves you from spending money on costly repairs or total key replacements. How to Clean Your Car Key Fob: Step-by-Step Guide Step 1: Open the Key Fob Gently Start by carefully opening your key fob. Most models have a small groove or notch where you can insert a flathead screwdriver or a coin to separate the shell. Be gentle — forcing it open can crack the plastic or damage internal clips. If you're unsure, check your car’s manual or look up your key model online to find specific instructions. Step 2: Remove the Battery Once you open the key fob, always remove the battery before cleaning. This protects the electronic circuit from any accidental moisture and prevents short-circuiting. Set the battery aside in a dry, safe place. Step 3: Clean the Exterior Use a soft, dry microfiber cloth to wipe the outside of the key fob shell. For tougher dirt or sticky areas, slightly dampen the cloth with water or isopropyl alcohol (70% or higher). Avoid using harsh cleaning chemicals that could damage the plastic or remove painted symbols. Step 4: Clean the Buttons and Small Gaps Dirt, dust, and pocket debris often collect around the buttons. These particles can block the buttons from making proper contact or cause them to stick. Use a cotton swab or a soft toothbrush to gently clean around the edges and in between the buttons. For tight spaces, a toothpick can help dislodge stubborn dirt. If needed, lightly moisten the cotton swab with alcohol to break down grime. Always dry the key fob thoroughly after cleaning. Step 5: Inspect and Clean the Battery Contacts Battery contacts can become dirty or corroded over time, especially if the battery leaked or moisture got inside. Check the metal contact points carefully. If you see white powder or greenish residue (common signs of corrosion), gently clean them using a cotton swab dipped in isopropyl alcohol. Be extremely careful not to bend or scratch the contacts. If corrosion is too severe, the key fob might need professional repair or a replacement circuit board. Step 6: Replace the Battery if Needed Key fob batteries typically last between 1 to 2 years, but frequent use, weak signals, or exposure to extreme temperatures can shorten battery life. If your battery is old or low, replace it with a new one. Most car key fobs use CR2032 or CR2025 batteries. Always make sure you install the new battery in the correct position, respecting the polarity (+ / -). A fresh battery not only improves response time but also ensures the signal reaches your car reliably. Step 7: Reassemble the Key Fob Once everything is clean and fully dry, carefully snap the key fob back together. Make sure the casing is securely closed and the buttons feel smooth and responsive. Test the key fob to confirm that it works correctly. Pro Tips to Keep Your Car Key Fob in Top Shape A well-maintained key fob can last many years. Here’s how to keep it working perfectly: Keep it Dry: Most key fobs aren’t waterproof. Avoid rain, puddles, wet pockets, or any contact with liquids. Use a Protective Cover: A silicone or rubber key cover adds shock protection, keeps out dirt, and prevents scratches. Avoid Extreme Heat or Cold: Leaving your key fob in direct sunlight or in a freezing car can damage the battery and weaken plastic parts. Change the Battery Regularly: Don’t wait for your key fob to completely stop working. Weak batteries can lead to unreliable signals and unexpected failure. Don’t Drop It: Even though most key fobs can handle light drops, repeated impact can cause internal damage. When to Replace the Key Fob Shell If your key fob shell is cracked, worn, or no longer closes tightly, it’s time to replace it. A damaged shell can let moisture and dirt reach the electronics and cause long-term damage. Replacing the shell is a quick and affordable solution that can extend your key fob’s life significantly. At Mr. Key , we offer high-quality key fob shells, batteries, and repair kits that can help you refresh your key fob and save money compared to dealership prices. Explore our key fob repair kits, protective covers, and replacement batteries now at mr-key.com . Your car key fob may seem like a small detail, but it plays a huge role in your daily life. Without it, you can’t get in or even start your car. The good news is that taking care of your key fob is easy. With regular cleaning, battery checks, and some simple maintenance, you can keep it working reliably for years. And if you need to replace your battery, your key shell, or your entire key fob, Mr. Key is here to help. We provide everything you need to keep your keys in perfect shape, save money, and avoid unnecessary trips to the dealer.

How to Remove or Change a Roof Rack Lock Barrel Easily

How to Remove or Change a Roof Rack Lock Barrel Easily

Changing or removing the lock barrel on your roof rack may seem like a daunting task, but it’s actually simpler than you might think. Whether you need a replacement due to a lost key, wear and tear, or just want to swap out an old lock for a new one, following the right steps can make the process hassle-free. This guide will walk you through everything you need to know about handling a roof rack lock barrel with ease. Why You Might Need to Change a Roof Rack Lock Barrel ? There are several reasons why you may want to replace or remove your roof rack lock barrel: Lost Key : If you've misplaced the key, replacing the lock barrel is often the most practical solution. Upgrading the Lock : Maybe you want a more secure lock for added peace of mind. Routine Maintenance : Over time, lock barrels can wear down, making it harder to insert or turn the key. Uniformity : If you've recently changed your car key, you may want to match your roof rack lock with it. Knowing why you’re changing the lock barrel will help you determine the steps you need to follow. What You’ll Need Before you start, gather these essential tools and items: Replacement Lock Barrel : Ensure it’s compatible with your roof rack model. Master Key or Removal Key : Often required to remove the old lock barrel. New Key : The key that corresponds to the replacement lock barrel. Flathead Screwdriver : To gently pry and release certain parts if needed. Step-by-Step Guide to Removing a Roof Rack Lock Barrel Removing a lock barrel from your roof rack doesn’t require extensive mechanical skills. Just follow these straightforward steps: 1. Locate the Lock Barrel The lock barrel is usually situated in the center or side of the roof rack. Look for the small lock with the keyhole, as this is where you'll be inserting the master or removal key. 2. Insert the Master Key or Removal Key If you have a master or removal key, insert it into the lock. This is often a universal key provided by the lock manufacturer specifically for removing lock barrels. Once it’s inserted, turn the key slightly to unlock the barrel. Tip: If you don’t have a removal key, contact a professional or see if you can order one specifically for your model. 3. Pull the Lock Barrel Out With the removal key still in place, gently pull the lock barrel out. If it’s resistant, try wiggling it slightly while pulling. Avoid forcing it, as this could damage the lock or roof rack. In some cases, you may need a flathead screwdriver to help pry it out, but be careful not to scratch the surrounding area. 4. Check the Casing After removing the lock barrel, inspect the casing where the barrel was installed. Make sure it’s clean and free of debris. Any dirt or rust could interfere with the new lock barrel, so it’s a good idea to clean this area before proceeding. Installing the New Lock Barrel Once the old barrel is removed, you’re ready to install the new one. Here’s how: 1. Align the New Lock Barrel Take your new lock barrel and align it with the casing where the old one was. Most barrels are designed to fit in only one direction, so make sure you align it properly to avoid jamming. 2. Insert the New Barrel Push the new lock barrel into the casing until it clicks into place. This might require a bit of pressure, but it should fit snugly without needing excessive force. 3. Test the New Key After installing the new lock barrel, insert the new key and turn it to ensure it’s working smoothly. The key should turn easily and lock securely. This step verifies that the new lock is properly aligned and functional. Common Challenges and Solutions While changing a roof rack lock barrel is generally straightforward, you might encounter some challenges. Here’s how to troubleshoot common issues: Stuck Barrel : If the old barrel is stuck, apply a lubricant like WD-40 around the lock to help loosen it. No Removal Key : If you don’t have a master or removal key, consider reaching out to a locksmith or checking if the manufacturer offers a replacement. Barrel Won’t Fit : Ensure you’ve purchased a compatible lock barrel. Even slight differences in design can prevent it from fitting properly. Tips for Maintaining Your Roof Rack Lock To keep your new lock barrel in good condition and prevent the need for frequent replacements, consider these maintenance tips: Regular Cleaning : Dirt and grime can accumulate inside the lock over time, making it harder to operate. Clean the lock regularly to prevent this. Use Lubricant : Apply a small amount of lubricant inside the lock barrel periodically to keep the key turning smoothly. Protect from Rust : If your roof rack is exposed to rain and humidity, use a protective cover or shield to keep moisture out of the lock barrel. Check Key Fit : Avoid using a damaged or bent key, as this can wear out the lock barrel more quickly. When to Seek Professional Help In some cases, removing or replacing a roof rack lock barrel might require assistance from a professional: Lost or Damaged Keys : If both your main key and master key are lost or damaged, a professional can help retrieve or replace the lock barrel. Damaged Lock Mechanism : If the lock itself is damaged or jammed, forcing it can make things worse. A professional locksmith can safely remove and replace it. Replacing or removing a roof rack lock barrel is an affordable and manageable task for most car owners. By following the right steps and keeping up with regular maintenance, you can ensure your roof rack lock stays functional and secure. Whether you’re upgrading for security or replacing a worn-out lock, a new lock barrel can make all the difference in keeping your roof rack safe. Effortless Key Replacement for a Variety of Locks Order 2x Union Keys FT Series, custom-cut to your original key code, for a hassle-free replacement. Compatible with a range of locks, including those from Aston Martin, Jaguar, Land Rover, and more, these keys are perfect for classic cars, caravans, petrol caps, roof racks, and truck canopies. Simply find your lock code (e.g., FT101-FT360) on the lock face and enjoy fast delivery of high-quality spare keys.

How to Protect Your Car’s Navigation Screen from Scratches, Glare & Fingerprints

How to Protect Your Car’s Navigation Screen from Scratches, Glare & Fingerprints

Modern cars often pack large touchscreens into the dash, and keeping these displays clear is key to enjoying every drive. A single scratch or dirty spot can make maps and menus hard to read. Car insurers warn that infotainment screens are surprisingly fragile – even a small dent or scratch can disable parts of the system . Worse, replacing a built-in navigation unit can cost thousands and take weeks . The good news? A little proactive care goes a long way. Interior dashboards are loaded with touchscreens that easily pick up scratches and smudges. For example, a high-quality navigation screen protector can shield your display from daily wear . These protectors are often made of tough 9H-tempered glass with an oleophobic coating (to repel fingerprints) and an anti-glare matte finish . A properly fitted protector keeps your screen looking brand-new and makes cleaning simpler. Invest in a Quality Screen Protector Choose the right fit Get a protector cut for your car’s make and model so it covers the entire display without blocking cameras or buttons. Hydrogel protector over tempered glass A hydrogel navigation screen protector is the best modern option for car screens. Unlike tempered glass, hydrogel film is flexible, ultra-thin, and self-healing — meaning small scratches disappear on their own over time. Hydrogel also fits curved or irregular screens better, doesn’t crack or chip like glass, and offers excellent clarity with strong anti-scratch and anti-glare properties. It maintains perfect touch sensitivity and blends seamlessly with the original display. To understand the real differences between hydrogel film and tempered glass — and which one offers the best long-term protection for your car — check out our detailed comparison guide: Hydrogel vs Tempered Glass Navigation Protectors Comparison . Anti-glare & oleophobic coatings Many navigation screen protectors include a matte, anti-glare surface. This scatters harsh sunlight and helps repel fingerprints and oil. (Some even advertise oleophobic layers that resist smudges.) Installation matters Follow the instructions carefully (clean the screen first, align the film, and smooth out bubbles). A misaligned or bubbled protector can itself cause visibility issues. Installing a car screen protector isn’t just about preventing scratches. It also helps maintain screen clarity over time. As one Tesla owner discovered, adding a new glass protector made even a worn, glare-prone screen “look almost new again” If you’ve already chosen a hydrogel protector and want to install it correctly, follow our step-by-step guide on how to install a hydrogel navigation screen protector . Clean Your Screen the Right Way Fingerprints, dust and grease are everyday enemies of visibility. But cleaning improperly can do more harm than good. Follow these expert tips: Use a microfiber cloth Wipe the screen with a soft, clean microfiber towel – even better if it’s dedicated just to your screen . This gentle fabric removes oils without scratching the glass. Spray cleaner on the cloth, not the screen If you need liquid cleaning, lightly mist it onto the cloth first. Never spray cleaners or water directly onto the touchscreen . Too much liquid or harsh chemicals can seep into seams or damage any oleophobic coatings. Avoid household glass cleaners Standard window cleaners (with ammonia or alcohol) can strip away protective coatings or damage the display . In fact, Car and Driver cautions that you should “avoid using household glass cleaner on your car’s touchscreen” unless you know it’s ammonia- and alcohol-free . Use fresh wipes Always use a clean side of your cloth or a new wipe on the screen. AGWS (an auto insurer) advises against using a cloth or wipe that’s already been on the dashboard or door panels – it can transfer grit and actually scratch the display Detail with precision If dirt or fingerprints linger, dampen the cloth with plain water or a gentle, screen-safe cleaner and buff in small circles. For stubborn spots, a second dry pass with the microfiber cloth will remove streaks. Wipe smudges away with a soft cloth – spraying cleaner on the cloth, not on the screen . Clean your screen each time you wash the car, or whenever you notice foggy patches. In fact, one test found that many “interior detailer” sprays (like Chemical Guys or Meguiar’s) can work just as well as specialized screen cleaners if they’re labeled safe for screens. Reduce Sunlight Glare Glare is one of the biggest complaints with modern car touchscreens. It makes maps hard to read, increases eye strain, and leads to drivers pressing harder on the display—over time, this causes wear and visible marks. To reduce glare: Install a matte hydrogel screen protector Adjust the display’s brightness and contrast Avoid cleaning with shiny or oily cloths Park with the dashboard away from intense sunlight when possible Hydrogel films help significantly because they diffuse harsh reflections without dulling the screen. Prevent Fingerprints and Smudges Touchscreens are fingerprint magnets. Oils from your hands quickly accumulate on the surface, especially on climate controls or zoom gestures. Solutions that actually work: Oleophobic coatings (built into many hydrogel protectors) Regular microfiber wipe-downs Avoid touching the screen with sunscreen or lotion on your hands Use voice commands for common actions when possible Drivers notice a big difference after installing a car navi screen protector—much fewer smudges and much easier cleaning. Protect the Screen During Everyday Use Small habits reduce long-term wear: Remove rings before using the touchscreen Don’t store hard objects (keys, coins) near the display Keep dust off the dashboard Avoid pressing with fingernails Use steering-wheel controls when possible Tiny scratches add up, especially on softer automotive materials. FAQ What is the best way to protect a car navigation screen? Installing a car-specific hydrogel screen protector provides the best protection against scratches, glare and fingerprints. Do hydrogel protectors really self-heal? Yes. The top layer softens slightly with heat and pressure, allowing micro-scratches to fade within minutes. Do these protectors affect touch sensitivity? No. Hydrogel films are extremely thin and designed to preserve the original touchscreen response. Can I install a screen protector myself? Hydrogel films are easy to install because they are flexible and bubble-resistant. Most people complete the installation in minutes. Will a protector reduce screen brightness? A high-quality hydrogel film maintains screen clarity while reducing harsh glare. Do car manufacturers recommend screen protectors? Many dealerships now advise using some form of screen protection due to rising replacement costs and increasing touchscreen sizes. Which Cars Benefit Most Some car brands benefit disproportionately from hydrogel screen protection — especially large-format touchscreens in premium models. If you want the full breakdown of the top models for 2025–2026, see our detailed guide on which cars benefit most from hydrogel navigation protection . To protect your own car’s screen from scratches, glare and fingerprints, visit our shop at mr-key.com . Related Guides How to Install a Hydrogel Navigation Screen Protector Which Cars Benefit Most From Hydrogel Navigation Protection? (2026 Overview) Hydrogel vs Tempered Glass Navigation Protectors Comparison

Car Key Fobs Explained: How They Work and Why They’re Essential

Car Key Fobs Explained: How They Work and Why They’re Essential

In today’s world, unlocking your car or starting the engine has never been easier. With a simple press of a button, the days of fumbling for traditional keys are behind us. Car key fobs are the modern solution that offer a blend of convenience, security, and technology. But how do these small, often overlooked devices work, and why are they so crucial in today’s automotive world? In this blog, we will dive into the mechanics of car key fobs, their benefits, and why you should understand their functionality. The Evolution of the Car Key Fob Car key fobs, as we know them today, are a far cry from the traditional metal keys that dominated the automotive world for centuries. The shift from traditional keys to key fobs began in the 1980s and 1990s, as automakers sought more efficient and secure ways to unlock vehicles and enable keyless entry. The first remote keyless entry (RKE) systems were introduced to the market in the 1980s. These systems allowed car owners to unlock their doors remotely without inserting a physical key. Over time, the technology evolved further, incorporating additional functions like starting the engine, opening the trunk, and even controlling the vehicle’s security systems—all from a single device. Today, most new vehicles come equipped with key fobs, and many modern models include advanced features like proximity sensing and even remote start capabilities. How Do Car Key Fobs Work? Car key fobs operate on radio frequency identification (RFID) or infrared (IR) technology to communicate with the car’s locking system. The process is relatively simple but requires precise technology to ensure security and functionality. Radio Frequency Communication (RF) : When you press a button on your key fob, it sends out a low-frequency signal to the car's receiver. This signal contains encrypted information, such as the command to unlock the doors or start the engine. The receiver in the car decodes the signal and executes the command. Encryption for Security : One of the key benefits of car key fobs is the security they offer. The signal transmitted by the fob is encrypted, making it difficult for hackers or thieves to intercept and clone the signal. In addition, many fobs are programmed with rolling codes, meaning the signal changes each time the fob is used, further reducing the risk of duplication. Proximity Sensors and Keyless Entry : Modern key fobs often include proximity sensors, which allow the car to detect when the fob is nearby. This enables keyless entry systems that unlock your car automatically as you approach. The fob only needs to be within a certain range—often just a few feet—for the car to recognize it. Battery-Powered : Key fobs rely on small batteries to function. Most key fobs use lithium coin cell batteries, which typically last between one and five years, depending on usage. The battery powers the transmitter, receiver, and any additional features (such as a display or remote start). Why Are Car Key Fobs Essential? In addition to their basic function of locking and unlocking a car, key fobs have become essential components for vehicle security and convenience. Below are several reasons why these devices are more than just an accessory: 1. Enhanced Security As vehicle theft has evolved, so too has the need for better security measures. Traditional car keys are relatively easy to copy, especially for older models. In contrast, key fobs provide far superior protection due to their encrypted signals and rolling code technology. This makes them much harder to duplicate or hack. Moreover, many key fobs are linked to sophisticated alarm systems. If an unauthorized attempt is made to start the vehicle without the fob’s signal, an alarm will sound, and the engine will not start. This extra layer of security significantly reduces the chances of vehicle theft. 2. Convenience and Ease of Use The days of manually unlocking a car with a metal key are long gone. Key fobs offer unprecedented convenience. With a simple button press, you can lock or unlock your doors, open the trunk, and even start the engine without removing the fob from your pocket or bag. This hands-free operation makes accessing your vehicle faster and easier, especially when carrying groceries or dealing with inclement weather. The proximity sensing technology also adds an extra layer of convenience, allowing you to unlock and start your car without needing to press any buttons—ideal for those busy days when you’re juggling multiple tasks. 3. Keyless Entry and Remote Start One of the most exciting features of modern car key fobs is the keyless entry and remote start functionality. These features have revolutionized how people interact with their vehicles. Keyless entry allows you to enter your car simply by being in close proximity, while remote start lets you start the engine from a distance, often via a smartphone app or by pressing a button on the fob itself. Remote start is particularly useful during the winter months. It allows you to start the car in advance, so the engine and cabin are warmed up before you even step inside. Similarly, in hot climates, remote start can be used to cool the cabin, making the car more comfortable when you enter. Global Adoption and Future Trends Car key fobs have become a global standard, with nearly all major automakers offering this feature in their vehicles. As more people embrace technology, the demand for even smarter key fobs continues to rise. In the future, we are likely to see further advancements in key fob technology. For instance, some manufacturers are already exploring biometric security features, such as fingerprint or facial recognition, to enhance the security of key fobs even further. Additionally, smartphone integration is becoming more widespread, allowing car owners to use their phones as key fobs, eliminating the need for a physical device altogether. While car key fobs have transformed the automotive landscape, they also raise new concerns, particularly regarding privacy and hacking risks. As technology advances, automakers and tech companies will need to stay ahead of potential security vulnerabilities to ensure that key fobs continue to serve as effective and secure tools for car owners. Car key fobs are no longer just a convenience—they have become an essential part of modern car ownership. From enhanced security features to the convenience of keyless entry and remote start, key fobs offer a range of benefits that make them indispensable for drivers around the world. As technology continues to evolve, we can expect even more advanced features to be integrated into future key fobs, further improving both convenience and security. Understanding how key fobs work and why they’re important is crucial for anyone who wants to make the most of their vehicle's technology. As we look to the future, it’s clear that key fobs will continue to play a central role in how we access and interact with our cars—an innovation that started with simple remote locking and has now become a vital aspect of our daily driving experience.

Chat with us