Post Name

Regular lock maintenance is essential to prevent key jamming or lock failure. Proper lubrication reduces wear and tear, ensures smooth operation, and extends the lifespan of your locks. A well-lubricated lock decreases the risk of your key getting stuck or breaking inside the lock—an inconvenient and costly problem. At MR-KEY, we understand the importance of well-maintained locks and want to help you keep yours in top condition.


How Often Should You Lubricate Your Locks?


For most locks, lubricating them every three to six months is sufficient. However, locks exposed to extreme weather conditions—such as those on towbars, roof racks, or outdoor gates—require more frequent maintenance. Rain, dust, and freezing temperatures can cause internal components to stick, making it difficult to insert or turn the key. If you notice resistance when using a lock, it’s time for lubrication.


What Lubricant Should You Use for Locks?


Choosing the right lubricant is crucial for long-term lock performance. Here are the best options:

Teflon-based (PTFE) spray – Forms a protective film inside the lock, reducing friction and repelling dust buildup.

Dry silicone spray – Excellent for outdoor locks as it resists moisture without attracting dirt.
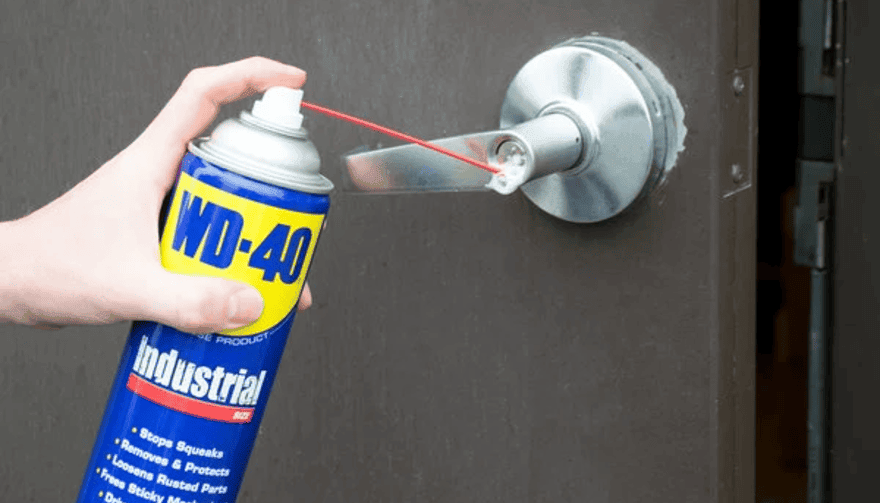
WD-40 Specialist Dry PTFE or White Lithium Grease – Unlike regular WD-40, these provide long-lasting lubrication and protection against corrosion.

Graphite powder – A great choice for older locks but should not be used if there’s oil residue inside the lock.


While WD-40 Multi-Use is a quick fix for stuck locks, it is primarily a cleaner rather than a long-term lubricant. If used, follow up with a dry lubricant to prevent dirt accumulation inside the lock.


How to Lubricate a Lock


If your lock is functioning properly but feels slightly stiff, follow these steps:

1. Clean the Lock – Insert and remove the key a few times to dislodge debris, wiping it clean each time.

2. Apply the Lubricant – Insert the spray straw into the keyhole and apply two short bursts of lubricant.

3. Work the Lock – Insert and turn the key multiple times to distribute the lubricant inside.

4. Wipe Excess Lubricant – Remove any residue from the key and lock exterior to prevent dirt buildup.


For graphite powder, follow the manufacturer’s specific instructions, as overapplication can lead to clumping inside the lock.


Special Care for Towbar and Roof Rack Locks


Locks on towbars and roof racks are exposed to harsher conditions than typical door locks. To keep them in good shape:

• Regularly inspect them for stiffness or corrosion.

• Apply dry silicone spray or PTFE lubricant for lasting protection.

• If the lock is exposed to frequent moisture, white lithium grease offers superior water resistance.


Lock It in: The Key to Long-Lasting Security


Regular lock maintenance is a small effort that prevents big problems. By keeping your locks clean and properly lubricated—especially those exposed to the elements—you can avoid costly repairs and ensure they function smoothly for years.


For high-quality lock maintenance products, visit MR-KEY and keep your locks in perfect working condition. A little maintenance goes a long way in ensuring security and peace of mind!

Related Posts

How to Program a Spare Car Key: Should You DIY or Call a Pro?

How to Program a Spare Car Key: Should You DIY or Call a Pro?

You’ve got a spare car key in your hand and one big question on your mind: can you program it yourself, or should you visit a locksmith or dealer? The answer depends on your car and the key. In this guide, you'll discover when DIY programming is possible, when it's not, and how to avoid common mistakes. Whether you're aiming to save money or just want a backup key for peace of mind, here's everything you need to know. Types of Car Keys: What You’re Working With Not all car keys are the same—and that matters. Older vehicles often use simple metal keys or basic transponder keys, while modern cars rely on electronic fobs and smart keys with encrypted chips. If your car was built before the early 2000s, there’s a good chance you can program a spare yourself without any special tools. Newer vehicles, however, might require dealer-level software or diagnostic equipment to complete the job. Basic key types include: Non-transponder metal keys : can be copied at any key-cutting service. Transponder keys : contain a chip that communicates with your car’s immobilizer. Remote key fobs : combine keyless entry with a transponder chip. Smart/proximity keys : high-tech, often require dealer programming. How DIY Key Programming Works If your car supports on-board programming, you're in luck. Here’s how a common DIY method looks: Insert your original (master) key into the ignition and turn it to “on” (don’t start the engine). Leave it for five seconds, then remove it. Quickly insert the new spare key and turn it to “on.” Wait for the security light to blink or turn off—this confirms successful programming. Test the spare key by starting the engine. Note: This process varies by vehicle. Always consult your owner's manual or search for your specific make, model, and year online before starting. When You’ll Need a Professional DIY isn’t always an option. If your car uses advanced keyless systems, push-button start, or encrypted communication, programming usually requires access to manufacturer software and security codes. In these cases, a qualified locksmith or dealership is your best (and safest) bet. Also, if your vehicle requires a unique PIN to program a new key—and you don’t have it—don’t guess. Incorrect attempts could lock the system and result in costly reprogramming. Choosing the Right Spare Key Buying the correct spare key is critical for success. You’ll need: The correct transponder chip type (e.g., ID46, ID48, PCF7946 ) Matching blade shape or key profile The correct frequency (commonly 433MHz or 868MHz ) Avoid cheap generic blanks unless you're certain they’re compatible. Poor-quality keys may not accept programming or may fail shortly after. Quick DIY Checklist: Are You Ready? You already have a working master key Your vehicle supports on-board key programming The spare matches in chip, frequency, and blade You’re comfortable following time-sensitive steps You’re okay calling a pro if things don’t work If you checked most of those, DIY might be a great fit. If not, you’re better off with professional help—it could save you time, frustration, and possibly money in the long run. Be Smart with Your Spare Key Having a backup key is more than convenient—it’s essential. From lost keys to unexpected lockouts, a properly programmed spare key can save the day. If your vehicle allows DIY programming, take your time, follow instructions carefully, and double-check compatibility. If you hit a wall, don’t force it. Pros are there for a reason. No matter which route you take, you’ll thank yourself later for being prepared. Because when it comes to your car keys, one really isn’t enough.

How to Take the Perfect Photo of Your Key for Easy Replacement

How to Take the Perfect Photo of Your Key for Easy Replacement

When you need a replacement key , taking a clear, detailed photo of your key can make the process much faster and more accurate. A high-quality image helps key makers understand the exact specifications, cuts, and dimensions of your key, which is especially important if you don’t have a spare. In this guide, we’ll walk you through the best practices for photographing your key so you can get an accurate replacement with ease. Why a Clear Key Photo Matters Photographing a key might sound simple, but it requires a bit of attention to detail. A well-taken photo captures the key’s grooves and unique cuts clearly, helping the key cutter replicate the exact pattern. Saves Time : A high-quality photo reduces the need for multiple attempts to cut a new key . Ensures Accuracy : Clear images help capture specific details, leading to a more precise fit. Convenient Process : With just a smartphone and a few tips, you can photograph your key from home without needing special equipment. Essential Tools for Photographing Your Key To take a clear photo of your key, you don’t need much beyond a few household items. Here’s what you’ll need: Smartphone or Camera : A phone camera is usually sufficient, but a standard digital camera works well too. Plain Background : Choose a neutral, solid-colored background like a piece of white paper or a smooth table surface. Good Lighting : Natural daylight or a bright room light helps capture details without shadows. Small Object for Elevation : A coin or similar item can lift the key slightly, making it easier to photograph. Step-by-Step Guide to Taking the Perfect Key Photo Follow these steps to take a photo that ensures clarity and accuracy for key replacement. 1. Set Up the Background Place a piece of plain white paper or another smooth, light-colored surface under your key. The solid color helps the details of the key stand out without any visual distractions. Tip : Avoid backgrounds with patterns or textures, as these can obscure the key’s features. 2. Position the Key Correctly Lay the key flat on the background, with the grooves and cuts facing up. The key should be positioned horizontally to allow a clear view of all its details. Side Profile : Make sure to capture the side profile that shows the cuts and grooves. Elevate Slightly : Place a coin or small object under one end of the key to angle it slightly toward the camera. This can help reduce shadows and improve focus on the cuts. 3. Adjust Lighting Good lighting is essential for capturing details. If possible, photograph your key in natural daylight near a window or use a well-lit room. Avoid Shadows : Ensure that no shadows fall across the key, as they can obscure details. Diffuse Light : If using a lamp, consider placing a thin cloth over it to diffuse the light and reduce harsh reflections. 4. Focus and Zoom Make sure your camera or smartphone is focused directly on the key. You may need to tap the screen to bring it into sharp focus. Zoom in Carefully : If you’re using a smartphone, zoom in slightly to capture the details, but avoid over-zooming, which can blur the image. Test Multiple Angles : Sometimes a slight adjustment in angle can capture the cuts more effectively, so take a few shots from slightly different perspectives. 5. Capture Multiple Photos It’s always a good idea to take several photos to ensure you have the best one. Try different angles and lighting adjustments to capture as many details as possible. Close-Up of the Grooves : Take one close-up image focusing on the cuts and grooves of the key. Overall Image : Include one full-length photo that shows the entire key from end to end. Try Different Angles : Slightly tilt the key or move the camera to see which angle best captures the detail of the cuts. Common Mistakes to Avoid When Photographing Your Key To get the best results, steer clear of these common issues that can impact the quality of your key photo: Blurry Images : If your hand shakes, use a small tripod or prop your phone on a stable surface. Poor Lighting : Avoid taking photos in dim rooms; use bright light to ensure the key is clearly visible. Obstructed Details : Make sure the entire length of the key is visible, without any part being cut off or covered. Tips for Ensuring a Smooth Replacement Process Once you have a clear photo of your key, there are a few final steps to make the replacement process as efficient as possible. Check the Photos : Look over your photos before sending them to ensure that they’re clear and detailed. Label the Key : If you’re photographing multiple keys, label each one in the image or add a note to avoid confusion. Include Measurements : If possible, add the measurements of the key’s length and width in your notes for added accuracy. A clear, detailed photo of your key can save you time and effort when seeking a replacement. By following these simple steps, you’ll provide all the necessary details to ensure your new key is an accurate match. Remember, good lighting, focus, and capturing all the unique cuts are essential to achieving the best results. With these guidelines, you’re set to take a photo that will make your key replacement process smooth and hassle-free.

How to Protect Your Car’s Navigation Screen from Scratches, Glare & Fingerprints

How to Protect Your Car’s Navigation Screen from Scratches, Glare & Fingerprints

Modern cars often pack large touchscreens into the dash, and keeping these displays clear is key to enjoying every drive. A single scratch or dirty spot can make maps and menus hard to read. Car insurers warn that infotainment screens are surprisingly fragile – even a small dent or scratch can disable parts of the system . Worse, replacing a built-in navigation unit can cost thousands and take weeks . The good news? A little proactive care goes a long way. Interior dashboards are loaded with touchscreens that easily pick up scratches and smudges. For example, a high-quality navigation screen protector can shield your display from daily wear . These protectors are often made of tough 9H-tempered glass with an oleophobic coating (to repel fingerprints) and an anti-glare matte finish . A properly fitted protector keeps your screen looking brand-new and makes cleaning simpler. Invest in a Quality Screen Protector Choose the right fit Get a protector cut for your car’s make and model so it covers the entire display without blocking cameras or buttons. Hydrogel protector over tempered glass A hydrogel navigation screen protector is the best modern option for car screens. Unlike tempered glass, hydrogel film is flexible, ultra-thin, and self-healing — meaning small scratches disappear on their own over time. Hydrogel also fits curved or irregular screens better, doesn’t crack or chip like glass, and offers excellent clarity with strong anti-scratch and anti-glare properties. It maintains perfect touch sensitivity and blends seamlessly with the original display. To understand the real differences between hydrogel film and tempered glass — and which one offers the best long-term protection for your car — check out our detailed comparison guide: Hydrogel vs Tempered Glass Navigation Protectors Comparison . Anti-glare & oleophobic coatings Many navigation screen protectors include a matte, anti-glare surface. This scatters harsh sunlight and helps repel fingerprints and oil. (Some even advertise oleophobic layers that resist smudges.) Installation matters Follow the instructions carefully (clean the screen first, align the film, and smooth out bubbles). A misaligned or bubbled protector can itself cause visibility issues. Installing a car screen protector isn’t just about preventing scratches. It also helps maintain screen clarity over time. As one Tesla owner discovered, adding a new glass protector made even a worn, glare-prone screen “look almost new again” If you’ve already chosen a hydrogel protector and want to install it correctly, follow our step-by-step guide on how to install a hydrogel navigation screen protector . Clean Your Screen the Right Way Fingerprints, dust and grease are everyday enemies of visibility. But cleaning improperly can do more harm than good. Follow these expert tips: Use a microfiber cloth Wipe the screen with a soft, clean microfiber towel – even better if it’s dedicated just to your screen . This gentle fabric removes oils without scratching the glass. Spray cleaner on the cloth, not the screen If you need liquid cleaning, lightly mist it onto the cloth first. Never spray cleaners or water directly onto the touchscreen . Too much liquid or harsh chemicals can seep into seams or damage any oleophobic coatings. Avoid household glass cleaners Standard window cleaners (with ammonia or alcohol) can strip away protective coatings or damage the display . In fact, Car and Driver cautions that you should “avoid using household glass cleaner on your car’s touchscreen” unless you know it’s ammonia- and alcohol-free . Use fresh wipes Always use a clean side of your cloth or a new wipe on the screen. AGWS (an auto insurer) advises against using a cloth or wipe that’s already been on the dashboard or door panels – it can transfer grit and actually scratch the display Detail with precision If dirt or fingerprints linger, dampen the cloth with plain water or a gentle, screen-safe cleaner and buff in small circles. For stubborn spots, a second dry pass with the microfiber cloth will remove streaks. Wipe smudges away with a soft cloth – spraying cleaner on the cloth, not on the screen . Clean your screen each time you wash the car, or whenever you notice foggy patches. In fact, one test found that many “interior detailer” sprays (like Chemical Guys or Meguiar’s) can work just as well as specialized screen cleaners if they’re labeled safe for screens. Reduce Sunlight Glare Glare is one of the biggest complaints with modern car touchscreens. It makes maps hard to read, increases eye strain, and leads to drivers pressing harder on the display—over time, this causes wear and visible marks. To reduce glare: Install a matte hydrogel screen protector Adjust the display’s brightness and contrast Avoid cleaning with shiny or oily cloths Park with the dashboard away from intense sunlight when possible Hydrogel films help significantly because they diffuse harsh reflections without dulling the screen. Prevent Fingerprints and Smudges Touchscreens are fingerprint magnets. Oils from your hands quickly accumulate on the surface, especially on climate controls or zoom gestures. Solutions that actually work: Oleophobic coatings (built into many hydrogel protectors) Regular microfiber wipe-downs Avoid touching the screen with sunscreen or lotion on your hands Use voice commands for common actions when possible Drivers notice a big difference after installing a car navi screen protector—much fewer smudges and much easier cleaning. Protect the Screen During Everyday Use Small habits reduce long-term wear: Remove rings before using the touchscreen Don’t store hard objects (keys, coins) near the display Keep dust off the dashboard Avoid pressing with fingernails Use steering-wheel controls when possible Tiny scratches add up, especially on softer automotive materials. FAQ What is the best way to protect a car navigation screen? Installing a car-specific hydrogel screen protector provides the best protection against scratches, glare and fingerprints. Do hydrogel protectors really self-heal? Yes. The top layer softens slightly with heat and pressure, allowing micro-scratches to fade within minutes. Do these protectors affect touch sensitivity? No. Hydrogel films are extremely thin and designed to preserve the original touchscreen response. Can I install a screen protector myself? Hydrogel films are easy to install because they are flexible and bubble-resistant. Most people complete the installation in minutes. Will a protector reduce screen brightness? A high-quality hydrogel film maintains screen clarity while reducing harsh glare. Do car manufacturers recommend screen protectors? Many dealerships now advise using some form of screen protection due to rising replacement costs and increasing touchscreen sizes. Which Cars Benefit Most Some car brands benefit disproportionately from hydrogel screen protection — especially large-format touchscreens in premium models. If you want the full breakdown of the top models for 2025–2026, see our detailed guide on which cars benefit most from hydrogel navigation protection . To protect your own car’s screen from scratches, glare and fingerprints, visit our shop at mr-key.com . Related Guides How to Install a Hydrogel Navigation Screen Protector Which Cars Benefit Most From Hydrogel Navigation Protection? (2026 Overview) Hydrogel vs Tempered Glass Navigation Protectors Comparison

The Essential Guide to Understanding Detachable Tow Bars

The Essential Guide to Understanding Detachable Tow Bars

Detachable tow bars offer versatility and convenience for car owners who occasionally need to tow. Unlike fixed tow bars, they can be removed when not in use, maintaining your car's aesthetics and avoiding unnecessary bulk. However, understanding how they work, their benefits, and their maintenance requirements is essential to get the most out of your tow bar. Here’s what you need to know. Why Choose a Detachable Tow Bar? A detachable tow bar is an excellent solution if you only tow occasionally or prefer a clean look for your car when the tow bar is not in use. Here are some of its key advantages: Aesthetic Appeal : When removed, the tow bar does not interfere with the car's design. Convenience : Detachable tow bars are easy to attach and remove without tools, making them user-friendly. Versatility : They allow you to tow various loads, from trailers to bike racks, without permanently altering your car's appearance. Legal Compliance : In some regions, a visible, unused tow bar can lead to fines. A detachable option helps you avoid this. Types of Detachable Tow Bars Detachable tow bars come in different types, each suited to specific needs and preferences: Vertical Detachable Tow Bars Design : These tow bars fit seamlessly into your car’s underside, leaving no visible parts when removed. Best For : Those prioritizing aesthetics and a clean finish. Horizontal Detachable Tow Bars Design : These are partially visible but still maintain a low profile. Best For : Easier access and handling without compromising too much on appearance. Swan Neck Tow Bars Design : These have a slim, curved neck, making them stylish and less obtrusive. Best For : European-style vehicles and those who need a compact towing solution. How to Install and Use a Detachable Tow Bar Installing and using a detachable tow bar is straightforward, but following the proper steps ensures safety and efficiency: Read the Manual : Always start by reviewing the manufacturer’s instructions specific to your tow bar. Clean the Mounting Area : Dirt or debris can interfere with secure attachment. Secure the Tow Bar : Align the tow bar with the mounting bracket and ensure it clicks into place. Test Stability : Gently pull the tow bar to confirm it’s securely attached. Remove When Not in Use : Detach the tow bar and store it in a clean, dry place to prevent wear. Common Issues and Troubleshooting While detachable tow bars are convenient, they can occasionally present challenges. Here’s how to address some common problems: Stuck Tow Bar : If the tow bar is difficult to remove, check for rust or dirt in the mounting area. Use a lubricant to loosen it, but avoid using excessive force. Loose Connection : Ensure the tow bar clicks firmly into place during installation. A loose tow bar can be dangerous. Key Issues : If the locking mechanism doesn’t work, inspect the key and lock for dirt or damage. Sometimes, a replacement key may be necessary. Tips for Maintaining Your Detachable Tow Bar Proper maintenance can extend the life of your detachable tow bar and ensure its performance: Regular Cleaning : Clean the tow bar and mounting area to prevent rust and buildup. Lubricate Moving Parts : Apply a small amount of lubricant to the locking mechanism and other moving parts for smooth operation. Inspect for Damage : Check for signs of wear, cracks, or rust, especially if you tow frequently. Store Properly : When not in use, store the tow bar in a protective case or bag in a dry location. Safety Considerations When Towing Towing comes with responsibility. Here are some safety tips to keep in mind: Check Weight Limits : Never exceed your car or tow bar’s towing capacity. Inspect Connections : Ensure the tow bar and trailer hitch are secure before every trip. Test Lights : Verify that your trailer’s brake and signal lights are functioning properly. Drive Cautiously : Towing affects handling and braking. Allow extra time for stopping and maneuvering. Benefits of Investing in a Detachable Tow Bar For many drivers, a detachable tow bar offers the perfect balance of functionality and style. Whether you’re towing for leisure, work, or practicality, this option ensures: A clean car appearance when the tow bar is removed. Versatile use for different towing needs. Easy storage and maintenance. Detachable tow bars are a versatile and practical choice for occasional towing. With proper installation, regular maintenance, and a focus on safety, you can enjoy their convenience without compromising your car's aesthetics. Whether you're hauling a trailer or attaching a bike rack, a detachable tow bar offers flexibility and ease for all your towing needs. What Will You Receive When Your Order is Complete? When you place an order, you’ll receive two perfectly cut keys for Witter, GWD, TOW Trust, or Renz towbars, tailored to your original key code. These keys are compatible with lock codes within the ranges TR01-TR10 or 32001-32200. Simply select your code from the dropdown menu (e.g., TR03), and we’ll take care of the rest. Order Your Keys Today!

Chat with us