Post Name

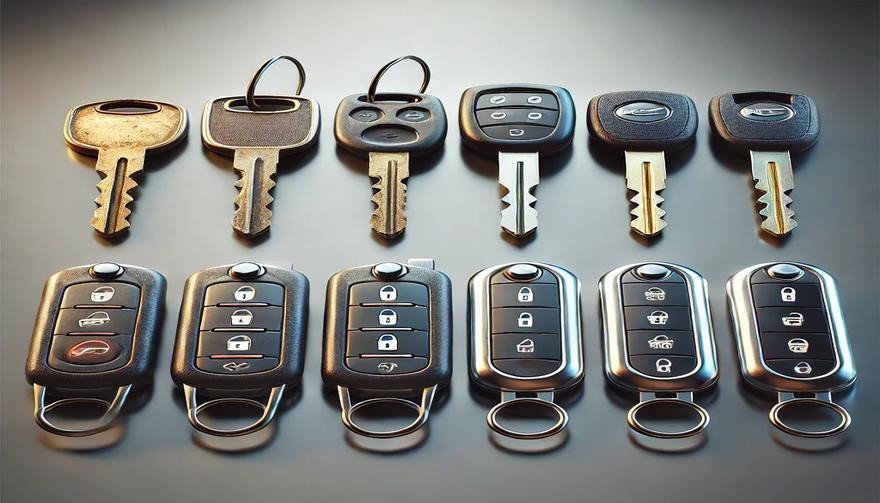
Car keys have come a long way from simple metal tools to advanced digital systems. This evolution reflects the advancements in automotive security, convenience, and technology. Understanding the history of car keys gives you a better appreciation of the tools you use to unlock, start, and secure your vehicle. Here’s a look at how car keys have transformed over the years.

1. The Humble Beginnings: Metal Keys

The story of car keys began with simple, unassuming metal keys designed to manually lock and unlock car doors.

  • How They Worked: These keys were physical tools that matched a mechanical lock’s configuration.
  • Challenges: Lost keys or broken locks often required professional locksmiths for replacements or repairs.
  • Impact: Metal keys, while functional, offered little in terms of advanced security or convenience.

Though basic, these keys laid the groundwork for innovations to come.

2. Entering the Electronic Era: Remote Keys

The next big leap in car key evolution came with the introduction of remote keys in the 1980s. These keys added a layer of convenience and functionality.

  • Features:
    • Remote locking and unlocking.
    • Panic buttons for emergencies.
    • Integration with car alarms for added security.
  • Advantages: No more fumbling for locks in the dark; a simple press of a button provided instant access.
  • Drawbacks: Batteries needed frequent replacement, and repairs were more complex than with traditional metal keys.

Remote keys quickly became a standard feature for modern vehicles.

3. The Smart Key Revolution

By the late 1990s and early 2000s, smart keys emerged, transforming how you interacted with your car.

  • How They Worked: These key fobs used radio signals to communicate with your car, allowing for keyless entry and push-button starts.
  • Benefits:
    • Enhanced security with encrypted signals.
    • Increased convenience with no need to insert a key into the ignition.
    • Sophisticated design and compact form factors.
  • Limitations: These keys are expensive to replace and require professional programming.

Smart keys brought unparalleled convenience but also increased the need for specialized services in case of loss or damage.

4. Integration with Smartphones: Digital Keys

In recent years, car key technology has embraced the smartphone revolution, allowing you to unlock and start your car using your mobile device.

  • Features:
    • App-based controls for locking, unlocking, and starting your car.
    • Sharing access with family or friends via the app.
    • Enhanced security with biometric verification like fingerprints or face recognition.
  • Advantages: No physical key needed, making it harder to lose or forget.
  • Considerations: Dependence on phone battery life and app reliability.

Digital keys represent the cutting edge of car key technology, blending convenience with advanced security features.

5. Biometric Car Keys: The Future of Security

Biometric keys are poised to redefine vehicle access with unmatched security and personalization.

  • How They Work: These systems rely on fingerprint or facial recognition to verify the user’s identity.
  • Benefits:
    • Impossible to replicate or hack.
    • Fully personalized access.
    • Enhanced theft protection.
  • Challenges: High development costs and limited availability in mainstream vehicles.

Biometric keys are still in their infancy but hint at a future where cars are more secure than ever.

6. Why Understanding Key Evolution Matters

Knowing how car keys have evolved helps you make informed decisions when it’s time to replace or upgrade.

  • Cost Considerations: From simple metal keys to advanced digital systems, replacement costs vary significantly.
  • Security Features: Understanding the security features of your key can help you prevent theft and unauthorized access.
  • Convenience: Opt for a system that matches your lifestyle, whether it’s a traditional key or an app-based digital solution.

The more you know, the better equipped you are to choose the right key for your vehicle.

Pro Tips for Key Replacement and Maintenance

  • Backup Keys: Always keep a spare key in a safe location.
  • Battery Checks: Replace key fob batteries regularly to avoid sudden malfunctions.
  • Professional Help: Seek professional assistance for programming smart or digital keys.
  • Protect Your Keys: Use a key cover to prevent wear and tear.

Proper maintenance ensures your car key remains functional and reliable for years to come.

From the simplicity of metal keys to the sophistication of biometric access, car key technology continues to evolve. Each advancement brings greater security, convenience, and innovation, making life easier for car owners like you. Whether you’re replacing a key or exploring the latest tech, understanding this evolution helps you stay ahead in the world of automotive technology.

Related Posts

Key Fob vs. Transponder vs. Smart Key: What’s the Difference?

Key Fob vs. Transponder vs. Smart Key: What’s the Difference?

Unlocking the Modern Car Key In the past, a car key was a simple piece of metal. You inserted it into the door, turned it, and the car unlocked. You repeated the process in the ignition to start the engine. Today, however, a car key might be a sleek device that never even leaves your pocket. It may unlock your doors remotely, start the car with a button, or communicate with your vehicle without you even touching it. This evolution in key technology has introduced convenience, security, and — for many drivers — a bit of confusion. What kind of key do you actually have? Is it a transponder key , a key fob , or a smart key ? And why does it matter? In this blog, we break down each type of modern car key, explain how they work, and highlight what makes them different — so you can better understand, maintain, and protect the device that starts your vehicle. What Is a Transponder Key? The transponder key was the first major step toward electronic vehicle security. Introduced in the 1990s, it features a small microchip embedded in the plastic head of a standard metal key. This chip communicates with the car's immobilizer system. When you insert the key into the ignition and turn it, the car sends out a low-frequency signal. If the chip responds with the correct, pre-programmed code, the vehicle starts. If the code is incorrect — or missing — the car won’t start at all. Key characteristics: Looks like a traditional key Contains a passive chip (no battery needed) Requires physical insertion and turning Designed to prevent hotwiring and unauthorized key copies Transponder keys are still widely used, especially in vehicles produced between the late 1990s and early 2010s. They’re simple, reliable, and provide basic but effective protection against theft. What Is a Key Fob? The term key fob typically refers to a small, handheld remote that controls access to your car without inserting a key into a lock. Most modern fobs include buttons for locking and unlocking the doors, opening the trunk, and triggering a panic alarm. Some also support remote engine start. In many vehicles, the fob is attached to — or integrated with — a mechanical key that includes a transponder chip. Others are "flip keys," with a metal blade that folds inside the fob casing. Key fob features: Enables remote locking/unlocking May include a transponder chip Often includes a mechanical backup key Battery-powered (usually coin cell batteries) May include passive entry on some models Key fobs offer a balance between convenience and control. While you still need to press buttons or insert a key in many cases, they streamline the process and add useful features. What Is a Smart Key? The smart key is the most advanced and convenient type of car key available today. It communicates with your vehicle wirelessly using radio frequency or low-energy Bluetooth. As long as the smart key is within range — often in your pocket or bag — the car will unlock automatically when you touch the handle, and start when you press the ignition button. Unlike a key fob, there’s no need to press buttons or insert anything into the ignition. The system detects the key’s presence and grants access and engine start as needed. Smart key features include: Passive keyless entry (PKE) Push-button start Proximity detection Fully hands-free operation Often includes comfort access features like memory seating and climate control However, smart keys also introduce new considerations. They rely entirely on battery power, so a dead battery can temporarily disable key functions. Because smart keys are always transmitting a signal, they are also vulnerable to relay attacks , in which thieves use signal amplifiers to trick the car into unlocking. Key Comparison Table To help clarify the differences between each type of key, here’s a side-by-side comparison: Feature Transponder Key Key Fob Smart Key Physical key required Yes Sometimes (flip blade) No Remote locking/unlocking No Yes (buttons) Yes (proximity-based) Push-button start No No Yes Battery required No Yes Yes Security level Moderate High (with chip) High Common years of use 1995–2012 2000–present 2015–present Risk of relay attack None Low (in some cases) High (without signal shield) Why It Matters: Practical Impacts for Drivers Understanding what kind of car key you have can save you time, money, and stress in several situations: 1. Replacing Lost or Broken Keys Smart keys can cost anywhere from $200–$600+ to replace and usually require dealership programming. Transponder keys are cheaper and often programmable by locksmiths. 2. Diagnosing Key Issues If your car won’t start, it could be due to a dead battery in your fob or smart key. But if you have a transponder key, the issue might be with the chip or immobilizer system. 3. Security Awareness Smart keys are vulnerable to digital theft via relay attacks. If you have one, consider using a Faraday pouch or signal-blocking case to protect your vehicle while parked. Want to protect your key? Browse Mr Key's security accessories here. 4. Choosing Accessories Batteries, protective covers, signal-blocking cases, and replacement parts vary depending on your key type. Buying the wrong product can lead to frustration or compatibility issues. Know Your Key, Protect Your Car Your car key is more than a tool — it’s an entry system, a security feature, and a communication device. Whether you’re carrying a traditional transponder key, a button-operated key fob, or a proximity-based smart key, knowing the difference is the first step toward better security, smarter repairs, and fewer surprises. In a world where cars are smarter than ever, your key plays a more important role than most drivers realize. Take a moment to identify which type you have — and take steps to protect it.

5 Reasons Why Your Car Remote Isn’t Working and How to Fix It

5 Reasons Why Your Car Remote Isn’t Working and How to Fix It

In an age where convenience is king, keyless entry systems have revolutionized how we interact with our vehicles. Gone are the days of fumbling for physical keys—today’s drivers rely heavily on the sleek, compact functionality of car remotes. However, what happens when this modern convenience fails you? Few things are more frustrating than standing beside your car, repeatedly pressing your remote, only to be met with silence. Understanding why your car remote isn’t working can save you from unnecessary panic, costly repairs, and inconvenient lockouts. This comprehensive guide explores the five most common reasons your remote may malfunction and offers in-depth, actionable solutions to get you back on the road quickly. 1. Battery Depletion: The Silent Saboteur The number one reason for car remote failure is, unsurprisingly, a dead or depleted battery. Though seemingly small, the battery inside your remote plays a crucial role in its operation. Most key fobs use lithium coin batteries (commonly CR2025 or CR2032), known for their durability and longevity. But even these reliable power sources don’t last forever. Factors contributing to faster battery depletion include: Frequent use (especially for remote start and lock/unlock functions) Extreme temperature exposure (both heat and cold reduce battery life) Long periods of inactivity (leading to gradual discharge) Solution: Replacing your key fob battery is a simple, cost-effective fix. Always consult your vehicle’s manual to identify the correct battery type. When replacing, ensure the new battery is seated correctly to avoid poor contact. Proactively changing the battery every 1-2 years, even before it’s fully drained, can prevent sudden failures. 2. Signal Interference: The Invisible Obstacle Key fobs communicate with your vehicle via radio frequencies. However, various external factors can interfere with this communication. Living in urban environments, parking in underground garages, or being near large electronic devices (such as cell towers, Wi-Fi routers, or even other vehicles) can disrupt the signal between your remote and car. Solution: If you suspect signal interference: Move closer to your vehicle or try unlocking it from a different angle. Step away from potential sources of interference like electronic devices or heavy machinery. Hold the key fob higher or away from your body to improve signal transmission. While occasional interference is common, if the problem persists across multiple locations, consider resetting or reprogramming your fob. 3. Desynchronization: Losing Connection Sometimes, your key fob may lose synchronization with your vehicle’s receiver—especially after events like a battery change or extended periods of non-use. When this happens, the fob and vehicle are essentially "speaking different languages," resulting in non-responsiveness. Solution: Check your vehicle's manual, as many manufacturers provide step-by-step instructions to manually re-sync the fob. Typically, this involves a sequence like inserting and turning the ignition key, pressing specific buttons, or opening and closing the doors in a set pattern. If manual reprogramming fails, you may need assistance from a dealership or certified locksmith equipped with the necessary diagnostic tools. 4. Physical Damage: The Wear and Tear Factor Remote key fobs, despite their solid appearance, are not invincible. Everyday handling—dropping the remote, spilling liquids, or even rough storage—can cause internal components to malfunction. Moisture exposure, in particular, is a key offender, leading to corrosion or short-circuiting of the circuitry inside. Solution: Inspect your remote regularly for: Visible cracks, chips, or signs of wear Sticky buttons or unresponsive keys Water damage indicators If damage is evident, replacing the remote may be your best bet. For minor issues, cleaning the interior components (after carefully opening the casing) with a soft cloth and isopropyl alcohol can sometimes restore functionality. Consider investing in a protective cover to prevent future damage. 5. Vehicle Receiver Issues: The Hidden Problem While the key fob often gets the blame, sometimes the issue lies within your vehicle’s receiver system. If the receiver—which detects and processes the signal from your remote—is malfunctioning, your remote will appear useless regardless of its condition. Solution: One telltale sign of a faulty receiver is if multiple remotes fail to operate the car. In this case, the problem is likely internal. Diagnosing and fixing receiver issues typically requires professional assistance, either from a dealership or an experienced automotive technician equipped with specialized diagnostic tools. Global Context: Keyless Challenges Worldwide The rise of keyless systems isn't limited to one region—it’s a global phenomenon. However, as technology advances, so do the challenges. For instance, key signal cloning and relay attacks have become prevalent, particularly in Europe and North America, prompting manufacturers to enhance security measures continually. Understanding the basics of how your key fob works and its vulnerabilities can help protect against both everyday failures and more sophisticated threats. Stay Ahead of the Problem Modern car remotes offer unmatched convenience, but when they fail, the disruption can be significant. Whether it’s a dead battery, signal interference, synchronization glitch, physical damage, or vehicle receiver issue, knowing how to identify and fix the problem puts you in control. Take proactive steps—replace batteries regularly, handle your remote with care, and familiarize yourself with your vehicle’s reprogramming process. A small investment of time today could save you from major headaches tomorrow. Stay informed. Stay prepared. And keep your car remote working seamlessly, wherever the road takes you.

Car Key Replacement: What to Do, How It Works, and When DIY Saves You Money

Car Key Replacement: What to Do, How It Works, and When DIY Saves You Money

Losing or breaking your car key can feel like a full-blown emergency. Whether your key won’t turn in the ignition, your remote suddenly stops responding, or you’ve misplaced the whole thing entirely, one thing is certain: you need a replacement—and fast. While most people assume that replacing a car key requires a trip to the dealership and a hefty bill, that’s no longer the only option. In fact, depending on your situation and car model, you may be able to handle it yourself with minimal cost and effort. Here’s what you need to know. Why Car Keys Are More Complicated Than You Think Gone are the days when a spare key meant heading to your local hardware store and getting a basic metal key cut in minutes. Today’s car keys are advanced devices that often include transponder chips, remote locking systems, and built-in immobilizers. Some even come as proximity fobs that allow push-button starting without ever taking the key out of your pocket. Because of this, replacing a lost or damaged key isn’t just about cutting a new blade—it often involves electronic programming and matching frequencies to your specific vehicle. Dealer, Locksmith, or DIY? Your Replacement Options When it comes to replacing a car key, you typically have three choices: Dealership : Offers official replacements, but often at the highest cost. Auto Locksmith : Generally more affordable and mobile, but availability varies. DIY : Ideal for shell replacements, battery swaps, and some remote keys—if you already have a functioning spare key or understand your model's programming process. If you’ve damaged your key shell or the battery has died, DIY is a surprisingly good option—especially if you’re comfortable working with small components. The Rise of DIY: Save Time, Learn Something, and Avoid Dealer Fees More and more drivers are discovering how easy it can be to fix their own car keys. Whether it’s replacing a worn key case, changing a battery, or even installing electronics into a new shell, DIY key repair is growing in popularity. To support that trend, we’ve created a full library of free video tutorials showing how to disassemble and reassemble key fobs for dozens of car models—from BMW and Audi to Peugeot, Fiat, and Toyota. These easy-to-follow guides show exactly how to change a key battery, switch a shell, or upgrade to a new case in minutes. 👉 Check out the full tutorial playlist on our YouTube channel: Mr-Key DIY Tutorials Step-by-Step: Replacing a Battery or Shell at Home Let’s say your remote still works but the case is cracked or the buttons are worn down. In that case, replacing just the outer shell is often all you need to do. Here’s a quick look at what that might involve: Carefully open the old key shell using a flat screwdriver. Remove the internal electronics and transponder chip. Insert them into your new replacement shell. Reinstall the battery or replace it with a fresh one (typically a CR2032 or CR1620). Snap everything together and test the key. If you already have a functioning key and just want a backup, some car models even allow you to program a new key yourself. Always check your owner’s manual or look up on-board programming methods by vehicle brand. Choosing the Right Key or Shell Not all replacement keys are created equal. Here’s what to consider: Chip Type : Most modern cars use a transponder chip (like ID46, PCF7946, etc.). Make sure your new key has the correct one. Blade Profile : HU83, VA2, TOY43—these are just a few examples. Match your key blade exactly. Frequency : Remote keys operate on specific frequencies (433MHz and 868MHz are most common in Europe). You can find affordable, compatible replacement shells and key fobs at reputable online stores like mr-key.com . When to Call a Pro There are still some situations where professional help is the smarter option: You’ve lost all copies of your key. Your car requires encrypted key coding with dealer-only tools. Your key has a broken or unresponsive transponder chip. In those cases, a locksmith or dealership may be necessary. Don’t Overpay—Just Be Prepared Car key replacement doesn’t have to be expensive, stressful, or time-consuming. In many cases, you can replace the shell, battery, or even the entire fob yourself—especially with a little guidance. Our Mr-Key YouTube channel is here to walk you through it. Whether you’re fixing a key today or preparing for the future, knowing your options puts you in control. And sometimes, the right tutorial is all it takes to save the day (and a lot of money).

Condensation Inside Motorcycle TFT Displays: Causes, Warning Signs & What It Really Means

Condensation Inside Motorcycle TFT Displays: Causes, Warning Signs & What It Really Means

Every modern motorcycle rider has seen it. You park your bike after a cold morning ride, glance at the dashboard, and notice a faint haze forming behind the TFT screen. Maybe small droplets gather along the edges. Maybe the whole display looks fogged from the inside. That moisture is not cosmetic. It is water inside a sealed electronic unit — and it is the earliest visible warning of a problem that can destroy a component costing €700 to over €1,200 to replace. This guide explains exactly why condensation forms inside motorcycle TFT displays, which bikes are most affected, what it really means for your instrument cluster, and the one affordable upgrade that prevents the damage cycle before it starts. Why Motorcycle TFT Displays Get Condensation Inside A motorcycle TFT display is a sealed electronic module exposed to some of the harshest conditions any screen will ever face. Unlike your phone in a pocket, a motorcycle dashboard sits directly in the path of rain, road spray, temperature swings, UV radiation, and constant vibration. Condensation forms when warm, humid air trapped inside the display housing meets a cooler surface — the glass front panel. The moisture in that air turns to liquid droplets on the coldest point, which is almost always the inside face of the screen. Here is how moisture gets trapped in the first place. Thermal breathing. Every ride creates a heat cycle. The engine, direct sunlight, and the display's own backlight warm the air inside the housing. When the bike stops and cools, that air contracts and draws in fresh, humid outside air through micro-gaps in the seals. Over weeks and months, humidity accumulates inside the unit. Seal degradation. The rubber gaskets and adhesive bonds that seal a TFT housing are not permanent. UV exposure breaks down rubber. Vibration loosens adhesive joints. Temperature cycling causes materials to expand and contract at different rates, gradually opening pathways for water ingress. Micro-damage to the front surface. Stone chips, cleaning scratches, and pressure marks on the display face can create hairline cracks invisible to the naked eye. These become moisture entry points — especially in rain or when using a pressure washer. High-humidity environments. Riders in coastal areas, tropical climates, or northern European countries with persistent dampness face accelerated moisture ingress. A bike garaged in a humid environment without ventilation is particularly vulnerable. The result is always the same: water inside the display that the sealed housing cannot easily release. Which Motorcycles Are Most Affected Condensation inside TFT displays is not limited to one manufacturer. It has been documented across virtually every major brand using TFT instrument clusters. BMW — The R 1250 GS, R 1300 GS, S 1000 RR, F 850 GS, and F 900 R all use 6.5-inch or 10.25-inch TFT displays. These are high-quality units, but they sit in exposed positions — particularly on adventure models ridden in all weather conditions. OEM replacement for the 6.5-inch TFT runs around £1,200, and if the wiring loom is damaged during theft or failure, that figure can reach £3,000+. Yamaha — Models like the MT-09, MT-07, Tracer 9, and Ténéré 700 use TFT dashboards. Yamaha's displays are generally well-sealed, but the same thermal breathing cycle applies. Adventure and touring riders who cover high mileage in variable conditions report condensation after 2–3 seasons. Honda — The Africa Twin, CB650R, and CBR1000RR-R all run TFT clusters. The Africa Twin's display sits in a highly exposed cockpit position. Forum reports from owners confirm moisture ingress, especially after extended wet-weather riding. Triumph — The Tiger 900, Street Triple, and Speed Triple RS use TFT displays. Triumph's units are compact, but the same vulnerability to vibration-induced seal failure applies across the range. Kawasaki — The Z900, Ninja 1000SX, Versys 1000, and newer Z650 models all feature TFT dashboards. Like all manufacturers, Kawasaki's sealed units face the same environmental pressures. The pattern is clear: this is not a brand-specific defect. It is an inherent vulnerability of mounting sensitive display technology in one of the most hostile environments imaginable. The Warning Signs You Should Never Ignore Condensation inside a motorcycle TFT display is progressive. It starts small and escalates. Here is what each stage looks like — and what it means. Light fogging after a cold start. A thin mist on the inside of the screen that clears within 10–15 minutes of riding. This is the earliest sign. Moisture is present inside the housing but has not yet caused damage. At this stage, the problem is still manageable. Persistent edge condensation. Droplets that form along the bottom or side edges of the display and do not fully evaporate during a ride. This means moisture is accumulating faster than it can escape. The seals are compromised. Internal staining or water marks. Visible trails, spots, or discolouration behind the glass that remain even when the display is dry. This is mineral residue from evaporated water. It means moisture has been cycling inside the display repeatedly. The internal coatings and bonding layers are being attacked. Intermittent display issues. Flickering backlight, sections of the screen dimming unevenly, or the display briefly shutting off during a ride. These are early signs of electrical damage from moisture reaching the circuit board or flex connectors behind the panel. Dead pixels appearing alongside condensation. If you see pixel failure combined with any visible moisture, the display is in active degradation. The liquid crystal layer or its driver circuits are being damaged. This combination almost always leads to full failure. Complete display blackout. The screen powers on but shows nothing, or fails to power on at all. At this point, the TFT module is usually beyond repair and must be replaced entirely. The critical takeaway: condensation that clears quickly is a warning. Condensation that stays, stains, or coincides with display glitches means damage is already underway. What Condensation Actually Does to a TFT Display The fog itself is not the problem. The damage happens behind it. A motorcycle TFT display is a laminated stack of layers: a front glass or polycarbonate cover, a polarising film, the liquid crystal panel itself, LED backlighting, and a circuit board with drivers and connectors. All bonded together with adhesive and housed in a sealed plastic or metal frame. When moisture sits inside this assembly, several destructive processes begin simultaneously. Corrosion of electrical contacts. The flex cables and solder joints connecting the LCD panel to the main circuit board are extremely sensitive to moisture. Even trace amounts of water can cause oxidation, increasing resistance and eventually breaking the connection. This is how entire rows or columns of pixels fail at once. Delamination of optical layers. The adhesive bonds between the polariser, LCD panel, and backlight diffuser swell and weaken when exposed to moisture. This causes visible clouding, uneven brightness, and eventually permanent optical distortion. Mineral deposits on internal surfaces. Water that evaporates inside the display leaves behind dissolved minerals and contaminants. These deposits scatter light, reduce contrast, and cannot be cleaned without disassembling the unit — which is rarely possible without destroying it. Short circuits on the PCB. If enough moisture reaches the main circuit board, it can bridge traces and create short circuits. This can cause complete display failure, error codes, or even damage to the motorcycle's CAN bus communication system. A motorcycle TFT display is not designed to be serviced. It is a sealed, disposable module. Once moisture damage reaches the internal electronics, the only option is full replacement. How to Prevent Water Ingress in Motorcycle TFT Displays Before Damage Starts Prevention is not complicated. But it requires acting before symptoms appear — not after. Never use a pressure washer on the dashboard. High-pressure water jets force moisture past seals that can handle rain but not direct, concentrated spray. Wash the display area gently with a damp microfibre cloth and motorcycle-safe LCD cleaner. Avoid parking in direct sunlight for extended periods. Prolonged heat accelerates UV degradation of seals and adhesives. It also increases the temperature differential that drives the thermal breathing cycle. Use a cover or park in shade when possible. Store the bike in a ventilated, dry environment. A damp, unventilated garage is one of the worst places for a motorcycle with a TFT display. If humidity control is not possible, a small dehumidifier or silica gel packs placed near the bike can help. Inspect the display edges regularly. Look for any visible gap between the display housing and its frame, or any separation of the front glass from the body. Catching a seal failure early — before moisture accumulates — gives you the chance to act. Protect the display surface from physical damage. The front face of the TFT is the largest and most vulnerable entry point for moisture. A single stone chip or a scratch from an abrasive cloth can breach the surface coating and create a pathway for water. Preventing that surface damage is the single most effective thing you can do. The One Upgrade That Prevents Condensation Damage in Motorcycle TFT Displays A quality screen protector designed specifically for your motorcycle's TFT display is the most cost-effective protection available — by a wide margin. Here is what a properly fitted screen protector actually does. It creates a physical barrier against impact. Stone chips, gravel flicks, and minor impacts hit the protector instead of the display surface. This eliminates the micro-cracks that become moisture entry points. It shields the surface from UV radiation. UV is the primary cause of seal and adhesive degradation. A screen protector absorbs UV energy before it reaches the display housing, slowing the ageing process of the seals beneath. It prevents cleaning damage. Without a protector, wiping the TFT with a dirty cloth, gloves, or the wrong cleaning product can create fine scratches that compromise the surface. With a protector fitted, you can clean aggressively without risking the display itself. After a few years, replace the protector — the screen underneath stays pristine. It reduces direct water contact with the display edges. A well-fitted protector overlaps the display bezels slightly, redirecting water away from the most vulnerable seal points around the screen perimeter. The cost comparison makes the decision obvious. A screen protector costs between €10 and €25. A TFT display replacement costs €700 to €1,500 or more, depending on the motorcycle. That is a return on investment measured in thousands of percent. Riders who fit a screen protector on day one of ownership — before the first ride, before the first stone chip, before the first rain — give their TFT display the best possible chance of lasting the life of the motorcycle. What to Do If You Already Have Condensation If moisture is already visible inside your display, the situation is not necessarily hopeless — but your options depend on how far it has progressed. If you see light fogging only. Park the bike in a warm, dry, ventilated space. Run the engine and let the display heat up for 20–30 minutes to encourage evaporation. Some riders have had success placing a small silica gel packet near the display housing to draw out residual moisture. Fit a screen protector immediately to prevent further surface-level water entry. If the bike is under warranty. Contact your dealer. Condensation inside a sealed TFT display is a manufacturing defect in the seal or housing. Many manufacturers — including BMW and KTM — have replaced displays under warranty for this exact issue. Document the condensation with clear photographs before your appointment. If condensation has caused staining or pixel issues. At this stage, the damage is internal and typically irreversible without replacing the display module. Get a quote from your dealer, check whether aftermarket options exist for your model, and fit a screen protector to the new unit immediately to prevent the cycle repeating. FAQ Is condensation inside my motorcycle TFT display normal? A very light, temporary fog on a cold morning that clears within minutes can occur even in a properly sealed unit. However, persistent condensation, visible droplets, or any staining is not normal — it indicates a compromised seal and active moisture ingress. Can I fix condensation inside a motorcycle display myself? If it is only light fogging, gentle heat and dry storage may resolve it temporarily. However, the seals are already compromised, so it will likely return. Full repair requires resealing or replacing the display unit, which is not a realistic DIY job for most riders. Will condensation void my warranty? No. Condensation inside a sealed factory unit is a seal failure, not user damage. Most manufacturers honour warranty claims for moisture ingress, provided there is no evidence of physical impact or tampering. Always document the issue with photos. How much does it cost to replace a motorcycle TFT display? OEM replacement costs vary significantly. BMW TFT units typically cost £700–£1,200 for the part alone, plus fitting. Honda, Yamaha, Triumph, and Kawasaki displays range from €400–€900 depending on the model. Labour adds €100–€300. Does a screen protector actually prevent condensation? A screen protector does not fix existing condensation. What it does is prevent the surface damage — stone chips, scratches, UV degradation — that causes seals to fail and moisture to enter in the first place. It is the most effective preventive measure available. Should I fit a screen protector to a brand-new bike? Yes. Day one. Before the first ride. The TFT display is at its most vulnerable when new because the seals have not yet been tested, and any early surface damage will accelerate their failure. Protecting the screen from the start is the best insurance against a four-figure repair bill down the line. Does riding in rain damage a motorcycle TFT display? Rain alone should not damage a properly sealed TFT display. The issue is cumulative: repeated exposure to rain, spray, temperature cycling, and UV gradually degrades seals over time. A screen protector significantly slows this process by shielding the most exposed surface. Protect Your Display Before It Costs You Hundreds A motorcycle TFT display is one of the most expensive single components on a modern bike — and one of the most exposed. The damage from water ingress is progressive, often invisible until it is too late, and almost always irreversible. A screen protector fitted from day one is the simplest, cheapest, and most effective way to protect that investment. Browse precision-fit motorcycle TFT screen protectors for BMW, Yamaha, Honda, Triumph, Kawasaki, and more at mr-key.com.

Chat with us