Post Name

Different Types of Car Keys: What Are You Dealing With?

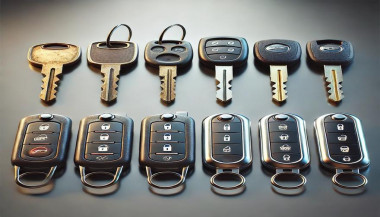
First, identify the type of key you use, as this will determine your options:

  • Traditional Metal Keys: Basic, non-electronic keys. Easy to duplicate and affordable to replace.
  • Transponder Keys: Keys with a chip for electronic communication with your car’s ignition.
  • Remote Key Fobs: Allow remote locking, unlocking, and sometimes starting of your car.
  • Smart Keys: Push-button start and keyless entry, offering high-tech convenience.

Skip the Dealership: Affordable Alternatives for Key Replacement

Dealerships often charge premium rates for key replacements. Here are more budget-friendly options:

Automotive Locksmiths:

  • Experts in creating and programming replacement keys, including transponder and smart keys.
  • Usually quicker and cheaper than a dealership.

DIY Key Duplication Kiosks:

  • Found in hardware stores and supermarkets.
  • Great for duplicating traditional metal keys on the spot.

Online Key Retailers:

  • Purchase replacement keys or fobs online at competitive prices.
  • Ensure compatibility with your vehicle and be prepared to find a professional to program electronic keys.

What to Do If You’ve Lost Your Key

Losing a car key is inconvenient, but following these steps can simplify the replacement process:

  1. Look for a Spare: Check whether you have a backup key available.
  2. Determine Key Type: Understand what kind of key you need replaced.
  3. Gather Car Details: Have your car’s make, model, year, and Vehicle Identification Number (VIN) handy.
  4. Contact a Professional: Reach out to an automotive locksmith or trusted replacement service for assistance.

How to Remove a Broken Key From a Lock

If a key snaps off in your car’s lock, don’t panic. Try one of these methods:

  • Use Needle-Nose Pliers or Tweezers: Carefully pull out the broken part if it’s sticking out.
  • Broken Key Extractor Tool: Insert this tool into the lock to hook and remove the key fragment.
  • Apply Lubrication: Spray a lubricant like WD-40 to make extraction smoother.

If these options don’t work, a professional locksmith can extract the key safely.

Prevent Key Mishaps Before They Happen

  • Duplicate Keys: Keep a spare key in a safe, accessible place to avoid emergencies.
  • Attach a Key Tracker: Use a Bluetooth tracker to quickly find misplaced keys.
  • Inspect Your Keys: Regularly check for wear and tear to avoid breaks.

Quick and Smart Solutions Keep You Moving

Losing or breaking your car keys doesn’t have to lead to frustration or hefty expenses. With the right approach, you can find affordable solutions and even take steps to prevent future mishaps. 

Why waste more time and money? Simply send us a picture of your key, and we’ll handle the rest. Quick, easy, and affordable—let Mr Key take care of your car key replacement needs today!

Related Posts

Dead Pixels on a Motorcycle TFT Display: What They Mean & When Replacement Is Inevitable

Dead Pixels on a Motorcycle TFT Display: What They Mean & When Replacement Is Inevitable

Dead pixels on a motorcycle TFT display are rarely “just cosmetic”. On modern bikes, the TFT dashboard is a sealed, laminated electronic unit exposed to sun, heat, vibration, rain, and pressure washing . When pixels fail, it often signals structural damage inside the display , not a surface defect. This article explains what TFT display dead pixels really mean, why they appear, how to diagnose them correctly, and the point where replacement becomes unavoidable . What riders mean by “dead pixels” — and why it matters The term motorcycle display dead pixels is used loosely. In practice, three very different faults exist. True dead pixels (permanently black) A true dead pixel is a pixel transistor that no longer functions. It stays black on all backgrounds and during startup screens. This is a hardware failure inside the LCD matrix . It does not self-heal. Stuck pixels (fixed bright color) A stuck pixel remains red, green, blue, or white. On phones or TVs, this can sometimes be intermittent. On motorcycle TFTs, stuck pixels are often caused by heat stress or internal pressure and frequently progress into permanent failure. Lines or blocks of dead pixels A vertical or horizontal line of missing pixels is not a pixel issue. It indicates row or column driver failure inside the panel — a structural defect of the display module. Once this appears, replacement is usually inevitable. Why TFT dead pixels appear on motorcycles Dead pixels on a dashboard are rarely random. They follow consistent mechanical and environmental causes. Heat and UV exposure Motorcycle TFTs sit in direct sunlight. Daily heat cycles expand and contract the laminated layers inside the display. Over time, this stresses internal bonds and pixel drivers. A single failed pixel can become a cluster. Micro-impact and pressure A light impact that doesn’t crack the glass can still damage the internal LCD stack. This is common on naked bikes and adventure models where the display is more exposed. Moisture ingress and condensation Condensation inside a TFT display is a critical warning sign. It means the factory seal has been compromised. Moisture accelerates corrosion on connectors and display drivers, often leading to dead pixels followed by total blackout. Electrical stress Voltage fluctuations or grounding issues can contribute, but if the pixel defect appears in the same physical location across reboots , the issue is almost always panel-level, not wiring. Brand examples: how this appears in real motorcycles Dead pixel reports follow similar patterns across brands. BMW TFT clusters: pixel lines or dark zones often appear after heat exposure or condensation events. Clusters are fully integrated and typically replaced as a unit. Yamaha TFT dashboards: isolated dead pixels may appear first, followed by spreading rows on models parked outdoors long-term. Kawasaki TFT displays: line failures are commonly reported after pressure washing or heavy rain use. Honda TFT dashboards: less frequent, but once pixel clusters appear, dealers usually recommend full replacement. Across all brands, panel repair is not part of standard dealer service . Fast diagnosis: how to tell if the damage is permanent You can determine the seriousness in minutes. Check startup screens If the pixel defect appears during the boot logo or splash screen, it is hardware, not software. Test multiple backgrounds Switch themes or display modes: Always black → dead pixel Always bright or colored → stuck pixel Straight line → driver failure Look for progression A defect that grows over weeks is not stable. Progression is a replacement signal. Inspect for condensation Any fogging or haze inside the screen means moisture ingress. Pixel failure combined with condensation almost always worsens. When TFT display replacement is inevitable Replacement is not about annoyance. It’s about predictable failure . Replacement becomes inevitable when any of the following occur: A row or column of dead pixels appears Dead pixels spread over time Dead pixels appear together with condensation The defect blocks speed, warnings, or riding data The bike relies on the TFT for ride modes or system alerts At this stage, the TFT is no longer a reliable instrument cluster. Why TFT displays are rarely repaired A motorcycle TFT is not a standalone screen. It is: Laminated glass + LCD + polarizer Sealed against weather Electronically paired to the motorcycle Separating and rebuilding this stack requires specialized industrial equipment. As a result, OEMs replace the entire unit . Used clusters introduce risks: coding issues, immobilizer pairing, mileage discrepancies, and unknown moisture history. Cost reality in Europe In Europe, OEM motorcycle TFT replacement typically ranges from: €600–€1,200 for mid-range models €1,500–€2,500+ for premium or integrated systems This includes coding and calibration, not just the display itself. That’s why a small dashboard pixel issue deserves early attention. Can dead pixels be prevented? You cannot prevent internal electronic aging. You can reduce the most common triggers: Surface scratches that weaken seals Micro-impacts UV exposure Moisture pooling around edges A properly fitted screen protector does not fix dead pixels, but it reduces the external damage pathways that often lead to full TFT failure. If you want to reduce the risk of turning a small pixel defect into a four-figure repair, you can protect the display surface early — explore motorcycle TFT screen protectors at mr-key.com FAQ: TFT display dead pixels Are dead pixels dangerous? They are not dangerous by themselves, but they often indicate deeper display degradation. Can software updates fix dead pixels? No. If the defect appears in the same physical location during startup, it is hardware. Will one dead pixel spread? Sometimes. Spread is common when heat or moisture is involved. Is condensation inside the TFT serious? Yes. Condensation indicates seal failure and greatly increases the risk of progressive damage. Is replacement always required? Not for a single stable pixel. Replacement becomes unavoidable with progression, lines, or moisture involvement.

The Complete Guide to Car Key Cutting: Everything You Need to Know

The Complete Guide to Car Key Cutting: Everything You Need to Know

Unlocking the Mysteries of Car Key Cutting Have you ever been in a situation where you needed a spare car key or had to replace a lost one? Car key cutting is an essential process for creating duplicate keys or replacements, but it’s often misunderstood. From traditional keys to modern transponder and smart keys, the art of key cutting has evolved dramatically with advancements in technology. This guide will walk you through the key cutting process, its types, and when professional help is required, helping you navigate the complexities of car key duplication with confidence. What Is Car Key Cutting? Car key cutting is the process of creating a new key that matches the physical shape and specifications of your vehicle’s locks and ignition. This process involves cutting the metal key blade to fit the car’s lock mechanism precisely. For modern cars, this may also include programming the electronic components of the key, such as transponder chips or remote controls. The method used for cutting a car key depends on the type of key and the car model. Traditional keys are simpler to cut, while transponder and smart keys require specialized tools and expertise. Types of Car Keys and Cutting Methods Traditional Keys These are the classic mechanical keys used in older vehicles. Cutting these keys involves duplicating the grooves and ridges of the original key using a key-cutting machine. Transponder Keys Found in most modern cars, transponder keys contain a microchip that communicates with the car’s computer. After cutting the blade, these keys must also be programmed to function. Smart Keys These advanced keys use wireless communication to interact with the car. They don’t require physical cutting but involve programming to sync with the vehicle. Each type of key requires a different approach and level of expertise, making it essential to know what kind of key you have before proceeding with duplication. The Key Cutting Process: Step by Step Identify the Key Type Determine whether you have a traditional, transponder, or smart key. This will dictate the tools and process needed for cutting and programming. Gather Required Information Provide the key cutter with details about your car, such as the make, model, and year. For some keys, a Vehicle Identification Number (VIN) may be required. Cutting the Key Blade For traditional and transponder keys, the blade is cut using a key duplicator or a laser key-cutting machine. Precision is crucial to ensure the key fits perfectly in the lock. Programming (if required) For transponder and smart keys, the key must be programmed to the car’s computer system. This step may require specialized equipment or professional expertise. When to Seek Professional Help While traditional keys can often be duplicated at local hardware stores, transponder and smart keys typically require specialized tools and knowledge. Professional locksmiths and dealerships are equipped to handle these advanced key types, ensuring proper cutting and programming. Reasons to choose a professional: Complexity: Smart and transponder keys require technical expertise. Accuracy: Professionals use precise equipment to ensure the key functions flawlessly. Programming Needs: Only trained specialists can program keys to sync with your vehicle. Cost of Car Key Cutting The cost of cutting a car key varies depending on the type of key and the service provider. Traditional keys are the most affordable, typically costing between $10 and $50. Transponder and smart keys, however, can range from $50 to $300 or more due to the additional programming required. Tips to save money: Have a spare key: This simplifies the duplication process and reduces costs. Compare prices: Contact multiple locksmiths or dealerships to find the best deal. Be Prepared for Every Key Emergency Car key cutting is a vital service for any car owner, whether you’re duplicating a spare key or replacing a lost one. Understanding the process and knowing when to seek professional help can save you time, money, and frustration. By staying informed and proactive, you can ensure that your vehicle remains accessible and secure, no matter what challenges arise.

The Journey of Car Keys: From Metal to Modern Tech

The Journey of Car Keys: From Metal to Modern Tech

Car keys have come a long way from simple metal tools to advanced digital systems. This evolution reflects the advancements in automotive security, convenience, and technology. Understanding the history of car keys gives you a better appreciation of the tools you use to unlock, start, and secure your vehicle. Here’s a look at how car keys have transformed over the years. 1. The Humble Beginnings: Metal Keys The story of car keys began with simple, unassuming metal keys designed to manually lock and unlock car doors. How They Worked: These keys were physical tools that matched a mechanical lock’s configuration. Challenges: Lost keys or broken locks often required professional locksmiths for replacements or repairs. Impact: Metal keys, while functional, offered little in terms of advanced security or convenience. Though basic, these keys laid the groundwork for innovations to come. 2. Entering the Electronic Era: Remote Keys The next big leap in car key evolution came with the introduction of remote keys in the 1980s. These keys added a layer of convenience and functionality. Features: Remote locking and unlocking. Panic buttons for emergencies. Integration with car alarms for added security. Advantages: No more fumbling for locks in the dark; a simple press of a button provided instant access. Drawbacks: Batteries needed frequent replacement, and repairs were more complex than with traditional metal keys. Remote keys quickly became a standard feature for modern vehicles. 3. The Smart Key Revolution By the late 1990s and early 2000s, smart keys emerged, transforming how you interacted with your car. How They Worked: These key fobs used radio signals to communicate with your car, allowing for keyless entry and push-button starts. Benefits: Enhanced security with encrypted signals. Increased convenience with no need to insert a key into the ignition. Sophisticated design and compact form factors. Limitations: These keys are expensive to replace and require professional programming. Smart keys brought unparalleled convenience but also increased the need for specialized services in case of loss or damage. 4. Integration with Smartphones: Digital Keys In recent years, car key technology has embraced the smartphone revolution, allowing you to unlock and start your car using your mobile device. Features: App-based controls for locking, unlocking, and starting your car. Sharing access with family or friends via the app. Enhanced security with biometric verification like fingerprints or face recognition. Advantages: No physical key needed, making it harder to lose or forget. Considerations: Dependence on phone battery life and app reliability. Digital keys represent the cutting edge of car key technology, blending convenience with advanced security features. 5. Biometric Car Keys: The Future of Security Biometric keys are poised to redefine vehicle access with unmatched security and personalization. How They Work: These systems rely on fingerprint or facial recognition to verify the user’s identity. Benefits: Impossible to replicate or hack. Fully personalized access. Enhanced theft protection. Challenges: High development costs and limited availability in mainstream vehicles. Biometric keys are still in their infancy but hint at a future where cars are more secure than ever. 6. Why Understanding Key Evolution Matters Knowing how car keys have evolved helps you make informed decisions when it’s time to replace or upgrade. Cost Considerations: From simple metal keys to advanced digital systems, replacement costs vary significantly. Security Features: Understanding the security features of your key can help you prevent theft and unauthorized access. Convenience: Opt for a system that matches your lifestyle, whether it’s a traditional key or an app-based digital solution. The more you know, the better equipped you are to choose the right key for your vehicle. Pro Tips for Key Replacement and Maintenance Backup Keys: Always keep a spare key in a safe location. Battery Checks: Replace key fob batteries regularly to avoid sudden malfunctions. Professional Help: Seek professional assistance for programming smart or digital keys. Protect Your Keys: Use a key cover to prevent wear and tear. Proper maintenance ensures your car key remains functional and reliable for years to come. From the simplicity of metal keys to the sophistication of biometric access, car key technology continues to evolve. Each advancement brings greater security, convenience, and innovation, making life easier for car owners like you. Whether you’re replacing a key or exploring the latest tech, understanding this evolution helps you stay ahead in the world of automotive technology.

Simple Tips to Free a Stuck Lock: What You Need to Know

Simple Tips to Free a Stuck Lock: What You Need to Know

Locks are meant to provide security, but when they seize up, they can leave you feeling frustrated and helpless. Dealing with a stuck lock is more common than you might think, and thankfully, there are affordable and effective solutions to get it working smoothly again. Whether it's a car door, trunk, or your home lock, here are some tried-and-true methods to free up a jammed lock. Why Locks Seize Up Understanding the causes behind a stuck lock can help you prevent it from happening in the future. Locks can seize up for various reasons: Dirt and Debris : Over time, dust, grime, or even small particles can accumulate inside the lock mechanism, making it harder for the internal parts to move smoothly. Rust and Corrosion : Exposure to moisture, humidity, or salty air can lead to rust buildup on metal parts within the lock, which can prevent movement. Lack of Lubrication : Locks need to be lubricated occasionally to ensure smooth operation. Without lubrication, friction increases, and the lock may eventually jam. Now, let’s look at some simple steps to tackle a seized lock. Step 1: Use Graphite Powder or Dry Lubricant The first thing to try is applying a lubricant, but be careful about what type you use. Wet or oil-based lubricants can attract dust, which eventually clogs the lock. Graphite Powder : This is one of the best options for freeing up a stuck lock. Sprinkle a small amount of graphite powder into the keyhole, insert the key, and gently move it back and forth. This spreads the graphite, reducing friction and allowing the lock components to move more freely. Dry Lubricants : These are specifically designed for locks and are ideal for situations where you want to avoid residue buildup. Spray a small amount into the lock, then insert the key and gently turn it. Pro Tip : Avoid using regular WD-40 or other oil-based products, as they may lead to a buildup over time, making the problem worse. Step 2: Try the Key with Gentle Force If lubrication alone doesn’t do the trick, the next step is to use a little gentle force with your key. Be cautious here; applying too much force could break the key inside the lock. Insert the Key : Once the lubricant has been applied, insert the key fully into the lock. Wiggle Carefully : Gently wiggle and turn the key without applying too much force. This movement may help distribute the lubricant further and gradually loosen up any stuck components. Caution : If you feel excessive resistance, don’t force the key. Forcing it can cause damage or even snap the key, which would require additional assistance to remove. Step 3: Warm Up the Lock (Especially Useful for Cold Weather) Cold temperatures can cause locks to seize due to ice or metal contraction. If you suspect the cold is the issue, warming up the lock can be effective. Use a Hair Dryer : Direct warm air onto the lock for several minutes to allow the metal to expand and the ice (if any) to melt. Heat the Key : You can also try warming the key slightly with a lighter, but exercise caution and make sure it isn’t too hot before inserting it into the lock. Safety Note : Avoid open flames directly on the lock itself, as this can damage surrounding surfaces or even warp the lock mechanism. Step 4: Use a Vinegar Solution for Corroded Locks If rust is the culprit, vinegar is a great household solution for loosening rust and corrosion in a lock. Apply Vinegar : Put a few drops of vinegar on the key, insert it into the lock, and let it sit for a minute or two. Vinegar can help dissolve light rust, making it easier to turn the key. Follow with Lubricant : After using vinegar, apply a small amount of graphite powder or dry lubricant to ensure the lock remains smooth and functional. Step 5: Work with Compressed Air to Remove Debris If dirt or debris has accumulated inside the lock, compressed air is a quick and efficient way to clear it out. Blow Out Dust : Use a can of compressed air and direct the nozzle into the keyhole. Short bursts of air can blow out dust and small debris that may be obstructing the mechanism. Follow Up : After using compressed air, it’s a good idea to add a dry lubricant to prevent any remaining dust from causing future jams. How to Prevent Lock Seizure in the Future Once you’ve successfully freed a seized lock, it’s helpful to take steps to prevent it from happening again. Here are some preventive tips: Regularly Lubricate : Use a dry lubricant or graphite powder once or twice a year, especially if you live in a humid or dusty area. Keep Locks Clean : Wipe off any visible dirt or dust around the lock mechanism. If the lock is exposed to elements (like outdoor or car locks), covering it can help keep debris and moisture out. Avoid Overusing Keys : If your key shows signs of wear, consider getting a replacement. Worn-out keys can cause more friction inside the lock, leading to jams. When to Seek Professional Help Sometimes, despite your best efforts, a lock just won’t budge. In cases where the lock is significantly damaged, heavily corroded, or if the key breaks inside, it’s best to reach out for professional assistance. A professional has specialized tools and expertise to address these issues without causing further damage. Taking Care of Your Locks A stuck lock can be an inconvenience, but by following these simple steps and using a little patience, you can often resolve the issue without professional help. Keeping locks in good condition with regular care is the key to ensuring they function smoothly for years to come.

Chat with us