Simple Tips to Free a Stuck Lock: What You Need to Know
29.10.2024
Locks are meant to provide security, but when they seize up, they can leave you feeling frustrated and helpless. Dealing with a stuck lock is more common than you might think, and thankfully, there are affordable and effective solutions to get it working smoothly again. Whether it's a car door, trunk, or your home lock, here are some tried-and-true methods to free up a jammed lock.
Why Locks Seize Up
Understanding the causes behind a stuck lock can help you prevent it from happening in the future. Locks can seize up for various reasons:
Dirt and Debris: Over time, dust, grime, or even small particles can accumulate inside the lock mechanism, making it harder for the internal parts to move smoothly.
Rust and Corrosion: Exposure to moisture, humidity, or salty air can lead to rust buildup on metal parts within the lock, which can prevent movement.
Lack of Lubrication: Locks need to be lubricated occasionally to ensure smooth operation. Without lubrication, friction increases, and the lock may eventually jam.
Now, let’s look at some simple steps to tackle a seized lock.
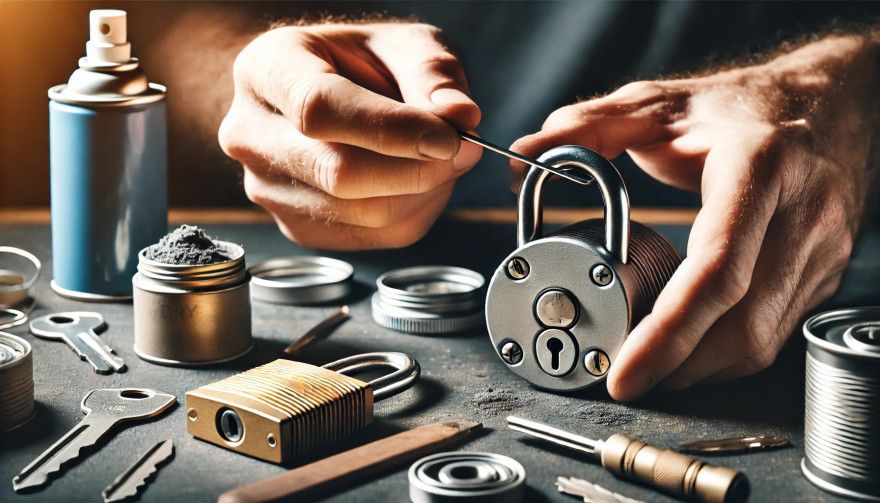
Step 1: Use Graphite Powder or Dry Lubricant
The first thing to try is applying a lubricant, but be careful about what type you use. Wet or oil-based lubricants can attract dust, which eventually clogs the lock.
Graphite Powder: This is one of the best options for freeing up a stuck lock. Sprinkle a small amount of graphite powder into the keyhole, insert the key, and gently move it back and forth. This spreads the graphite, reducing friction and allowing the lock components to move more freely.
Dry Lubricants: These are specifically designed for locks and are ideal for situations where you want to avoid residue buildup. Spray a small amount into the lock, then insert the key and gently turn it.
Pro Tip: Avoid using regular WD-40 or other oil-based products, as they may lead to a buildup over time, making the problem worse.
Step 2: Try the Key with Gentle Force
If lubrication alone doesn’t do the trick, the next step is to use a little gentle force with your key. Be cautious here; applying too much force could break the key inside the lock.
Insert the Key: Once the lubricant has been applied, insert the key fully into the lock.
Wiggle Carefully: Gently wiggle and turn the key without applying too much force. This movement may help distribute the lubricant further and gradually loosen up any stuck components.
Caution: If you feel excessive resistance, don’t force the key. Forcing it can cause damage or even snap the key, which would require additional assistance to remove.
Step 3: Warm Up the Lock (Especially Useful for Cold Weather)
Cold temperatures can cause locks to seize due to ice or metal contraction. If you suspect the cold is the issue, warming up the lock can be effective.
Use a Hair Dryer: Direct warm air onto the lock for several minutes to allow the metal to expand and the ice (if any) to melt.
Heat the Key: You can also try warming the key slightly with a lighter, but exercise caution and make sure it isn’t too hot before inserting it into the lock.
Safety Note: Avoid open flames directly on the lock itself, as this can damage surrounding surfaces or even warp the lock mechanism.
Step 4: Use a Vinegar Solution for Corroded Locks
If rust is the culprit, vinegar is a great household solution for loosening rust and corrosion in a lock.
Apply Vinegar: Put a few drops of vinegar on the key, insert it into the lock, and let it sit for a minute or two. Vinegar can help dissolve light rust, making it easier to turn the key.
Follow with Lubricant: After using vinegar, apply a small amount of graphite powder or dry lubricant to ensure the lock remains smooth and functional.
Step 5: Work with Compressed Air to Remove Debris
If dirt or debris has accumulated inside the lock, compressed air is a quick and efficient way to clear it out.
Blow Out Dust: Use a can of compressed air and direct the nozzle into the keyhole. Short bursts of air can blow out dust and small debris that may be obstructing the mechanism.
Follow Up: After using compressed air, it’s a good idea to add a dry lubricant to prevent any remaining dust from causing future jams.
How to Prevent Lock Seizure in the Future
Once you’ve successfully freed a seized lock, it’s helpful to take steps to prevent it from happening again. Here are some preventive tips:
Regularly Lubricate: Use a dry lubricant or graphite powder once or twice a year, especially if you live in a humid or dusty area.
Keep Locks Clean: Wipe off any visible dirt or dust around the lock mechanism. If the lock is exposed to elements (like outdoor or car locks), covering it can help keep debris and moisture out.
Avoid Overusing Keys: If your key shows signs of wear, consider getting a replacement. Worn-out keys can cause more friction inside the lock, leading to jams.
When to Seek Professional Help
Sometimes, despite your best efforts, a lock just won’t budge. In cases where the lock is significantly damaged, heavily corroded, or if the key breaks inside, it’s best to reach out for professional assistance. A professional has specialized tools and expertise to address these issues without causing further damage.
Taking Care of Your Locks
A stuck lock can be an inconvenience, but by following these simple steps and using a little patience, you can often resolve the issue without professional help. Keeping locks in good condition with regular care is the key to ensuring they function smoothly for years to come.
Changing or removing the lock barrel on your roof rack may seem like a daunting task, but it’s actually simpler than you might think. Whether you need a replacement due to a lost key, wear and tear, or just want to swap out an old lock for a new one, following the right steps can make the process hassle-free. This guide will walk you through everything you need to know about handling a roof rack lock barrel with ease. Why You Might Need to Change a Roof Rack Lock Barrel ? There are several reasons why you may want to replace or remove your roof rack lock barrel: Lost Key : If you've misplaced the key, replacing the lock barrel is often the most practical solution. Upgrading the Lock : Maybe you want a more secure lock for added peace of mind. Routine Maintenance : Over time, lock barrels can wear down, making it harder to insert or turn the key. Uniformity : If you've recently changed your car key, you may want to match your roof rack lock with it. Knowing why you’re changing the lock barrel will help you determine the steps you need to follow. What You’ll Need Before you start, gather these essential tools and items: Replacement Lock Barrel : Ensure it’s compatible with your roof rack model. Master Key or Removal Key : Often required to remove the old lock barrel. New Key : The key that corresponds to the replacement lock barrel. Flathead Screwdriver : To gently pry and release certain parts if needed. Step-by-Step Guide to Removing a Roof Rack Lock Barrel Removing a lock barrel from your roof rack doesn’t require extensive mechanical skills. Just follow these straightforward steps: 1. Locate the Lock Barrel The lock barrel is usually situated in the center or side of the roof rack. Look for the small lock with the keyhole, as this is where you'll be inserting the master or removal key. 2. Insert the Master Key or Removal Key If you have a master or removal key, insert it into the lock. This is often a universal key provided by the lock manufacturer specifically for removing lock barrels. Once it’s inserted, turn the key slightly to unlock the barrel. Tip: If you don’t have a removal key, contact a professional or see if you can order one specifically for your model. 3. Pull the Lock Barrel Out With the removal key still in place, gently pull the lock barrel out. If it’s resistant, try wiggling it slightly while pulling. Avoid forcing it, as this could damage the lock or roof rack. In some cases, you may need a flathead screwdriver to help pry it out, but be careful not to scratch the surrounding area. 4. Check the Casing After removing the lock barrel, inspect the casing where the barrel was installed. Make sure it’s clean and free of debris. Any dirt or rust could interfere with the new lock barrel, so it’s a good idea to clean this area before proceeding. Installing the New Lock Barrel Once the old barrel is removed, you’re ready to install the new one. Here’s how: 1. Align the New Lock Barrel Take your new lock barrel and align it with the casing where the old one was. Most barrels are designed to fit in only one direction, so make sure you align it properly to avoid jamming. 2. Insert the New Barrel Push the new lock barrel into the casing until it clicks into place. This might require a bit of pressure, but it should fit snugly without needing excessive force. 3. Test the New Key After installing the new lock barrel, insert the new key and turn it to ensure it’s working smoothly. The key should turn easily and lock securely. This step verifies that the new lock is properly aligned and functional. Common Challenges and Solutions While changing a roof rack lock barrel is generally straightforward, you might encounter some challenges. Here’s how to troubleshoot common issues: Stuck Barrel : If the old barrel is stuck, apply a lubricant like WD-40 around the lock to help loosen it. No Removal Key : If you don’t have a master or removal key, consider reaching out to a locksmith or checking if the manufacturer offers a replacement. Barrel Won’t Fit : Ensure you’ve purchased a compatible lock barrel. Even slight differences in design can prevent it from fitting properly. Tips for Maintaining Your Roof Rack Lock To keep your new lock barrel in good condition and prevent the need for frequent replacements, consider these maintenance tips: Regular Cleaning : Dirt and grime can accumulate inside the lock over time, making it harder to operate. Clean the lock regularly to prevent this. Use Lubricant : Apply a small amount of lubricant inside the lock barrel periodically to keep the key turning smoothly. Protect from Rust : If your roof rack is exposed to rain and humidity, use a protective cover or shield to keep moisture out of the lock barrel. Check Key Fit : Avoid using a damaged or bent key, as this can wear out the lock barrel more quickly. When to Seek Professional Help In some cases, removing or replacing a roof rack lock barrel might require assistance from a professional: Lost or Damaged Keys : If both your main key and master key are lost or damaged, a professional can help retrieve or replace the lock barrel. Damaged Lock Mechanism : If the lock itself is damaged or jammed, forcing it can make things worse. A professional locksmith can safely remove and replace it. Replacing or removing a roof rack lock barrel is an affordable and manageable task for most car owners. By following the right steps and keeping up with regular maintenance, you can ensure your roof rack lock stays functional and secure. Whether you’re upgrading for security or replacing a worn-out lock, a new lock barrel can make all the difference in keeping your roof rack safe. Effortless Key Replacement for a Variety of Locks Order 2x Union Keys FT Series, custom-cut to your original key code, for a hassle-free replacement. Compatible with a range of locks, including those from Aston Martin, Jaguar, Land Rover, and more, these keys are perfect for classic cars, caravans, petrol caps, roof racks, and truck canopies. Simply find your lock code (e.g., FT101-FT360) on the lock face and enjoy fast delivery of high-quality spare keys.
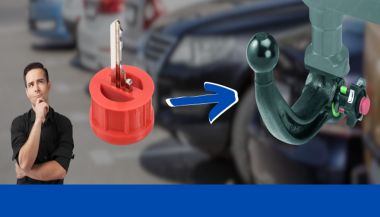
Westfalia towbars are a common choice for many car owners due to their reliability and ease of use. However, because you may use your Westfalia towbar key sporadically throughout the year, it’s not uncommon to misplace it, often at the most inconvenient times—like when you're about to go on vacation. If you've lost your key , you might not know the number of the key you need to order a replacement. Fortunately, there is a way to determine this, depending on whether your towbar lock has a 3-digit or a 5-digit number. Step 1: Check the Number on Your Towbar Lock The first step is to inspect your towbar lock to see if it has a 3-digit or 5-digit number. Here’s what to do next: Sample picture of how 5-digits lock number looks like. If you have a 3-digit number: Unfortunately, the key code remains unknown based on this number alone. We can only manufacture a new key if you have at least one original key and can provide us with the W** or 2W** code from it. If you have a 5-digit number: You're in luck! You can easily determine the correct key code. The key code is based on the last two digits of the 5-digit lock number, prefixed with "2W". Step 2: Calculate Your Key Code If your towbar lock has a 5-digit number, simply ignore the first three digits and use the last two digits. Prepend "2W" to these digits to form the key code. For example, if the code on your lock is 33322 , then your key code is 2W22 . This code will be the number you provide when ordering a replacement key. Even if your 5-digit lock code starts with a different set of three digits, the method remains the same—ignore the first three and focus on the last two digits. For your convenience, we include our key code generator below. What to Do If You’ve Lost All Your Keys If you have lost all your keys and only have the 5-digit number on the lock, you can still determine the correct key using the method described above. Unfortunately, if your lock only has a 3-digit number, the specific key code cannot be determined based on the number alone. Remember, the key code is crucial for obtaining a replacement key. If the towbar was manufactured after 2008, the 5-digit code on the lock cylinder will allow you to identify the correct key. Simply use the last two digits and prefix them with "2W" to get the key code. If you're ever unsure, it's always a good idea to reach out to the manufacturer or a professional who can assist in identifying the correct key. Conclusion Choosing the correct key for your Westfalia towbar is straightforward if you know what to look for. By following these steps, you can quickly determine the correct key code and ensure you're never stuck without access to your towbar when you need it most. Be sure to keep your key code information safe, and consider having a spare key made to avoid future issues. Click Here To Order Your Westfalia Towbar Key >>
Have you ever pressed your car key fob multiple times without an immediate response? It’s frustrating, right? A drained key fob battery can cause unexpected issues, and if you don’t replace it in time, you might find yourself locked out of your car at the worst moment. Fortunately, there are some telltale signs that indicate your car key battery is running low – and replacing it is a quick and cost-effective fix. Your car key is one of the most essential accessories you use daily, yet we often overlook its maintenance. While it may seem small, the proper functioning of your key fob is crucial for your convenience and security. Here are five signs that it’s time to replace your key battery before it stops working completely. 1. Your Key Works Intermittently One of the first signs of a weakening battery is an inconsistent key fob response. If it works fine sometimes but requires multiple button presses at other times, the battery is likely running low. A new battery will restore the key’s normal sensitivity. This issue can be especially frustrating when you're in a hurry or carrying items and need your car to unlock instantly. If you notice your key fob working intermittently, don’t wait until you get locked out—replace the battery promptly. 2. The Signal Range Has Decreased A brand-new car key fob allows you to lock and unlock your vehicle from a considerable distance. If you’ve noticed that you now need to be much closer for the key to work, this is a clear sign that the battery is weakening. Modern key fobs can control your vehicle from as far as 15 meters or more. When you find yourself needing to be right next to the car for it to respond, it’s time to replace the battery. A weak signal can lead to access and ignition problems, which can be inconvenient in daily use. 3. You Need to Press the Buttons Harder A properly functioning car key should respond immediately to a simple press of a button. If you need to press harder or hold the button longer for it to work, the battery is no longer providing enough power to send a strong signal. Beyond just being inconvenient, this can also damage the key fob itself due to increased pressure on the electronic components. Replacing the battery will help you avoid additional wear and tear and ensure your key works smoothly without extra effort. 4. Your Car No Longer Recognizes the Key For vehicles with push-button start systems, the key fob must be close enough for the car to detect it. If your car struggles to recognize the key and you have to bring it closer to the dashboard or ignition button, this is a clear sign of a low battery. This can be particularly annoying on rainy days or when you’re in a hurry. A properly functioning key fob should allow seamless use of your vehicle without delays or the need to adjust its position. 5. The Key Stops Working Completely If your key fob suddenly stops working and you have ruled out other possible causes, such as a damaged circuit or faulty buttons, the battery is most likely completely drained. Before you panic and assume the key fob is broken, try replacing the battery first. It’s a simple and inexpensive solution that restores your key’s functionality in seconds. How to Replace Your Car Key Battery Changing your car key battery is usually a straightforward task that only requires a small screwdriver and a new CR2032 battery. Locate the seam along the key fob’s edge and carefully pry it open. Remove the old battery and observe its position, then insert the new battery in the same orientation. In less than five minutes, your key will work like new again. There’s no need to spend money on a replacement key when a battery swap is a quick and affordable fix. Don’t Wait Until It’s Too Late! Preventative maintenance is key to avoiding unnecessary hassles. If your key is showing signs of weakness, don’t ignore them! Replace the battery in time and ensure your vehicle operates flawlessly.
Modern car keys have come a long way from the traditional cut metal blades of the past. What was once a simple tool for turning an ignition has evolved into a smart, encrypted device with layers of built-in security. Among the most critical components in today’s car keys is the transponder chip — a small but vital element that could be the reason your car doesn’t start after replacing your key shell. If you've recently changed the shell or casing of your key and suddenly find that your car won’t start, you're not alone. This is one of the most common (and frustrating) issues car owners face when performing a key repair or upgrade. So let’s break down what’s really happening — and how you can fix it. What Is a Transponder and What Does It Do? A transponder chip (short for “transmitter-responder”) is a small electronic component embedded in your car key. Its purpose is to communicate with your vehicle’s immobilizer system to authorize ignition. Here’s how it works: When you insert your key and turn the ignition, your car sends out a radio signal. The transponder chip in your key responds with a coded signal unique to your car. If the code is correct, the car’s computer disables the immobilizer and allows the engine to start. If the chip is missing, broken, or the code doesn’t match — the engine won’t start, even if the key blade physically turns. This system is an anti-theft measure, and it's present in most vehicles manufactured after the late 1990s. Without a functional transponder, your key may unlock the doors but it will not allow the car to start. This ensures that even if someone manages to copy the physical blade of your key, they still can’t steal your car. Why Your Key Might Not Work After Shell Replacement Changing your key shell (also called a case or housing) can seem like a simple cosmetic repair — but it’s easy to overlook the importance of transferring the transponder chip during the process. If your key no longer starts the car after a shell replacement, the most likely reason is: You forgot to move the transponder chip into the new shell. In many keys, the chip is not part of the electronics board . It’s often a tiny black or glass capsule , sometimes hidden in a small compartment within the key shell — completely separate from the buttons and battery. If you didn’t see it, it’s probably still sitting inside the old casing. Some people assume that simply moving over the circuit board and battery is enough — but without the transponder, your key won’t be recognized by the car’s immobilizer. This results in the engine failing to start, even though the buttons may still lock and unlock the doors. Symptoms of a Missing or Misplaced Transponder If your key turns in the ignition but: The car does not crank or start You see a flashing key icon or immobilizer warning on the dashboard The central locking might still work, but the engine won’t respond You hear a clicking sound but no ignition occurs Then it’s almost certainly a transponder issue. The car's system is waiting for a valid coded signal from the key — and without it, the start command is rejected. How to Fix It: What You Need to Do Here’s how to get your car running again: 1. Check Your Old Key Shell Open the old casing and look for a small black or clear capsule (typically rice-sized). That’s your transponder chip. Some are glued in place and may require careful prying. 2. Transfer the Chip Carefully remove it and insert it into the correct compartment in your new key shell. Some aftermarket shells have a specific slot for it, while others require a bit of creativity to keep it securely in place. In some cases, adhesive putty or double-sided tape can help hold it. 3. Reassemble and Test Put your key back together and try starting the car again. If the chip is correctly placed, it should work immediately — no reprogramming needed. Always test both ignition and door lock/unlock functions. What If You Lost the Chip? Unfortunately, if the chip is damaged or lost, the key will no longer be able to start your vehicle. In this case, you’ll need to: Contact a professional auto locksmith Have a new transponder chip programmed to your car’s immobilizer system Provide proof of ownership (such as your vehicle logbook or registration) in most cases Depending on the make and model of your car, programming a new chip may cost anywhere from $50 to $250 , and it typically requires special diagnostic equipment. It’s worth noting that some dealerships may charge significantly more than independent auto locksmiths — and you may have to wait longer for service. Pro Tips When Replacing Your Key Shell Always examine the inside of your old shell carefully before throwing it away. Take photos before disassembly so you know where each component goes. If you're unsure where the chip is or how to transfer it, look for DIY videos specific to your key model. Use tweezers and caution — the chip is fragile. Avoid static electricity or contact with magnets during the transfer process. Some modern keys have transponders integrated into the circuit board , in which case no separate chip needs to be moved. If you’re working with a smart key or proximity key, additional steps may be required. These typically involve re-synchronization with the vehicle’s system and may not function correctly without professional assistance. Small Chip, Big Consequences It’s incredible how something as small as a transponder chip can control such a major function. Replacing your key shell is a great way to refresh the look and feel of your key — but it’s vital not to overlook the importance of transferring every component, especially the transponder. Many DIY repairs are abandoned or lead to confusion simply because of this overlooked step. Fortunately, it’s one of the easiest problems to fix once you understand what to look for. If your key looks brand new but your car won’t start, don’t panic. Chances are, the solution is sitting inside your old key shell — quietly waiting to be moved over.
We use cookies to personalise content and ads, to provide social media features and to analyse our traffic. We also share information about your use of our site with our social media, advertising and analytics partners who may combine it with other information that you’ve provided to them or that they’ve collected from your use of their services.
Basic
Cookies necessary for the proper functioning of the online store (such as storing products in the cart, sending a forgotten cart reminder by e-mail, etc. )
Ensures security for visitors by preventing cross-site request forgery. This cookie is essential for website and visitor security.
1 day
1st Party
laravel_session
PHP
To store the username of the logged in user. This information is necessary to allow the user to remain logged in to a website without having to submit their username and password for each page visited. Without this cookie, the user cannot move to areas of the website that require authenticated access.
Up to 2 hours
1st Party
__stripe_mid
Stripe
Serves to provide fraud prevention when attempting to shop on the site.
Up to 1 year
3rd Party
Advertisement
Advertising on other websites or platforms, retargeting, remarketing.
This cookie is set by Facebook to deliver advertising when they are on Facebook or a digital platform powered by advertising on Facebook after you visit this website.
2 months
3rd Party
fr
Facebook
The cookie also tracks a user's web behavior on sites that have a Facebook pixel or Facebook social plugin.
-
3rd Party
Analytics
Web controlling, conversion tracking of marketing tools.
Used to reduce the query rate. If Google Analytics is implemented via Google Tag Manager, this cookie will be named _dc_gtm_ .
1 minute
3rd Party
_gac_<property-id>
Google Analytics
Contains campaign-related information about the user. Linked Google Analytics and Google Ads accounts, Google Ads website conversion tags will read this cookie.
90 days
3rd Party
Google Remarketing
Google Analytics
Used to track pages viewed by users that are sent to Google Ads
-
3rd Party
dynx_itemid
Google Analytics
Used to track product ID in Google Ads
-
3rd Party
dynx_pagetype
Google Analytics
Used to track page type in Google Ads
-
3rd Party
dynx_totalvalue
Google Analytics
Used to track product value in Google Ads
3rd Party
dynx_category
Google Analytics
Used for category tracking in Google Ads
-
3rd Party
ga4_analytics
Google Analytics
Serves to process behavior such as setting Google Analytics cookies, sending automatic and enhanced measurement events, and declaring common settings.
3rd Party
Google Conversion Tracking
Google Ads.
Used to transmit order information to Google Ads.
-
3rd Party
conversion ID
Google Ads.
An identification number used to transmit order information to Google Ads.
-
3rd Party
conversion labеl
Google Ads.
A label used to transmit information about successful orders to Google Ads.
-
3rd Party
Additional software
Other external services and software to personalize the user experience.
Cookies are small text files that can be used by websites to make a user's experience more efficient.
The law states that we can store cookies on your device if they are strictly necessary for the operation of this site. For all other types of cookies we need your permission.
This site uses different types of cookies. Some cookies are placed by third party services that appear on our pages.
You can at any time change or withdraw your consent from the Cookie Declaration on our website.
Learn more about who we are, how you can contact us and how we process personal data in our Privacy Policy.
Please state your consent ID and date when you contact us regarding your consent.

_1736346704.jpg)
 (1)_1741183083.jpg)
 (1)_1743078116.jpg)