Simple Tips to Free a Stuck Lock: What You Need to Know
29.10.2024
Locks are meant to provide security, but when they seize up, they can leave you feeling frustrated and helpless. Dealing with a stuck lock is more common than you might think, and thankfully, there are affordable and effective solutions to get it working smoothly again. Whether it's a car door, trunk, or your home lock, here are some tried-and-true methods to free up a jammed lock.
Why Locks Seize Up
Understanding the causes behind a stuck lock can help you prevent it from happening in the future. Locks can seize up for various reasons:
Dirt and Debris: Over time, dust, grime, or even small particles can accumulate inside the lock mechanism, making it harder for the internal parts to move smoothly.
Rust and Corrosion: Exposure to moisture, humidity, or salty air can lead to rust buildup on metal parts within the lock, which can prevent movement.
Lack of Lubrication: Locks need to be lubricated occasionally to ensure smooth operation. Without lubrication, friction increases, and the lock may eventually jam.
Now, let’s look at some simple steps to tackle a seized lock.
Step 1: Use Graphite Powder or Dry Lubricant
The first thing to try is applying a lubricant, but be careful about what type you use. Wet or oil-based lubricants can attract dust, which eventually clogs the lock.
Graphite Powder: This is one of the best options for freeing up a stuck lock. Sprinkle a small amount of graphite powder into the keyhole, insert the key, and gently move it back and forth. This spreads the graphite, reducing friction and allowing the lock components to move more freely.
Dry Lubricants: These are specifically designed for locks and are ideal for situations where you want to avoid residue buildup. Spray a small amount into the lock, then insert the key and gently turn it.
Pro Tip: Avoid using regular WD-40 or other oil-based products, as they may lead to a buildup over time, making the problem worse.
Step 2: Try the Key with Gentle Force
If lubrication alone doesn’t do the trick, the next step is to use a little gentle force with your key. Be cautious here; applying too much force could break the key inside the lock.
Insert the Key: Once the lubricant has been applied, insert the key fully into the lock.
Wiggle Carefully: Gently wiggle and turn the key without applying too much force. This movement may help distribute the lubricant further and gradually loosen up any stuck components.
Caution: If you feel excessive resistance, don’t force the key. Forcing it can cause damage or even snap the key, which would require additional assistance to remove.
Step 3: Warm Up the Lock (Especially Useful for Cold Weather)
Cold temperatures can cause locks to seize due to ice or metal contraction. If you suspect the cold is the issue, warming up the lock can be effective.
Use a Hair Dryer: Direct warm air onto the lock for several minutes to allow the metal to expand and the ice (if any) to melt.
Heat the Key: You can also try warming the key slightly with a lighter, but exercise caution and make sure it isn’t too hot before inserting it into the lock.
Safety Note: Avoid open flames directly on the lock itself, as this can damage surrounding surfaces or even warp the lock mechanism.
Step 4: Use a Vinegar Solution for Corroded Locks
If rust is the culprit, vinegar is a great household solution for loosening rust and corrosion in a lock.
Apply Vinegar: Put a few drops of vinegar on the key, insert it into the lock, and let it sit for a minute or two. Vinegar can help dissolve light rust, making it easier to turn the key.
Follow with Lubricant: After using vinegar, apply a small amount of graphite powder or dry lubricant to ensure the lock remains smooth and functional.
Step 5: Work with Compressed Air to Remove Debris
If dirt or debris has accumulated inside the lock, compressed air is a quick and efficient way to clear it out.
Blow Out Dust: Use a can of compressed air and direct the nozzle into the keyhole. Short bursts of air can blow out dust and small debris that may be obstructing the mechanism.
Follow Up: After using compressed air, it’s a good idea to add a dry lubricant to prevent any remaining dust from causing future jams.
How to Prevent Lock Seizure in the Future
Once you’ve successfully freed a seized lock, it’s helpful to take steps to prevent it from happening again. Here are some preventive tips:
Regularly Lubricate: Use a dry lubricant or graphite powder once or twice a year, especially if you live in a humid or dusty area.
Keep Locks Clean: Wipe off any visible dirt or dust around the lock mechanism. If the lock is exposed to elements (like outdoor or car locks), covering it can help keep debris and moisture out.
Avoid Overusing Keys: If your key shows signs of wear, consider getting a replacement. Worn-out keys can cause more friction inside the lock, leading to jams.
When to Seek Professional Help
Sometimes, despite your best efforts, a lock just won’t budge. In cases where the lock is significantly damaged, heavily corroded, or if the key breaks inside, it’s best to reach out for professional assistance. A professional has specialized tools and expertise to address these issues without causing further damage.
Taking Care of Your Locks
A stuck lock can be an inconvenience, but by following these simple steps and using a little patience, you can often resolve the issue without professional help. Keeping locks in good condition with regular care is the key to ensuring they function smoothly for years to come.
Losing or encountering issues with your car key can feel like a nightmare, especially when you’re in a hurry. From unresponsive key fobs to stuck keys, these problems are more common than you might think. The good news? Most of these issues have simple, affordable fixes that you can address quickly. This guide will help you identify common car key problems and provide solutions to get you back on track without breaking the bank. 1. Key Won’t Turn in the Ignition Why It Happens: When your car key refuses to turn, it’s often due to a worn-out key, a damaged ignition cylinder, or a locked steering wheel. How to Fix It: Check the Steering Wheel: If the wheel is locked, try gently turning the steering wheel left and right while turning the key in the ignition. Inspect the Key: A bent or worn-out key can cause alignment issues. Try a spare key if you have one. Lubricate the Ignition: Use a small amount of graphite lubricant (avoid oil-based products) to loosen the ignition cylinder. If All Else Fails: Consult a professional to replace the key or ignition lock. Tip: Avoid forcing the key, as this could damage the ignition further. 2. Car Key Fob Isn’t Responding Why It Happens: Modern key fobs are convenient, but they rely on batteries and electronic components that can fail. A dead battery is the most common culprit. How to Fix It: Replace the Battery: Open your key fob (usually with a small screwdriver) and swap out the old battery for a fresh one. Most fobs use coin-shaped batteries like CR2032. Reprogram the Key Fob: If changing the battery doesn’t work, your fob may need reprogramming. Follow your car manual’s instructions or consult a professional locksmith. Check for Damage: Inspect the buttons and internal components for signs of wear or moisture. Tip: Always keep a spare battery on hand to avoid unexpected key fob failures. 3. Key Stuck in the Ignition Why It Happens: This issue often stems from a locked transmission, dirt in the ignition, or a worn-out key that doesn’t align properly. How to Fix It: Ensure the Car Is in Park: For automatic cars, check that the gear shifter is fully in the “Park” position. Clean the Ignition: Use compressed air to remove dirt or debris from the keyhole. Jiggle the Key: Gently wiggle the key while applying light pressure to help free it. Inspect for Damage: If the key is bent, avoid forcing it. A professional can help safely extract it. Tip: If the problem persists, you may need to replace the ignition cylinder or key to prevent further damage. 4. Worn or Damaged Car Key Why It Happens: Over time, constant use can wear down the grooves on your key, making it difficult to start the car or open the doors. How to Fix It: Get a Duplicate Key: If your key is showing wear, have a duplicate made while it still works. Replace the Key: A locksmith can create a new key based on your car’s lock or key code. Upgrade to a Modern Key: If you’re using an older mechanical key, consider upgrading to a transponder key or key fob for added convenience and security. Tip: Don’t wait until your key stops working entirely. Replacing a worn key early can save you time and stress. 5. Key Fob Signal Interference Why It Happens: Sometimes, your car key fob may not respond due to signal interference from nearby electronics or a faulty antenna. How to Fix It: Move Away from Interference: Check for other devices nearby, such as Wi-Fi routers or radios, which may disrupt the signal. Inspect the Fob: Ensure the key fob’s battery is working and the buttons are functional. Reset the Key Fob: Follow your car manual’s instructions to reset or resynchronize the fob. Test the Car’s Receiver: If the problem persists, there may be an issue with your car’s signal receiver. Tip: Parking in a location free from electronic interference can help diagnose if this is the root cause. Preventing Car Key Problems: Simple Tips Taking care of your car key now can save you from bigger headaches later. Here are some quick maintenance tips: Keep Keys Clean: Avoid exposing keys to water, dirt, or chemicals. Store Spare Keys Safely: Always have a backup key in a secure and accessible place. Replace Batteries Regularly: Change key fob batteries annually to prevent unexpected failures. Inspect Your Keys: If you notice wear, cracks, or loose buttons, address the issue early. Why Addressing Car Key Problems Early Saves You Money Ignoring small car key problems can lead to more expensive repairs down the road. For example: A damaged ignition can cost far more to replace than addressing a stuck key early. Reprogramming a lost or broken key fob is more costly than simply replacing a battery. Getting a duplicate key before the original breaks ensures you’re not left stranded. By staying proactive, you can keep your car keys functioning smoothly without spending a fortune.
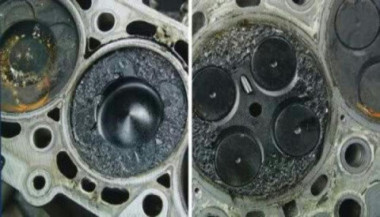
Swirl flaps are a BMW system that has been introduced to help burn the fuel mixture in the cylinder better due to the fact that diesel engines do not have throttle valves and it is not possible to adjust the air-fuel ratio. A diesel engine without vortex valves operates between a poor and a rich fuel mixture, because the only way to regulate it is through fuel injection. Design of the first generation swirl flaps that are made of made of metal. Unfortunately, swirl flaps are responsible for countless damaged engines and costly repairs due to design errors or metal fatigue. Once damaged, the cylinder sucks them in and causes great damage. This is how damaged valves damage the cylinder. Typical swirl flaps suction damage. The vortex valves are positioned in the inlet and are controlled by vacuum (DDE 4.0) or electrically (DDE5.0 / DDE6.4) by the engine ECU. Effects of malfunctioning valves: Swirl valves are stuck in open position: Deterioration of exhaust gas performance at lower speeds. Swirl valves are stuck in closed position: Approximate power loss of 10% at high engine speeds. How swirl flaps work: Performance characteristics: The vortex valves are in the closed position, at low engine speeds and small amounts of fuel injected (controlled by the ECU card). They open under the following conditions: coolant temperature <14 ° C OR * fuel quantity> 24 mg OR engine speed 2250 rpm OR inlet air temperature <-5 ° C BMW and Pierburg have decided to produce diesel engines with metal vortex valves. The speed at which the pistons in the diesel engine operate is at least 60 rpm, so a sucked vortex valve will break and cause a number of damages inside the engine. In most cases, one or more pistons are severely damaged, as a bonus you get valves, in some cases a head or turbocharger. And this combination with a BMW engine is like a cumulative jackpot 🙂 In 2004, BMW began work on the problem and improved the design, however, a number of owners reported ongoing problems in this area. The solution to this problem is by removing the vortex valves and plugging, which does not affect the performance of the engine and at the same time, you can safely pass the exhaust test. Engines: M47 (136hp VP44 fuel pump) has no valves. M47N common rail engine (including M47N / M47TU / M47TUD20) (150hp. Face lift model from 2001 -) has valves. M57 engines (M57D) (525d & 187hp. 330d) cars with manual transmission do not have valves, but those with automatic have. M57N engines (M57TUD) (525d & 330d 204hp) have vortex valves. Ruined swirl flaps: The plugs that replace the vortex valves are easy to find on the internet, but you can also find them here on our website. Typical plugs: Disassembly of vortex valves: The vortex valves can be safely dismantled and in most cases if they are removed properly no loss of power is felt. Final list of models for which vortex valves are installed: Engine: M47N/M47TU/M47TUD20 Applications: * 110 kW (148 hp) and 330 N·m (243 lb·ft) o E46 320d 2001-2005 o E83 X3 2.0d (up to end of 2006) Engine: M47TU2D20 The engine was updated again in 2004 as the M47TU2D20. Still at 1995 cc, it produced more power across the range. Applications: * 120 kW (161 hp) and 340 N·m (251 lb·ft) E60/E61 520d E87 120d E90/E91 320d E83 X3 2.0d (end of 2006 onwards) Engine: M57/M57D25 M57D25 was introduced in 2000. Applications: * 166 PS (122 kW; 164 hp) at 4000 rpm, 350 N·m (260 lb·ft) at 2000-2500 rpm with a 4750 rpm redline, models: 2000-2003 E39 525d *Vehicles With Automatic Transmission ONLY* Engine: M57N/M57TU/M57TUD25 M57TUD25 was introduced in 2004. Applications: * 177 PS (130 kW; 175 hp) at 4000 rpm, 400 N·m (300 lb·ft) at 2000-2750 rpm models: E60/E61 525d Engine: M57/M57D30 M57D30, also called M57D29, was introduced in 1998. Applications: * 184 PS (135 kW; 181 hp)@4000, 390 N·m (290 lb·ft)@1750-3200 models: E39 530d *Vehicles With Automatic Transmission ONLY* E46 330d/330xd *Vehicles With Automatic Transmission ONLY* * 184 PS (135 kW; 181 hp)@4000, 410 N·m (300 lb·ft)@2000-3000 models: E38 730d *Vehicles With Automatic Transmission ONLY* E53 X5 3.0d * 193 PS (142 kW; 190 hp)@4000, 410 N·m (300 lb·ft)@1750-3000 models: E38 730d E39 530d Engine: M57N/M57TU/M57TUD30 M57TUD30 was introduced in 2002. It originally produced 160 kW (215 hp) at 4000 rpm and 500 N·m (370 lb·ft) at 2000-2750 rpm, but was tweaked for 150 kW (201 hp) at 4000 rpm and 410 N·m (300 lb·ft) at 1500-3250 rpm for 2003 and again for 200 kW (268 hp) at 4000 rpm and 560 N·m (410 lb·ft) at 2000-2250 rpm in 2004. Applications: * 204 PS (150 kW; 201 hp)@4000, 410 N·m (300 lb·ft)@1500-3250 models: E46 330d/330Cd/330xd E83 X3 3.0d * 218 PS (160 kW; 215 hp)@4000, 500 N·m (370 lb·ft)@2000-2750 models: E53 X5 3.0d E60/E61 530d/530xd E65 730d * 272 PS (200 kW; 268 hp)@4000, 560 N·m (410 lb·ft)@2000-2250 E60/E61 535d * 245 PS (180 kW; 242 hp)@4000, 500 N·m (370 lb·ft)@2000-2250 * 286 PS (210 kW; 282 hp)@4000, 580 N·m (430 lb·ft)@2000-2250 Engine: M57TU2D30 M57TU2D30 was introduced in 2007, making its debut in the facelifted E60 and E61. * M57TU2D30-UL: 197 PS (145 kW; 194 hp) * M57TU2D30-OL: 235 PS (173 kW; 232 hp)@4000, 500 N·m (370 lb·ft)@2000-2750 * M57TU2D30-TOP: 286 PS (210 kW; 282 hp), 580 N·m (430 lb·ft) Applications: * 197 PS (145 kW; 194 hp), 400 N·m (300 lb·ft) models: E90/E91/E92 325d E60/E61 525d/525xd * 231 PS (170 kW; 228 hp)@4000, 500 N·m (370 lb·ft)@2000-2750 models: E65 730d E90/E91 325d E90/E91 330d/330xd * 235 PS (173 kW; 232 hp) models: E60/E61, BMW E70, BMW E71 * 286 PS (210 kW; 282 hp), 580 N·m (430 lb·ft) models: E60/E61 535d E70 X5 3.0sd E71 X6 xDrive35d E83 X3 3.0sd E90/E91 335d The above models are listed for information only if you want to to make sure your engine has valves installed, please contact a competent person. Please note that the information described above is for informational purposes only and does not claim to be reliable. Mr-key.com is not responsible for any repair work you undertake that is related to the topic described in this article.
When you think about cars, what comes to mind? Speed, design, or maybe the feeling of freedom when you hit the open road? But there’s one crucial aspect of driving that you might not think about as much—safety. Cars today are safer than ever, thanks to decades of innovations and advancements. But how did we get here? Let’s dive into the history of car safety features and see just how far we’ve come to protect you and your loved ones on the road. The Early Days: A Lack of Safety Awareness Back in the early 1900s, cars were viewed as luxury items and status symbols. Safety wasn’t really a concern. Cars had no seat belts, no airbags, and certainly no crumple zones. People focused more on making vehicles go faster and look better than on keeping passengers safe. In those days, accidents were far more dangerous, often leading to severe injuries or fatalities. It wasn’t until the rise of car ownership in the 1920s and 1930s that people began to notice just how dangerous cars could be. The growing number of vehicles on the road led to more accidents, and the need for safety features became evident. The Invention of Seat Belts: The First Major Breakthrough Seat belts were one of the first car safety features to be introduced. But they didn’t become standard right away. In fact, the idea of a seat belt first appeared in the late 19th century, designed for use in airplanes, not cars. It wasn’t until the 1950s that the seat belt began to find its way into automobiles, thanks to Swedish engineer Nils Bohlin, who designed the three-point seat belt in 1959. Bohlin’s invention, which you still use today, was a game-changer. It saved countless lives and reduced serious injuries in crashes. Volvo was the first company to introduce the three-point seat belt in their vehicles, and soon after, other manufacturers followed suit. Airbags: A Revolutionary Step Forward As seat belts became more common, automakers started looking for additional ways to protect drivers and passengers. Enter the airbag. The airbag was initially developed in the 1950s, but it took decades of refinement before it became a standard feature in cars. The first production car equipped with an airbag was the 1973 Oldsmobile Toronado, but it wasn’t until the 1990s that airbags became widely available. Today, airbags are a critical component of vehicle safety systems, with front, side, and even curtain airbags designed to protect you from all angles in a crash. Alongside seat belts, airbags are now seen as one of the most effective life-saving technologies in modern vehicles. Crumple Zones: Protecting You in a Collision Crumple zones are another innovation that may not be immediately obvious, but they play a huge role in keeping you safe. In the event of a crash, crumple zones are designed to absorb and dissipate energy, reducing the force transferred to passengers. Introduced in the 1950s by Mercedes-Benz, crumple zones help reduce the impact of a collision by sacrificing the car’s body to protect the occupants. Today, crumple zones are standard in virtually every car, and their design continues to evolve, improving crash safety with each new model year. Anti-lock Brakes: Helping You Keep Control The introduction of anti-lock braking systems (ABS) in the 1970s was another massive leap forward in car safety. ABS prevents the wheels from locking up during braking, which helps maintain steering control during an emergency stop. This system is especially useful on slippery surfaces like rain-soaked or icy roads. Before ABS, sudden braking could lead to skidding, causing drivers to lose control of their vehicles. ABS has significantly reduced the number of accidents caused by loss of control and has become a staple of modern driving safety. Electronic Stability Control: The Technology That Saves Lives Electronic Stability Control (ESC) was a groundbreaking safety feature that hit the market in the 1990s. ESC helps you maintain control of your car during skids or oversteering by automatically applying brakes to individual wheels. Studies have shown that ESC can reduce the risk of a fatal crash by as much as 50%. In fact, the National Highway Traffic Safety Administration (NHTSA) now mandates that all cars sold in the United States come equipped with ESC. This technology has proven to be especially helpful in preventing rollovers, which are among the most dangerous types of accidents. The Future of Car Safety: What’s Next? Car safety features have come a long way, but we’re not done yet. The future of vehicle safety lies in advanced driver-assistance systems (ADAS), which use sensors, cameras, and radar to detect potential hazards and prevent accidents before they happen. Some of the technologies that are becoming increasingly common include lane departure warnings, automatic emergency braking, and adaptive cruise control. And let’s not forget the promise of self-driving cars, which could drastically reduce accidents caused by human error, which accounts for the majority of crashes today. The Importance of Car Safety As we look back on the history of car safety features, it’s incredible to see how far we’ve come. From the early days of no seat belts or airbags to today’s cutting-edge technology, the automotive industry has made safety a top priority. The next time you get behind the wheel, take a moment to appreciate all the safety features designed to protect you. Whether it’s a simple seat belt or a high-tech stability control system, these innovations have made driving safer for everyone. And remember, no matter how advanced your car’s safety systems are, the best protection is still responsible driving. Stay alert, drive safely, and always buckle up!
Removing a key from a lock may seem simple, but it can become tricky when dealing with stuck or broken keys. Whether you're dealing with a standard lock, padlock, or vehicle ignition, understanding the correct techniques can save you from damage and frustration. This guide will walk you through the essential steps for removing keys from various types of locks, offering practical advice and tips to ensure a smooth process. Common Scenarios and Challenges Keys can become stuck or difficult to remove for several reasons, including misalignment, wear and tear, or damage to the key or lock. Additionally, environmental factors like temperature changes can cause metals to expand or contract, making key removal more challenging. Recognizing the cause of the issue is the first step in effectively addressing it. Basic Techniques for Key Removal Gentle Wiggle and Pull: The first technique to try is a gentle wiggle and pull. Hold the key firmly and move it slightly up and down or side to side while pulling gently. This method works well if the key is simply stuck due to misalignment. Lubrication: If the key is difficult to remove, applying a small amount of graphite powder or a silicone-based lubricant into the keyhole can help. Avoid using oil-based lubricants, as they can attract dirt and grime, potentially worsening the problem. Tapping the Lock: For stubborn cases, lightly tapping the lock with a hammer while gently pulling the key can help dislodge it. This method is effective when the key is stuck due to debris or minor misalignments within the lock. Advanced Techniques for Stuck Keys Using a Key Extractor: If the key is broken off inside the lock, a key extractor tool can be very effective. Insert the tool into the keyhole, hook the broken key piece, and pull it out carefully. This method requires patience and a steady hand. Pliers and Tweezers: If part of the key is still protruding, you can use needle-nose pliers or tweezers to grip and pull the key out. Be careful not to apply too much force, as this can push the key further into the lock or damage the lock mechanism. Heat Application: In cold weather, metal contracts, which can cause the key to get stuck. Gently heating the key with a hairdryer or warm cloth can expand the metal slightly, making it easier to remove. However, avoid using an open flame, as it can damage the lock or key. Preventing Key Stuck Issues Prevention is always better than cure. Here are some tips to prevent keys from getting stuck in the future: Regular Maintenance: Keep your locks and keys clean and well-lubricated with appropriate materials. Regularly inspect for wear and tear, and replace any damaged keys or locks. Use Duplicate Keys: If you notice a key becoming difficult to use, have a duplicate made before it breaks or becomes stuck. This will save you the hassle of dealing with a stuck key. Avoid Excessive Force: Never force a key into a lock. If it doesn’t turn easily, stop and inspect both the key and the lock for damage or obstruction. When to Call a Professional While many stuck key issues can be resolved with the techniques mentioned above, there are times when professional assistance is necessary. If you’ve tried all the methods and the key remains stuck, or if you’re dealing with a high-security lock, it’s best to contact a professional locksmith. They have the tools and expertise to safely remove the key without damaging the lock or key further. Dealing with a stuck key can be frustrating, but understanding the proper techniques can save you time and prevent damage. From basic wiggling and lubrication to more advanced methods like using a key extractor, there are various approaches depending on the severity of the situation. Regular maintenance and careful handling can help prevent these issues from occurring in the first place. When in doubt, don’t hesitate to seek professional help to ensure your lock and key remain in good working condition.
We use cookies to personalise content and ads, to provide social media features and to analyse our traffic. We also share information about your use of our site with our social media, advertising and analytics partners who may combine it with other information that you’ve provided to them or that they’ve collected from your use of their services.
Basic
Cookies necessary for the proper functioning of the online store (such as storing products in the cart, sending a forgotten cart reminder by e-mail, etc. )
Ensures security for visitors by preventing cross-site request forgery. This cookie is essential for website and visitor security.
1 day
1st Party
laravel_session
PHP
To store the username of the logged in user. This information is necessary to allow the user to remain logged in to a website without having to submit their username and password for each page visited. Without this cookie, the user cannot move to areas of the website that require authenticated access.
Up to 2 hours
1st Party
__stripe_mid
Stripe
Serves to provide fraud prevention when attempting to shop on the site.
Up to 1 year
3rd Party
Advertisement
Advertising on other websites or platforms, retargeting, remarketing.
This cookie is set by Facebook to deliver advertising when they are on Facebook or a digital platform powered by advertising on Facebook after you visit this website.
2 months
3rd Party
fr
Facebook
The cookie also tracks a user's web behavior on sites that have a Facebook pixel or Facebook social plugin.
-
3rd Party
Analytics
Web controlling, conversion tracking of marketing tools.
Used to reduce the query rate. If Google Analytics is implemented via Google Tag Manager, this cookie will be named _dc_gtm_ .
1 minute
3rd Party
_gac_<property-id>
Google Analytics
Contains campaign-related information about the user. Linked Google Analytics and Google Ads accounts, Google Ads website conversion tags will read this cookie.
90 days
3rd Party
Google Remarketing
Google Analytics
Used to track pages viewed by users that are sent to Google Ads
-
3rd Party
dynx_itemid
Google Analytics
Used to track product ID in Google Ads
-
3rd Party
dynx_pagetype
Google Analytics
Used to track page type in Google Ads
-
3rd Party
dynx_totalvalue
Google Analytics
Used to track product value in Google Ads
3rd Party
dynx_category
Google Analytics
Used for category tracking in Google Ads
-
3rd Party
ga4_analytics
Google Analytics
Serves to process behavior such as setting Google Analytics cookies, sending automatic and enhanced measurement events, and declaring common settings.
3rd Party
Google Conversion Tracking
Google Ads.
Used to transmit order information to Google Ads.
-
3rd Party
conversion ID
Google Ads.
An identification number used to transmit order information to Google Ads.
-
3rd Party
conversion labеl
Google Ads.
A label used to transmit information about successful orders to Google Ads.
-
3rd Party
Additional software
Other external services and software to personalize the user experience.
Cookies are small text files that can be used by websites to make a user's experience more efficient.
The law states that we can store cookies on your device if they are strictly necessary for the operation of this site. For all other types of cookies we need your permission.
This site uses different types of cookies. Some cookies are placed by third party services that appear on our pages.
You can at any time change or withdraw your consent from the Cookie Declaration on our website.
Learn more about who we are, how you can contact us and how we process personal data in our Privacy Policy.
Please state your consent ID and date when you contact us regarding your consent.


 (1)_1736344531.jpg)
 (1)_1736346373.jpg)
 (1)_1736340291.jpeg)