Simple Tips to Free a Stuck Lock: What You Need to Know
29.10.2024
Locks are meant to provide security, but when they seize up, they can leave you feeling frustrated and helpless. Dealing with a stuck lock is more common than you might think, and thankfully, there are affordable and effective solutions to get it working smoothly again. Whether it's a car door, trunk, or your home lock, here are some tried-and-true methods to free up a jammed lock.
Why Locks Seize Up
Understanding the causes behind a stuck lock can help you prevent it from happening in the future. Locks can seize up for various reasons:
Dirt and Debris: Over time, dust, grime, or even small particles can accumulate inside the lock mechanism, making it harder for the internal parts to move smoothly.
Rust and Corrosion: Exposure to moisture, humidity, or salty air can lead to rust buildup on metal parts within the lock, which can prevent movement.
Lack of Lubrication: Locks need to be lubricated occasionally to ensure smooth operation. Without lubrication, friction increases, and the lock may eventually jam.
Now, let’s look at some simple steps to tackle a seized lock.
Step 1: Use Graphite Powder or Dry Lubricant
The first thing to try is applying a lubricant, but be careful about what type you use. Wet or oil-based lubricants can attract dust, which eventually clogs the lock.
Graphite Powder: This is one of the best options for freeing up a stuck lock. Sprinkle a small amount of graphite powder into the keyhole, insert the key, and gently move it back and forth. This spreads the graphite, reducing friction and allowing the lock components to move more freely.
Dry Lubricants: These are specifically designed for locks and are ideal for situations where you want to avoid residue buildup. Spray a small amount into the lock, then insert the key and gently turn it.
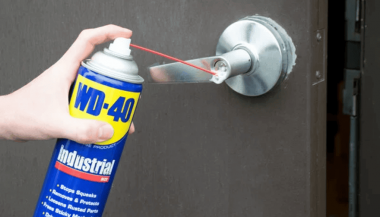
Pro Tip: Avoid using regular WD-40 or other oil-based products, as they may lead to a buildup over time, making the problem worse.
Step 2: Try the Key with Gentle Force
If lubrication alone doesn’t do the trick, the next step is to use a little gentle force with your key. Be cautious here; applying too much force could break the key inside the lock.
Insert the Key: Once the lubricant has been applied, insert the key fully into the lock.
Wiggle Carefully: Gently wiggle and turn the key without applying too much force. This movement may help distribute the lubricant further and gradually loosen up any stuck components.
Caution: If you feel excessive resistance, don’t force the key. Forcing it can cause damage or even snap the key, which would require additional assistance to remove.
Step 3: Warm Up the Lock (Especially Useful for Cold Weather)
Cold temperatures can cause locks to seize due to ice or metal contraction. If you suspect the cold is the issue, warming up the lock can be effective.
Use a Hair Dryer: Direct warm air onto the lock for several minutes to allow the metal to expand and the ice (if any) to melt.
Heat the Key: You can also try warming the key slightly with a lighter, but exercise caution and make sure it isn’t too hot before inserting it into the lock.
Safety Note: Avoid open flames directly on the lock itself, as this can damage surrounding surfaces or even warp the lock mechanism.
Step 4: Use a Vinegar Solution for Corroded Locks
If rust is the culprit, vinegar is a great household solution for loosening rust and corrosion in a lock.
Apply Vinegar: Put a few drops of vinegar on the key, insert it into the lock, and let it sit for a minute or two. Vinegar can help dissolve light rust, making it easier to turn the key.
Follow with Lubricant: After using vinegar, apply a small amount of graphite powder or dry lubricant to ensure the lock remains smooth and functional.
Step 5: Work with Compressed Air to Remove Debris
If dirt or debris has accumulated inside the lock, compressed air is a quick and efficient way to clear it out.
Blow Out Dust: Use a can of compressed air and direct the nozzle into the keyhole. Short bursts of air can blow out dust and small debris that may be obstructing the mechanism.
Follow Up: After using compressed air, it’s a good idea to add a dry lubricant to prevent any remaining dust from causing future jams.
How to Prevent Lock Seizure in the Future
Once you’ve successfully freed a seized lock, it’s helpful to take steps to prevent it from happening again. Here are some preventive tips:
Regularly Lubricate: Use a dry lubricant or graphite powder once or twice a year, especially if you live in a humid or dusty area.
Keep Locks Clean: Wipe off any visible dirt or dust around the lock mechanism. If the lock is exposed to elements (like outdoor or car locks), covering it can help keep debris and moisture out.
Avoid Overusing Keys: If your key shows signs of wear, consider getting a replacement. Worn-out keys can cause more friction inside the lock, leading to jams.
When to Seek Professional Help
Sometimes, despite your best efforts, a lock just won’t budge. In cases where the lock is significantly damaged, heavily corroded, or if the key breaks inside, it’s best to reach out for professional assistance. A professional has specialized tools and expertise to address these issues without causing further damage.
Taking Care of Your Locks
A stuck lock can be an inconvenience, but by following these simple steps and using a little patience, you can often resolve the issue without professional help. Keeping locks in good condition with regular care is the key to ensuring they function smoothly for years to come.
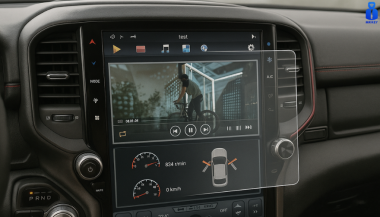
Cars and vehicles nowadays often include large touchscreen navigation systems that are prone to scratches, fingerprints and cracks. These displays are expensive to replace – one owner reported a factory infotainment screen costing over $3,000 to swap out – so protecting them is crucial. That’s where navigation screen protectors come in. The two main options are hydrogel film protectors and tempered glass protectors . Below, we compare hydrogel vs tempered glass for car navigation screens, looking at fit, durability, clarity and more, so you can choose the best protection for your car. Hydrogel vs Tempered Glass: The Essentials Tempered glass protectors A rigid, hard 9H glass shield. Excellent scratch resistance, very clear, and feels like the original screen. Best for completely flat displays. Hydrogel protectors A flexible, self-healing polymer film originally used in aviation and military applications. Ultra-thin, edge-to-edge fit, excellent for curved or uniquely shaped screens. Key difference: Hydrogel bends. Tempered glass doesn’t. Fit & Coverage (Hydrogel Wins) Modern cars often have curved or tapered displays. Tempered glass cannot follow these shapes, leaving exposed edges, air gaps or weak adhesion points. Hydrogel protectors conform perfectly to flat, curved and 3D-shaped screens. They wrap the edges, eliminate halo gaps, and achieve full-surface coverage. If your car’s screen isn’t perfectly flat, hydrogel is the correct choice. Scratch & Impact Protection Tempered glass: Extremely resistant to scratches Can crack on impact, sacrificing itself to protect the screen Once cracked, must be replaced Hydrogel: Softer surface, but self-heals micro-scratches over time Doesn’t shatter; absorbs everyday bumps Ideal for preventing long-term wear and swirl marks Glass is harder; hydrogel stays clearer longer thanks to self-healing. Clarity, Glare & Touch Sensitivity Both types maintain high clarity and touch accuracy, but behave differently in real use: Tempered glass: Ultra-clear Glossy surface shows fingerprints easily Good touch response Hydrogel: Crystal-clear or matte anti-glare options Reduces reflections in sunlight — very useful in cars Zero touch interference due to ultra-thin structure Minor micro-bubbles self-resolve within hours If you drive in bright sun or hate fingerprint shine, hydrogel’s matte option is a major advantage. Installation & Removal Tempered glass: Simple dry install One-shot alignment Rigid, so easy to place but unforgiving if misaligned Hydrogel: Dry or wet install Allows micro-adjustments Easy bubble removal No cracking during installation Removal is simple for both, though hydrogel is safer (no glass shards, no risk of breakage during removal). If you want to learn more about how to install your hydrogel navigation screen protector visit our guide. Which Should You Choose? For general car owners with modern infotainment systems, the winner is clear: ✔ Hydrogel protectors are better for most car navigation screens. Why: Perfect fit on curved screens Self-healing surface Anti-glare options Full edge-to-edge coverage Zero loss in touch sensitivity Tempered glass is fine for older or perfectly flat screens — but today’s automotive displays benefit more from hydrogel technology. FAQ Does a navigation screen really need protection? Yes. Screens scratch easily, attract fingerprints, and are expensive to replace. A protector preserves clarity and resale value. Is hydrogel or tempered glass better overall? Hydrogel — unless your screen is perfectly flat. It fits better, reduces glare, and self-heals surface scratches. Will a protector affect touch response? No. Both types maintain excellent touch accuracy. Hydrogel is especially responsive due to its thin, adaptive structure. How do I protect my screen from fingerprints and glare? Use a matte hydrogel film. For more techniques, see our guide on [ How to Protect Your Car’s Navigation Screen from Scratches, Glare & Fingerprints ] . Which cars benefit most from hydrogel protection? Any model with curved, large, glossy or high-resolution displays. See our model list: [ Which Cars Benefit Most From Hydrogel Navigation Protection? ] . For custom-cut hydrogel protectors for your exact car model, visit mr-key.com . Related Guides How to Protect Your Car’s Navigation Screen from Scratches, Glare & Fingerprints How to Install a Hydrogel Navigation Screen Protector Which Cars Benefit Most From Hydrogel Navigation Protection?
Car keys and locks are everyday essentials that we often take for granted—until they malfunction. From ensuring the longevity of your car keys to properly lubricating locks for smooth operation, maintenance plays a vital role in avoiding inconvenience and costly repairs. In this guide, we explore how to care for your car keys and master the art of lock lubrication. Common Issues with Car Keys and How to Prevent Them Car keys are more than just tools; they’re lifelines to your vehicle. Whether you have a traditional metal key or an advanced smart key, these essential devices are prone to wear and tear. Understanding common problems and their solutions can save you time and stress. 1. Worn-Out Key Blades Over time, the metal blades of traditional car keys can become worn, making it difficult to start your car. This is especially common in keys used frequently or roughly. To prevent this, avoid using your car key for tasks like opening packages or prying objects. 2. Weak Key Fob Batteries For those with remote or smart keys, a weak battery is a common issue. A fading signal or difficulty locking/unlocking your car remotely are signs it’s time for a battery replacement. Replacing the battery every 1-2 years can help maintain consistent performance. 3. Scratched or Damaged Smart Keys Smart keys have sensitive electronics that can be damaged by rough handling or exposure to extreme temperatures. Always store your key in a protective case and keep it away from direct sunlight or freezing conditions. Pro Tip: Always have a spare key on hand. This not only saves time during emergencies but also reduces the wear on your primary key. Why Locks Need Regular Lubrication Locks are intricate mechanisms designed to provide security. However, dirt, grime, and regular use can cause them to stick or malfunction. Lubrication ensures smooth operation and prevents long-term damage. How Locks Deteriorate Locks endure constant exposure to the elements, which makes them vulnerable to dirt, dust, and moisture. Over time, these factors can lead to stiffness, making it difficult to turn the key. If left unchecked, the lock may become entirely unusable, requiring costly replacement. Choosing the Right Lock Lubricant Not all lubricants are created equal, and choosing the right one is crucial for maintaining your locks. Here are the best options: Graphite Powder This dry lubricant is a top choice for locks. It doesn’t attract dust and provides smooth operation without residue build-up. Silicone Spray Silicone-based sprays offer moisture resistance and work well for both interior and exterior locks. Avoid over-applying, as excess lubricant can attract grime. Avoid Oil-Based Lubricants Products like WD-40 may seem convenient but are not ideal for locks. They can attract dirt and worsen the problem over time. Step-by-Step Guide to Lubricating a Lock Follow these steps to keep your locks functioning flawlessly: Clean the Lock Begin by removing visible dirt and debris using a soft brush or compressed air. This ensures the lubricant can reach internal components effectively. Apply Lubricant Insert the nozzle of your lubricant into the keyhole and spray or apply a small amount. If using graphite powder, gently squeeze the bottle to distribute the powder evenly. Insert and Turn the Key Insert your key and turn it several times to distribute the lubricant throughout the lock mechanism. Test the Lock Check the lock’s operation by locking and unlocking it multiple times. If it still feels stiff, reapply a small amount of lubricant. Pro Tip: Lubricate locks every 6-12 months, or more frequently if they’re exposed to harsh weather conditions. Maintenance Tips for Long-Term Performance 1. Protect Outdoor Locks For locks exposed to the elements, such as gates or sheds, consider using a lock cover to shield them from rain and snow. Regularly inspect and lubricate these locks to prevent rust and corrosion. 2. Store Spare Keys Properly Spare keys should be kept in a safe, dry place. Avoid leaving them in areas with high humidity, as moisture can lead to rust on metal keys. 3. Address Issues Early If you notice stiffness or difficulty turning a key, address the issue immediately. Ignoring minor problems can lead to complete lock failure. The Global Perspective on Lock and Key Maintenance Different regions face unique challenges when it comes to maintaining locks and keys. In cold climates, freezing temperatures can cause locks to seize, requiring specialized de-icing sprays. In humid or coastal areas, locks are more prone to rust and may need frequent lubrication to combat corrosion. Meanwhile, digital locks are becoming increasingly popular in urban areas worldwide. These systems require their own maintenance, such as software updates and battery replacements, to ensure optimal functionality. A Little Maintenance Goes a Long Way Caring for your car keys and locks is a small investment of time that can save you from major inconveniences. By taking preventative steps like lubricating locks and protecting your keys, you can ensure their longevity and performance. Take a moment today to inspect your keys and locks. Are they in optimal condition? If not, a quick round of maintenance can make all the difference. For more insights on maintaining your everyday essentials, explore our other articles and unlock the secrets to hassle-free living.
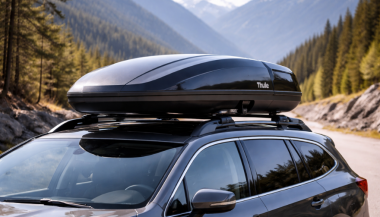
Losing a roof rack key is more common than manufacturers like to admit. The good news: it's almost always solvable — quickly, cheaply, and without a locksmith. Here's the exact sequence to follow, from the moment you realise the key is gone. Step 1: Don't Panic — and Don't Force It The first instinct is to try to open the lock anyway. Don't. Forcing a barrel lock with the wrong tool damages the cylinder, strips the keyway, and turns a simple €8 key replacement into a €40 lock cylinder replacement. Leave the lock alone until you have the right key or professional help. Step 2: Check for the Key Code Before you do anything else, find your key code. This is the number stamped on your lock barrel, printed on your original key card, or listed in your rack documentation. Where to look: The lock face — look at the front of any lock point on your rack. The code is usually stamped directly on the metal Your original key — if you have one remaining key, the code is often stamped on the bow (the flat grip section) Paperwork — the key card or code card that came with your rack at purchase Registration confirmation — if you registered your rack online with Thule, Yakima, or Mont Blanc, the code may be on your account Found the code? You're done with the hard part. Jump to Step 5. No code visible? Continue to Step 3. Step 3: Photograph the Lock Take a clear, close-up photograph of the lock face in good light. This photo can do two things: Help a specialist identify your key — experienced suppliers can often determine the correct key from the keyway profile and any partial stamping visible in a photo Help a locksmith decode the lock — a physical locksmith can sometimes read the code from the lock face or decode it by impression Send the photo to a specialist before assuming you're stuck. Step 4: Identify Your Brand and Model If the code is genuinely unreadable, your brand and rack model narrows down the options considerably. Thule — uses N-series codes (N001–N200+), stamped on the lock barrel. If you know your N-code, the key is in stock. Yakima — uses SKS (Same Key System) codes, typically found on the lock core. Common range: SKS-101 to SKS-132+. Mont Blanc — numeric code system, on a sticker inside the lock or on the original key card. GIVI — code found on the product label or lock face. Other brands — most use ISO-standard barrel formats with numeric codes. Once you have brand + model, a specialist supplier can suggest the most likely code ranges for your rack generation and help you narrow it down. Step 5: Order the Replacement Key With your code confirmed, ordering is straightforward. What you need to provide: Brand (Thule, Yakima, Mont Blanc, GIVI, other) Exact key code (e.g. N121, SKS-115) Quantity — we recommend ordering two: one replacement and one spare From mr-key.com, keys ship to most European destinations within 2–5 business days . No locksmith. No dealer visit. No full rack replacement. Step 6: What If You Still Can't Unlock the Rack? If you have cargo on the rack that you need to remove urgently — bikes, a roof box, ski equipment — and you cannot wait for a replacement key, you have limited but real options. Option A: Call a locksmith A locksmith experienced with barrel locks can open your rack lock without damage and, in many cases, cut you a working key on the spot. This costs €50–€120 depending on location and time of day. Option B: Contact your rack manufacturer Thule and Yakima both have customer service lines. With proof of purchase or registered ownership, they may be able to supply a replacement key or lock service. Option C: Remove the lock cylinder On some rack models, the lock cylinder can be removed from the outside with the rack foot or arm partially dismantled. This requires mechanical confidence and the correct tools — consult your rack's installation manual first. Once the cylinder is out, a locksmith can decode it or you can replace it entirely. Roof Rack After the Crisis: What to Do Next Once you have access and a replacement key in hand, take 10 minutes to prevent this from happening again. Photograph your key code. Take a photo of the code stamped on your lock face. Store it in cloud storage or email it to yourself with the subject line "roof rack key code — [your rack brand]." Buy a spare key. It costs less than €10. Keep it somewhere separate from your main keyring — a drawer at home, your work locker, your other car. Register your rack. Thule and Yakima both offer product registration. Registering links your key code to your account, making future replacements instant. Label your key. If you have multiple sets of keys — car, house, garage, rack — label your rack key clearly so it's never confused and never left behind. Roof Rack Key Replacement: Brand-by-Brand Quick Reference Brand Where to Find Code Key Format Notes Thule Stamped on lock face N001–N200+ One-Key System: one code for all locks Yakima On lock core SKS-101–SKS-132+ Same Key System: one code for all locks Mont Blanc Inside lock or key card Numeric Sticker sometimes fades — check paperwork GIVI Product label or lock face Numeric Primarily motorcycle/touring racks Kamei / G3 / Farad Lock face or documentation Varies Contact supplier with photo if unsure FAQ Q: I lost both keys — can I still get a replacement? A: Yes. The key code is stamped on the lock itself, not on the key. As long as you can read the code on the lock face, you can order a replacement. If the code is unreadable, send a photo to a specialist supplier. Q: My rack is second-hand and came with no keys — what are my options? A: Check the lock face for a stamped code. If none is visible, a locksmith can decode the lock. Alternatively, order a replacement lock cylinder for your rack model — it will arrive with new keys and a new code. Q: How long will a locksmith take to open a roof rack lock? A: Most experienced locksmiths can open a barrel-style rack lock in under 10 minutes. The challenge is finding one who works on non-automotive locks — call ahead and confirm. Q: Can I drill out a roof rack lock myself? A: Technically yes, but this destroys the lock cylinder and leaves your rack unsecurable until you replace the full lock assembly. Only consider this if the cargo is time-critical and a locksmith is not available. Q: Will my insurance cover a lost roof rack key? A: Home contents or vehicle insurance sometimes covers key replacement, including accessories like rack locks. Check your policy — the cost of a specialist supplier is low, but it's worth reclaiming if covered. Q: I found a spare key in my car — how do I know if it's the right one? A: Try it carefully and gently. If it inserts smoothly and turns without force, it's the correct key. If it doesn't insert fully or requires force, stop — it's the wrong profile and forcing it risks damaging the cylinder. Q: Can I order a replacement key for an old rack that's no longer sold? A: In most cases yes. Key codes from established brands like Thule and Yakima remain in production for decades. Discontinued rack models still use the same N-series or SKS key codes. Get Your Replacement Key Today You know the code. You know the process. Don't leave it until the next trip. Visit mr-key.com to order your replacement roof rack key by brand and code. We ship to Germany, France, Italy, Greece, Netherlands, Romania, Spain, the UK, and across Europe — with tracking on every order. → Order Your Roof Rack Key at mr-key.com Also read: The Complete Guide to Roof Rack Replacement Keys | Thule Roof Rack Key Replacement: How to Find Your Code and Order the Right Key
Regular lock maintenance is essential to prevent key jamming or lock failure. Proper lubrication reduces wear and tear, ensures smooth operation, and extends the lifespan of your locks. A well-lubricated lock decreases the risk of your key getting stuck or breaking inside the lock—an inconvenient and costly problem. At MR-KEY , we understand the importance of well-maintained locks and want to help you keep yours in top condition. How Often Should You Lubricate Your Locks? For most locks, lubricating them every three to six months is sufficient. However, locks exposed to extreme weather conditions—such as those on towbars, roof racks, or outdoor gates—require more frequent maintenance. Rain, dust, and freezing temperatures can cause internal components to stick, making it difficult to insert or turn the key. If you notice resistance when using a lock, it’s time for lubrication. What Lubricant Should You Use for Locks? Choosing the right lubricant is crucial for long-term lock performance. Here are the best options: • Teflon-based (PTFE) spray – Forms a protective film inside the lock, reducing friction and repelling dust buildup. • Dry silicone spray – Excellent for outdoor locks as it resists moisture without attracting dirt. • WD-40 Specialist Dry PTFE or White Lithium Grease – Unlike regular WD-40, these provide long-lasting lubrication and protection against corrosion. • Graphite powder – A great choice for older locks but should not be used if there’s oil residue inside the lock. While WD-40 Multi-Use is a quick fix for stuck locks, it is primarily a cleaner rather than a long-term lubricant. If used, follow up with a dry lubricant to prevent dirt accumulation inside the lock. How to Lubricate a Lock If your lock is functioning properly but feels slightly stiff, follow these steps: 1. Clean the Lock – Insert and remove the key a few times to dislodge debris, wiping it clean each time. 2. Apply the Lubricant – Insert the spray straw into the keyhole and apply two short bursts of lubricant. 3. Work the Lock – Insert and turn the key multiple times to distribute the lubricant inside. 4. Wipe Excess Lubricant – Remove any residue from the key and lock exterior to prevent dirt buildup. For graphite powder , follow the manufacturer’s specific instructions, as overapplication can lead to clumping inside the lock. Special Care for Towbar and Roof Rack Locks Locks on towbars and roof racks are exposed to harsher conditions than typical door locks. To keep them in good shape: • Regularly inspect them for stiffness or corrosion. • Apply dry silicone spray or PTFE lubricant for lasting protection. • If the lock is exposed to frequent moisture, white lithium grease offers superior water resistance. Lock It in: The Key to Long-Lasting Security Regular lock maintenance is a small effort that prevents big problems. By keeping your locks clean and properly lubricated—especially those exposed to the elements—you can avoid costly repairs and ensure they function smoothly for years. For high-quality lock maintenance products, visit MR-KEY and keep your locks in perfect working condition. A little maintenance goes a long way in ensuring security and peace of mind!
We use cookies to personalise content and ads, to provide social media features and to analyse our traffic. We also share information about your use of our site with our social media, advertising and analytics partners who may combine it with other information that you’ve provided to them or that they’ve collected from your use of their services.
Basic
Cookies necessary for the proper functioning of the online store (such as storing products in the cart, sending a forgotten cart reminder by e-mail, etc. )
Ensures security for visitors by preventing cross-site request forgery. This cookie is essential for website and visitor security.
1 day
1st Party
laravel_session
PHP
To store the username of the logged in user. This information is necessary to allow the user to remain logged in to a website without having to submit their username and password for each page visited. Without this cookie, the user cannot move to areas of the website that require authenticated access.
Up to 2 hours
1st Party
__stripe_mid
Stripe
Serves to provide fraud prevention when attempting to shop on the site.
Up to 1 year
3rd Party
Advertisement
Advertising on other websites or platforms, retargeting, remarketing.
This cookie is set by Facebook to deliver advertising when they are on Facebook or a digital platform powered by advertising on Facebook after you visit this website.
2 months
3rd Party
fr
Facebook
The cookie also tracks a user's web behavior on sites that have a Facebook pixel or Facebook social plugin.
-
3rd Party
Analytics
Web controlling, conversion tracking of marketing tools.
Used to reduce the query rate. If Google Analytics is implemented via Google Tag Manager, this cookie will be named _dc_gtm_ .
1 minute
3rd Party
_gac_<property-id>
Google Analytics
Contains campaign-related information about the user. Linked Google Analytics and Google Ads accounts, Google Ads website conversion tags will read this cookie.
90 days
3rd Party
Google Remarketing
Google Analytics
Used to track pages viewed by users that are sent to Google Ads
-
3rd Party
dynx_itemid
Google Analytics
Used to track product ID in Google Ads
-
3rd Party
dynx_pagetype
Google Analytics
Used to track page type in Google Ads
-
3rd Party
dynx_totalvalue
Google Analytics
Used to track product value in Google Ads
3rd Party
dynx_category
Google Analytics
Used for category tracking in Google Ads
-
3rd Party
ga4_analytics
Google Analytics
Serves to process behavior such as setting Google Analytics cookies, sending automatic and enhanced measurement events, and declaring common settings.
3rd Party
Google Conversion Tracking
Google Ads.
Used to transmit order information to Google Ads.
-
3rd Party
conversion ID
Google Ads.
An identification number used to transmit order information to Google Ads.
-
3rd Party
conversion labеl
Google Ads.
A label used to transmit information about successful orders to Google Ads.
-
3rd Party
Additional software
Other external services and software to personalize the user experience.
Cookies are small text files that can be used by websites to make a user's experience more efficient.
The law states that we can store cookies on your device if they are strictly necessary for the operation of this site. For all other types of cookies we need your permission.
This site uses different types of cookies. Some cookies are placed by third party services that appear on our pages.
You can at any time change or withdraw your consent from the Cookie Declaration on our website.
Learn more about who we are, how you can contact us and how we process personal data in our Privacy Policy.
Please state your consent ID and date when you contact us regarding your consent.


 (1)_1737723462.jpg)