Simple Tips to Free a Stuck Lock: What You Need to Know
29.10.2024
Locks are meant to provide security, but when they seize up, they can leave you feeling frustrated and helpless. Dealing with a stuck lock is more common than you might think, and thankfully, there are affordable and effective solutions to get it working smoothly again. Whether it's a car door, trunk, or your home lock, here are some tried-and-true methods to free up a jammed lock.
Why Locks Seize Up
Understanding the causes behind a stuck lock can help you prevent it from happening in the future. Locks can seize up for various reasons:
Dirt and Debris: Over time, dust, grime, or even small particles can accumulate inside the lock mechanism, making it harder for the internal parts to move smoothly.
Rust and Corrosion: Exposure to moisture, humidity, or salty air can lead to rust buildup on metal parts within the lock, which can prevent movement.
Lack of Lubrication: Locks need to be lubricated occasionally to ensure smooth operation. Without lubrication, friction increases, and the lock may eventually jam.
Now, let’s look at some simple steps to tackle a seized lock.
Step 1: Use Graphite Powder or Dry Lubricant
The first thing to try is applying a lubricant, but be careful about what type you use. Wet or oil-based lubricants can attract dust, which eventually clogs the lock.
Graphite Powder: This is one of the best options for freeing up a stuck lock. Sprinkle a small amount of graphite powder into the keyhole, insert the key, and gently move it back and forth. This spreads the graphite, reducing friction and allowing the lock components to move more freely.
Dry Lubricants: These are specifically designed for locks and are ideal for situations where you want to avoid residue buildup. Spray a small amount into the lock, then insert the key and gently turn it.
Pro Tip: Avoid using regular WD-40 or other oil-based products, as they may lead to a buildup over time, making the problem worse.
Step 2: Try the Key with Gentle Force
If lubrication alone doesn’t do the trick, the next step is to use a little gentle force with your key. Be cautious here; applying too much force could break the key inside the lock.
Insert the Key: Once the lubricant has been applied, insert the key fully into the lock.
Wiggle Carefully: Gently wiggle and turn the key without applying too much force. This movement may help distribute the lubricant further and gradually loosen up any stuck components.
Caution: If you feel excessive resistance, don’t force the key. Forcing it can cause damage or even snap the key, which would require additional assistance to remove.
Step 3: Warm Up the Lock (Especially Useful for Cold Weather)
Cold temperatures can cause locks to seize due to ice or metal contraction. If you suspect the cold is the issue, warming up the lock can be effective.
Use a Hair Dryer: Direct warm air onto the lock for several minutes to allow the metal to expand and the ice (if any) to melt.
Heat the Key: You can also try warming the key slightly with a lighter, but exercise caution and make sure it isn’t too hot before inserting it into the lock.
Safety Note: Avoid open flames directly on the lock itself, as this can damage surrounding surfaces or even warp the lock mechanism.
Step 4: Use a Vinegar Solution for Corroded Locks
If rust is the culprit, vinegar is a great household solution for loosening rust and corrosion in a lock.
Apply Vinegar: Put a few drops of vinegar on the key, insert it into the lock, and let it sit for a minute or two. Vinegar can help dissolve light rust, making it easier to turn the key.
Follow with Lubricant: After using vinegar, apply a small amount of graphite powder or dry lubricant to ensure the lock remains smooth and functional.
Step 5: Work with Compressed Air to Remove Debris
If dirt or debris has accumulated inside the lock, compressed air is a quick and efficient way to clear it out.
Blow Out Dust: Use a can of compressed air and direct the nozzle into the keyhole. Short bursts of air can blow out dust and small debris that may be obstructing the mechanism.
Follow Up: After using compressed air, it’s a good idea to add a dry lubricant to prevent any remaining dust from causing future jams.
How to Prevent Lock Seizure in the Future
Once you’ve successfully freed a seized lock, it’s helpful to take steps to prevent it from happening again. Here are some preventive tips:
Regularly Lubricate: Use a dry lubricant or graphite powder once or twice a year, especially if you live in a humid or dusty area.
Keep Locks Clean: Wipe off any visible dirt or dust around the lock mechanism. If the lock is exposed to elements (like outdoor or car locks), covering it can help keep debris and moisture out.
Avoid Overusing Keys: If your key shows signs of wear, consider getting a replacement. Worn-out keys can cause more friction inside the lock, leading to jams.
When to Seek Professional Help
Sometimes, despite your best efforts, a lock just won’t budge. In cases where the lock is significantly damaged, heavily corroded, or if the key breaks inside, it’s best to reach out for professional assistance. A professional has specialized tools and expertise to address these issues without causing further damage.
Taking Care of Your Locks
A stuck lock can be an inconvenience, but by following these simple steps and using a little patience, you can often resolve the issue without professional help. Keeping locks in good condition with regular care is the key to ensuring they function smoothly for years to come.
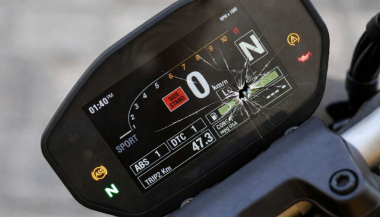
Motorcycle TFT displays are no longer simple speedometers. They are high-resolution computers bonded to glass, sealed against weather, coded to the bike’s electronics, and integrated into safety systems. When a broken TFT display happens, the bill is rarely just “a screen.” Below is the most complete, Europe-focused breakdown of motorcycle display replacement cost you’ll find online—built for riders who are actively searching for replacement prices and real-world risks. What Actually Breaks When a TFT Display Fails A TFT failure is rarely cosmetic. Modern displays are laminated units. Damage spreads. Common failure modes Cracked outer glass → moisture ingress follows Dead pixels or pixel lines → panel failure, not fixable Water ingress / condensation → corrosion of PCB and connectors Sun delamination → layers separate, image fades or ghosts Complete blackout → power board or CAN communication fault Once moisture enters, replacement—not repair—is the only OEM-approved path. Motorcycle Display Replacement Cost (Europe, Real Numbers) These are OEM replacement ranges in Europe, excluding insurance, based on dealer parts pricing, labour, and required coding. Brand Typical TFT Replacement Cost (€) Yamaha €650 – €1,400 BMW €1,200 – €2,500 Honda €800 – €1,800 Triumph €900 – €2,000 Kawasaki €700 – €1,600 Important: These are not worst-case numbers. They are normal dealer outcomes once a display is declared faulty. Why TFT Replacement Is So Expensive 1. The screen is bonded, not modular You cannot replace “just the glass.” The LCD, digitizer, polarizer, and control board are sealed together. 2. Coding & pairing is often mandatory Many TFT units must be coded to the ECU / immobiliser . Without dealer software: Warning lights remain Ride modes may not function Service intervals can’t be reset This adds labour and eliminates cheap aftermarket options. 3. Dead pixels = full replacement Unlike TVs or phones, dead pixels on motorcycle TFTs are not serviceable . OEM policy treats this as a safety-critical component. 4. Water ingress escalates damage fast Condensation today becomes corrosion tomorrow. Displays that “still work” often fail weeks later. The Most Expensive Damage Types (Ranked) Water ingress / condensation Often invisible at first Leads to PCB corrosion Almost always ends in full replacement Dead pixels / pixel columns Caused by pressure, UV heat, or micro-fractures No repair path Cracked glass Immediate usability loss Allows moisture entry Sun delamination Common on bikes parked outdoors Progressive, irreversible Real-World Cost Example (BMW vs Yamaha) BMW adventure / sport models TFT unit: €1,500–€2,200 Coding & labour: €200–€400 Total: €1,700–€2,600 Yamaha mid-range models TFT unit: €700–€1,100 Labour: €100–€250 Total: €800–€1,350 Same problem. Vastly different outcomes. Why “Used” or eBay TFT Displays Are Risky Many riders try to save money this way. Most regret it. VIN or ECU mismatch Immobiliser conflicts No warranty Hidden moisture damage Dealer refusal to code A used TFT that fails after installation means paying twice . The Preventable Part: Surface Damage That Starts It All Most catastrophic failures start small: Fine scratches Stone impacts UV exposure Heat cycling Once the protective surface is compromised, water ingress and pixel failure follow . That’s why many riders choose hydrogel motorcycle screen protectors —they absorb impact, self-heal micro-scratches, and add a moisture barrier without affecting visibility. You can browse motorcycle screen protectors by brand and model here → Motorcycle TFT screen protectors for Yamaha, BMW, Honda, Triumph & Kawasaki . (Exact fit matters. Generic films do not.) What Dealers Rarely Warn You About Condensation voids goodwill claims Pixel defects worsen with time Sun damage is considered “wear” Even hairline cracks can invalidate warranty By the time you ask for a quote, the outcome is usually decided. FAQ — Motorcycle TFT Display Replacement How much does a motorcycle TFT display cost to replace? In Europe, expect €650 to €2,500+ , depending on brand, model, and coding requirements. Can dead pixels be repaired? No. Dead pixels mean full TFT replacement on modern motorcycles. Is condensation inside the display dangerous? Yes. Condensation indicates seal failure and usually leads to corrosion and total failure. Can I ride with a broken TFT display? Often no. Many bikes rely on the TFT for warnings, modes, and diagnostics. Does a screen protector really help? Yes—for scratch prevention, impact absorption, and moisture protection . It cannot fix damage, but it significantly reduces risk. Are aftermarket TFT displays a safe option? Rarely. Most lack proper integration, coding support, or durability. Protecting a €1,500 Part Costs a Fraction A motorcycle TFT display is one of the most expensive components on your bike that faces direct impact, UV exposure, heat, and water—every ride . If you want model-specific protection designed for your exact display shape, visit our shop at mr-key.com and choose the right motorcycle screen protector for your bike.
A Journey Through Time Imagine holding a car key from 1920 and trying to start a modern electric vehicle. The mere concept of what a “car key” represents has undergone a profound transformation, reflecting changes in automotive technology, security, and convenience. From simple mechanical tools to sophisticated digital devices, car keys have evolved alongside the vehicles they unlock. But how did we get here, and what does the future hold for this essential accessory? The Humble Beginnings: Mechanical Keys The car key’s story begins in the early 20th century, a time when cars were a luxury rather than a necessity. Early automobiles didn’t require keys as we know them today. Drivers used manual cranks to start the engine, a labor-intensive and often hazardous process. By the 1920s, the first generation of mechanical car keys emerged. These keys were simple, utilitarian devices used to lock the vehicle’s ignition or steering mechanisms. They marked the beginning of an era where security and convenience started to merge. Key features of early car keys included: A straightforward design, often a single-sided cut metal key. Limited security, as locks were rudimentary and easily picked. Despite their simplicity, these keys represented a revolutionary leap in vehicle security and usability. Entering the Electric Era: Ignition and Beyond The 1940s and 1950s saw a significant evolution in car keys with the introduction of ignition locks. These new systems required a key to start the vehicle, making cars both safer and easier to use. Manufacturers like Chrysler pioneered these innovations, creating a standard that would dominate for decades. The electric ignition systems introduced: A dual-purpose functionality: keys could unlock doors and start engines. Enhanced security, discouraging theft by eliminating manual starts. However, as automotive theft techniques became more sophisticated, so did the need for better security measures. The Advent of Remote Keyless Entry The 1980s and 1990s marked a pivotal period in the evolution of car keys with the introduction of remote keyless entry (RKE) systems. These keys included a built-in transmitter, allowing drivers to lock and unlock their cars with the push of a button. This innovation redefined convenience and set the stage for a digital future. Key highlights of RKE systems: Enhanced security with encrypted signals to prevent unauthorized access. Added features such as panic buttons and trunk releases. For many, the ability to control their car remotely became synonymous with modern luxury and convenience. Smart Keys and Digital Transformation As the 21st century arrived, car keys underwent another transformation, becoming “smart.” These keys, often shaped more like fobs than traditional keys, allowed for keyless ignition and entry. Equipped with proximity sensors, smart keys automatically unlock doors and start engines when the fob is nearby. Features of smart keys include: Passive entry and start systems, eliminating the need to physically insert a key. Advanced encryption technologies to combat modern car theft tactics. Automotive giants such as Mercedes-Benz and BMW led the charge in incorporating smart keys into their vehicles, reflecting a growing trend toward connectivity and automation. Biometric and Smartphone Integration: A Glimpse into the Future Today, the car key is on the brink of another revolution. Biometric systems and smartphone integration are becoming increasingly common, offering even greater security and convenience. Emerging trends include: Fingerprint and facial recognition systems : Some luxury vehicles now allow drivers to unlock and start their cars using biometric data. Digital keys : Smartphone apps are replacing physical keys entirely, enabling drivers to control their vehicles remotely. These innovations are part of a broader shift toward connected mobility. With digital ecosystems becoming central to the automotive experience, car keys are evolving into multifunctional tools that integrate seamlessly with a driver’s digital life. Global Perspectives: Trends Across Markets The evolution of car keys has not been uniform across the globe. In developed markets such as North America, Europe, and Japan, digital and smart keys dominate, reflecting advanced technological adoption. In contrast, mechanical keys remain prevalent in emerging economies, where affordability and simplicity often take precedence over cutting-edge innovation. Automotive manufacturers are responding to these differences by tailoring their offerings. For instance: In premium markets, luxury carmakers emphasize smart and biometric key systems as standard. In cost-sensitive regions, manufacturers offer basic mechanical or remote keys as a practical solution. These distinctions highlight the diverse ways in which the car key continues to evolve, shaped by cultural, economic, and technological factors. The Challenges Ahead: Balancing Innovation and Security While modern car keys offer unparalleled convenience, they also come with challenges. Cybersecurity threats, such as hacking and relay attacks, pose significant risks to digital and smart key systems. Industry experts emphasize the need for robust encryption and regular software updates to mitigate these risks. Moreover, the shift toward digital keys raises concerns about dependency on smartphones. What happens if a phone runs out of battery or malfunctions? Manufacturers are exploring hybrid solutions that combine digital and physical access to address such scenarios. Unlocking the Future The evolution of the car key mirrors the broader changes in automotive technology, from mechanical simplicity to digital sophistication. As we move toward an era of autonomous and connected vehicles, the humble car key is poised to become an even more integral part of our mobility experience. For now, car keys remain a fascinating blend of past, present, and future. Whether it’s a vintage metal key or a cutting-edge biometric system, they continue to unlock not just our vehicles but also the stories of innovation and progress. The next time you hold your car key—be it physical, smart, or digital—pause for a moment to appreciate the journey it represents. Who knows? In a few decades, we might be reminiscing about keys altogether as we step into fully autonomous, keyless vehicles.
As a car owner, managing multiple key replacements can be daunting. Fortunately, there's a streamlined method to order several keys simultaneously using a CSV file. Here's how you can simplify the process: 1. Prepare Your Key List Create a Spreadsheet: Use software like Microsoft Excel to list your key codes. Enter Details: In Column A, input each key code; in Column B, specify the quantity needed. Avoid Headers: Start directly with your data; do not include column titles. 2. Save as CSV Choose CSV Format: When saving, select 'CSV (Comma delimited)' from the 'Save as type' dropdown. Ensure Correct Format: Avoid other CSV formats to prevent compatibility issues. 3. Upload Your CSV File Access Your Account: Log into your trade account on the key replacement website. Navigate to Product Page: Find the specific key product you need. Upload CSV: Click the 'Upload a CSV' button above the key number entry field and select your file. Wait for Processing: Large files may take time to upload; remain on the page until completion. 4. Complete Your Order Add to Basket: Once uploaded, click 'Add to basket.' Proceed to Checkout: Follow the standard payment process to finalize your order. Important Considerations Separate Files for Different Keys: If ordering various key types or series, create individual CSV files for each. Trade Account Requirement: This feature is typically available to trade account holders; ensure you have the necessary access. By following these steps, you can efficiently manage bulk key replacements, saving time and ensuring accuracy.
When you need a replacement key , taking a clear, detailed photo of your key can make the process much faster and more accurate. A high-quality image helps key makers understand the exact specifications, cuts, and dimensions of your key, which is especially important if you don’t have a spare. In this guide, we’ll walk you through the best practices for photographing your key so you can get an accurate replacement with ease. Why a Clear Key Photo Matters Photographing a key might sound simple, but it requires a bit of attention to detail. A well-taken photo captures the key’s grooves and unique cuts clearly, helping the key cutter replicate the exact pattern. Saves Time : A high-quality photo reduces the need for multiple attempts to cut a new key . Ensures Accuracy : Clear images help capture specific details, leading to a more precise fit. Convenient Process : With just a smartphone and a few tips, you can photograph your key from home without needing special equipment. Essential Tools for Photographing Your Key To take a clear photo of your key, you don’t need much beyond a few household items. Here’s what you’ll need: Smartphone or Camera : A phone camera is usually sufficient, but a standard digital camera works well too. Plain Background : Choose a neutral, solid-colored background like a piece of white paper or a smooth table surface. Good Lighting : Natural daylight or a bright room light helps capture details without shadows. Small Object for Elevation : A coin or similar item can lift the key slightly, making it easier to photograph. Step-by-Step Guide to Taking the Perfect Key Photo Follow these steps to take a photo that ensures clarity and accuracy for key replacement. 1. Set Up the Background Place a piece of plain white paper or another smooth, light-colored surface under your key. The solid color helps the details of the key stand out without any visual distractions. Tip : Avoid backgrounds with patterns or textures, as these can obscure the key’s features. 2. Position the Key Correctly Lay the key flat on the background, with the grooves and cuts facing up. The key should be positioned horizontally to allow a clear view of all its details. Side Profile : Make sure to capture the side profile that shows the cuts and grooves. Elevate Slightly : Place a coin or small object under one end of the key to angle it slightly toward the camera. This can help reduce shadows and improve focus on the cuts. 3. Adjust Lighting Good lighting is essential for capturing details. If possible, photograph your key in natural daylight near a window or use a well-lit room. Avoid Shadows : Ensure that no shadows fall across the key, as they can obscure details. Diffuse Light : If using a lamp, consider placing a thin cloth over it to diffuse the light and reduce harsh reflections. 4. Focus and Zoom Make sure your camera or smartphone is focused directly on the key. You may need to tap the screen to bring it into sharp focus. Zoom in Carefully : If you’re using a smartphone, zoom in slightly to capture the details, but avoid over-zooming, which can blur the image. Test Multiple Angles : Sometimes a slight adjustment in angle can capture the cuts more effectively, so take a few shots from slightly different perspectives. 5. Capture Multiple Photos It’s always a good idea to take several photos to ensure you have the best one. Try different angles and lighting adjustments to capture as many details as possible. Close-Up of the Grooves : Take one close-up image focusing on the cuts and grooves of the key. Overall Image : Include one full-length photo that shows the entire key from end to end. Try Different Angles : Slightly tilt the key or move the camera to see which angle best captures the detail of the cuts. Common Mistakes to Avoid When Photographing Your Key To get the best results, steer clear of these common issues that can impact the quality of your key photo: Blurry Images : If your hand shakes, use a small tripod or prop your phone on a stable surface. Poor Lighting : Avoid taking photos in dim rooms; use bright light to ensure the key is clearly visible. Obstructed Details : Make sure the entire length of the key is visible, without any part being cut off or covered. Tips for Ensuring a Smooth Replacement Process Once you have a clear photo of your key, there are a few final steps to make the replacement process as efficient as possible. Check the Photos : Look over your photos before sending them to ensure that they’re clear and detailed. Label the Key : If you’re photographing multiple keys, label each one in the image or add a note to avoid confusion. Include Measurements : If possible, add the measurements of the key’s length and width in your notes for added accuracy. A clear, detailed photo of your key can save you time and effort when seeking a replacement. By following these simple steps, you’ll provide all the necessary details to ensure your new key is an accurate match. Remember, good lighting, focus, and capturing all the unique cuts are essential to achieving the best results. With these guidelines, you’re set to take a photo that will make your key replacement process smooth and hassle-free.
We use cookies to personalise content and ads, to provide social media features and to analyse our traffic. We also share information about your use of our site with our social media, advertising and analytics partners who may combine it with other information that you’ve provided to them or that they’ve collected from your use of their services.
Basic
Cookies necessary for the proper functioning of the online store (such as storing products in the cart, sending a forgotten cart reminder by e-mail, etc. )
Ensures security for visitors by preventing cross-site request forgery. This cookie is essential for website and visitor security.
1 day
1st Party
laravel_session
PHP
To store the username of the logged in user. This information is necessary to allow the user to remain logged in to a website without having to submit their username and password for each page visited. Without this cookie, the user cannot move to areas of the website that require authenticated access.
Up to 2 hours
1st Party
__stripe_mid
Stripe
Serves to provide fraud prevention when attempting to shop on the site.
Up to 1 year
3rd Party
Advertisement
Advertising on other websites or platforms, retargeting, remarketing.
This cookie is set by Facebook to deliver advertising when they are on Facebook or a digital platform powered by advertising on Facebook after you visit this website.
2 months
3rd Party
fr
Facebook
The cookie also tracks a user's web behavior on sites that have a Facebook pixel or Facebook social plugin.
-
3rd Party
Analytics
Web controlling, conversion tracking of marketing tools.
Used to reduce the query rate. If Google Analytics is implemented via Google Tag Manager, this cookie will be named _dc_gtm_ .
1 minute
3rd Party
_gac_<property-id>
Google Analytics
Contains campaign-related information about the user. Linked Google Analytics and Google Ads accounts, Google Ads website conversion tags will read this cookie.
90 days
3rd Party
Google Remarketing
Google Analytics
Used to track pages viewed by users that are sent to Google Ads
-
3rd Party
dynx_itemid
Google Analytics
Used to track product ID in Google Ads
-
3rd Party
dynx_pagetype
Google Analytics
Used to track page type in Google Ads
-
3rd Party
dynx_totalvalue
Google Analytics
Used to track product value in Google Ads
3rd Party
dynx_category
Google Analytics
Used for category tracking in Google Ads
-
3rd Party
ga4_analytics
Google Analytics
Serves to process behavior such as setting Google Analytics cookies, sending automatic and enhanced measurement events, and declaring common settings.
3rd Party
Google Conversion Tracking
Google Ads.
Used to transmit order information to Google Ads.
-
3rd Party
conversion ID
Google Ads.
An identification number used to transmit order information to Google Ads.
-
3rd Party
conversion labеl
Google Ads.
A label used to transmit information about successful orders to Google Ads.
-
3rd Party
Additional software
Other external services and software to personalize the user experience.
Cookies are small text files that can be used by websites to make a user's experience more efficient.
The law states that we can store cookies on your device if they are strictly necessary for the operation of this site. For all other types of cookies we need your permission.
This site uses different types of cookies. Some cookies are placed by third party services that appear on our pages.
You can at any time change or withdraw your consent from the Cookie Declaration on our website.
Learn more about who we are, how you can contact us and how we process personal data in our Privacy Policy.
Please state your consent ID and date when you contact us regarding your consent.


 (1)_1736339207.jpeg)
 (1)_1736343157.jpg)