Post Name

Motorcycle TFT displays are no longer simple speedometers. They are high-resolution computers bonded to glass, sealed against weather, coded to the bike’s electronics, and integrated into safety systems. When a broken TFT display happens, the bill is rarely just “a screen.”

Below is the most complete, Europe-focused breakdown of motorcycle display replacement cost you’ll find online—built for riders who are actively searching for replacement prices and real-world risks.

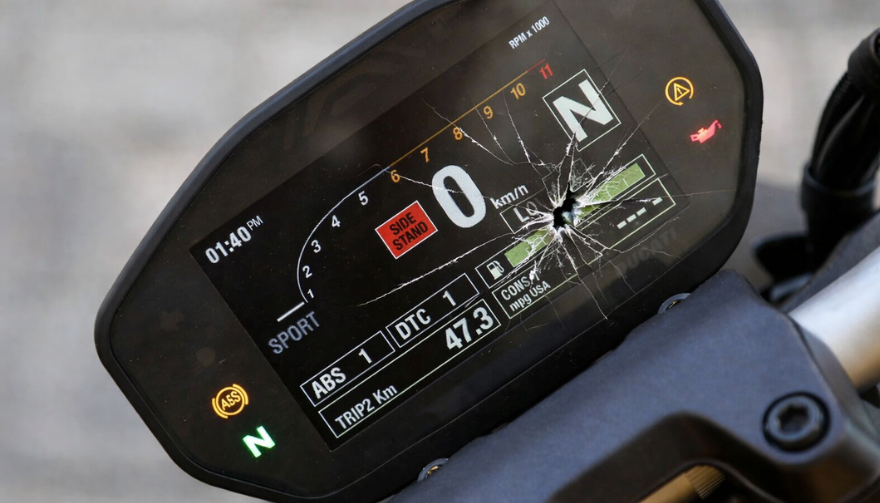
What Actually Breaks When a TFT Display Fails
A TFT failure is rarely cosmetic. Modern displays are laminated units. Damage spreads.

Common failure modes
Cracked outer glass → moisture ingress follows
Dead pixels or pixel lines → panel failure, not fixable
Water ingress / condensation → corrosion of PCB and connectors
Sun delamination → layers separate, image fades or ghosts
Complete blackout → power board or CAN communication fault

Once moisture enters, replacement—not repair—is the only OEM-approved path.

Motorcycle Display Replacement Cost (Europe, Real Numbers)
These are OEM replacement ranges in Europe, excluding insurance, based on dealer parts pricing, labour, and required coding.

BrandTypical TFT Replacement Cost (€)
Yamaha€650 – €1,400
BMW€1,200 – €2,500
Honda€800 – €1,800
Triumph€900 – €2,000
Kawasaki€700 – €1,600

Important: These are not worst-case numbers. They are normal dealer outcomes once a display is declared faulty.

Why TFT Replacement Is So Expensive

1. The screen is bonded, not modular
You cannot replace “just the glass.” The LCD, digitizer, polarizer, and control board are sealed together.

2. Coding & pairing is often mandatory
Many TFT units must be coded to the ECU / immobiliser. Without dealer software:
Warning lights remain
Ride modes may not function
Service intervals can’t be reset

This adds labour and eliminates cheap aftermarket options.

3. Dead pixels = full replacement
Unlike TVs or phones, dead pixels on motorcycle TFTs are not serviceable. OEM policy treats this as a safety-critical component.

4. Water ingress escalates damage fast
Condensation today becomes corrosion tomorrow. Displays that “still work” often fail weeks later.

The Most Expensive Damage Types (Ranked)

Water ingress / condensation
Often invisible at first
Leads to PCB corrosion
Almost always ends in full replacement

Dead pixels / pixel columns
Caused by pressure, UV heat, or micro-fractures
No repair path

Cracked glass
Immediate usability loss
Allows moisture entry

Sun delamination
Common on bikes parked outdoors
Progressive, irreversible

Real-World Cost Example (BMW vs Yamaha)

BMW adventure / sport models
TFT unit: €1,500–€2,200
Coding & labour: €200–€400
Total: €1,700–€2,600

Yamaha mid-range models
TFT unit: €700–€1,100
Labour: €100–€250
Total: €800–€1,350

Same problem. Vastly different outcomes.


Why “Used” or eBay TFT Displays Are Risky
Many riders try to save money this way. Most regret it.
VIN or ECU mismatch
Immobiliser conflicts
No warranty
Hidden moisture damage
Dealer refusal to code

A used TFT that fails after installation means paying twice.

The Preventable Part: Surface Damage That Starts It All
Most catastrophic failures start small:
Fine scratches
Stone impacts
UV exposure
Heat cycling

Once the protective surface is compromised, water ingress and pixel failure follow.

That’s why many riders choose hydrogel motorcycle screen protectors—they absorb impact, self-heal micro-scratches, and add a moisture barrier without affecting visibility.

You can browse motorcycle screen protectors by brand and model hereMotorcycle TFT screen protectors for Yamaha, BMW, Honda, Triumph & Kawasaki.
(Exact fit matters. Generic films do not.)

What Dealers Rarely Warn You About
Condensation voids goodwill claims
Pixel defects worsen with time
Sun damage is considered “wear”
Even hairline cracks can invalidate warranty

By the time you ask for a quote, the outcome is usually decided.

FAQ — Motorcycle TFT Display Replacement

How much does a motorcycle TFT display cost to replace?
In Europe, expect €650 to €2,500+, depending on brand, model, and coding requirements.

Can dead pixels be repaired?
No. Dead pixels mean full TFT replacement on modern motorcycles.

Is condensation inside the display dangerous?
Yes. Condensation indicates seal failure and usually leads to corrosion and total failure.

Can I ride with a broken TFT display?
Often no. Many bikes rely on the TFT for warnings, modes, and diagnostics.

Does a screen protector really help?
Yes—for scratch prevention, impact absorption, and moisture protection. It cannot fix damage, but it significantly reduces risk.

Are aftermarket TFT displays a safe option?
Rarely. Most lack proper integration, coding support, or durability.


Protecting a €1,500 Part Costs a Fraction
A motorcycle TFT display is one of the most expensive components on your bike that faces direct impact, UV exposure, heat, and water—every ride.

If you want model-specific protection designed for your exact display shape, visit our shop at mr-key.com and choose the right motorcycle screen protector for your bike.

Related Posts

Are Key Fobs Waterproof? A Comprehensive Guide to Keeping Your Key Fob Safe

Are Key Fobs Waterproof? A Comprehensive Guide to Keeping Your Key Fob Safe

In an era of advanced automotive technology, key fobs have become an essential part of modern driving. From unlocking doors to starting engines remotely, these small yet powerful devices are a marvel of convenience. However, one question often looms in the minds of car owners: are key fobs waterproof? With water being a common hazard in everyday life, understanding the limitations and care requirements of your key fob is crucial. Understanding Key Fob Technology Key fobs are more than just electronic keys; they are compact computers that communicate with your car. Using radio frequency (RF) technology, they transmit encrypted signals to your vehicle, enabling features like remote locking, engine start, and even personalized settings. This intricate technology is housed in a small casing that protects the internal components. While key fobs are designed to endure daily wear and tear, their resilience to water varies. Some models offer water resistance, but this is not synonymous with being fully waterproof. The degree of water resistance depends on the design and build quality of the key fob, which can differ significantly between manufacturers and models. Are Key Fobs Waterproof or Water-Resistant? The terms “waterproof” and “water-resistant” are often used interchangeably, but they have distinct meanings. Waterproof indicates that a device can be submerged in water without damage, while water-resistant means it can withstand splashes or brief exposure to water but not submersion. Most key fobs fall into the latter category. For example, some car manufacturers claim their key fobs can handle minor splashes or light rain. However, prolonged exposure to water or immersion—such as dropping your fob into a pool—can damage the electronic components and render the device unusable. Global Standards and Variability Globally, there is no universal standard governing the water resistance of key fobs. Manufacturers often follow internal guidelines or industry best practices. In some regions, automakers have started offering key fobs with improved water resistance as a response to customer demands for greater durability. For instance, luxury brands like BMW and Mercedes-Benz have introduced models with enhanced protection, but even these devices are not guaranteed to survive complete immersion. Comparatively, in markets where cost efficiency is prioritized, such as in certain developing countries, key fobs may lack advanced water-resistant features. This variability underscores the importance of checking the specifications of your specific key fob model. What to Do If Your Key Fob Gets Wet Accidents happen, and it’s not uncommon for key fobs to encounter water. If your key fob gets wet, quick action can often prevent permanent damage. First, remove the key fob from water immediately and dry it thoroughly with a soft cloth. If possible, open the casing to allow air circulation and dry the internal components. Avoid using heat sources such as hair dryers, as excessive heat can warp the plastic casing or damage the sensitive electronics. In cases of significant water exposure, placing the key fob in a container of uncooked rice or silica gel packets can help absorb moisture. However, this is not guaranteed to save a severely water-damaged key fob. If the device does not work after drying, contacting a professional locksmith or dealership for repair or replacement is the best course of action. Tips for Protecting Your Key Fob To minimize the risk of water damage, there are several precautions you can take: Use a protective case or cover designed specifically for key fobs. These accessories provide an added layer of protection against moisture and physical impacts. Avoid placing your key fob in pockets or bags where it may come into contact with liquids, such as water bottles or spilled drinks. Store your key fob in a designated dry area when not in use, particularly in environments where water exposure is likely, such as beaches or pools. The Future of Waterproof Key Fobs As technology advances, so does the potential for more robust key fobs. Automotive manufacturers are exploring the use of advanced materials and sealing techniques to create truly waterproof devices. Additionally, the rise of smartphone-based digital keys may eventually render physical key fobs obsolete, eliminating concerns about water damage altogether. Internationally, innovations in waterproofing technology are being driven by consumer demand and environmental considerations. For example, in regions with high humidity or frequent rainfall, automakers are under pressure to offer more durable solutions. As a result, future key fobs may combine water resistance with other features, such as solar charging or biometric security. Navigating the Realities of Key Fob Care Key fobs are indispensable in modern driving, but they are not invincible. While some offer limited water resistance, the majority are vulnerable to prolonged exposure or immersion. Understanding these limitations and taking proactive measures to protect your key fob can save you time, money, and frustration. As technology evolves, the prospect of waterproof or entirely digital keys becomes more realistic. For now, car owners should familiarize themselves with the specifications of their key fobs and follow best practices for care. Whether you’re navigating a sudden downpour or an accidental spill, a little knowledge and preparation can go a long way in safeguarding your key fob and ensuring uninterrupted access to your vehicle.

The Complete Guide to Car Key Cutting: Everything You Need to Know

The Complete Guide to Car Key Cutting: Everything You Need to Know

Unlocking the Mysteries of Car Key Cutting Have you ever been in a situation where you needed a spare car key or had to replace a lost one? Car key cutting is an essential process for creating duplicate keys or replacements, but it’s often misunderstood. From traditional keys to modern transponder and smart keys, the art of key cutting has evolved dramatically with advancements in technology. This guide will walk you through the key cutting process, its types, and when professional help is required, helping you navigate the complexities of car key duplication with confidence. What Is Car Key Cutting? Car key cutting is the process of creating a new key that matches the physical shape and specifications of your vehicle’s locks and ignition. This process involves cutting the metal key blade to fit the car’s lock mechanism precisely. For modern cars, this may also include programming the electronic components of the key, such as transponder chips or remote controls. The method used for cutting a car key depends on the type of key and the car model. Traditional keys are simpler to cut, while transponder and smart keys require specialized tools and expertise. Types of Car Keys and Cutting Methods Traditional Keys These are the classic mechanical keys used in older vehicles. Cutting these keys involves duplicating the grooves and ridges of the original key using a key-cutting machine. Transponder Keys Found in most modern cars, transponder keys contain a microchip that communicates with the car’s computer. After cutting the blade, these keys must also be programmed to function. Smart Keys These advanced keys use wireless communication to interact with the car. They don’t require physical cutting but involve programming to sync with the vehicle. Each type of key requires a different approach and level of expertise, making it essential to know what kind of key you have before proceeding with duplication. The Key Cutting Process: Step by Step Identify the Key Type Determine whether you have a traditional, transponder, or smart key. This will dictate the tools and process needed for cutting and programming. Gather Required Information Provide the key cutter with details about your car, such as the make, model, and year. For some keys, a Vehicle Identification Number (VIN) may be required. Cutting the Key Blade For traditional and transponder keys, the blade is cut using a key duplicator or a laser key-cutting machine. Precision is crucial to ensure the key fits perfectly in the lock. Programming (if required) For transponder and smart keys, the key must be programmed to the car’s computer system. This step may require specialized equipment or professional expertise. When to Seek Professional Help While traditional keys can often be duplicated at local hardware stores, transponder and smart keys typically require specialized tools and knowledge. Professional locksmiths and dealerships are equipped to handle these advanced key types, ensuring proper cutting and programming. Reasons to choose a professional: Complexity: Smart and transponder keys require technical expertise. Accuracy: Professionals use precise equipment to ensure the key functions flawlessly. Programming Needs: Only trained specialists can program keys to sync with your vehicle. Cost of Car Key Cutting The cost of cutting a car key varies depending on the type of key and the service provider. Traditional keys are the most affordable, typically costing between $10 and $50. Transponder and smart keys, however, can range from $50 to $300 or more due to the additional programming required. Tips to save money: Have a spare key: This simplifies the duplication process and reduces costs. Compare prices: Contact multiple locksmiths or dealerships to find the best deal. Be Prepared for Every Key Emergency Car key cutting is a vital service for any car owner, whether you’re duplicating a spare key or replacing a lost one. Understanding the process and knowing when to seek professional help can save you time, money, and frustration. By staying informed and proactive, you can ensure that your vehicle remains accessible and secure, no matter what challenges arise.

Removing Keys from Locks: A Comprehensive Guide

Removing Keys from Locks: A Comprehensive Guide

Removing a key from a lock may seem simple, but it can become tricky when dealing with stuck or broken keys. Whether you're dealing with a standard lock, padlock, or vehicle ignition, understanding the correct techniques can save you from damage and frustration. This guide will walk you through the essential steps for removing keys from various types of locks, offering practical advice and tips to ensure a smooth process. Common Scenarios and Challenges Keys can become stuck or difficult to remove for several reasons, including misalignment, wear and tear, or damage to the key or lock. Additionally, environmental factors like temperature changes can cause metals to expand or contract, making key removal more challenging. Recognizing the cause of the issue is the first step in effectively addressing it. Basic Techniques for Key Removal Gentle Wiggle and Pull: The first technique to try is a gentle wiggle and pull. Hold the key firmly and move it slightly up and down or side to side while pulling gently. This method works well if the key is simply stuck due to misalignment. Lubrication: If the key is difficult to remove, applying a small amount of graphite powder or a silicone-based lubricant into the keyhole can help. Avoid using oil-based lubricants, as they can attract dirt and grime, potentially worsening the problem. Tapping the Lock: For stubborn cases, lightly tapping the lock with a hammer while gently pulling the key can help dislodge it. This method is effective when the key is stuck due to debris or minor misalignments within the lock. Advanced Techniques for Stuck Keys Using a Key Extractor: If the key is broken off inside the lock, a key extractor tool can be very effective. Insert the tool into the keyhole, hook the broken key piece, and pull it out carefully. This method requires patience and a steady hand. Pliers and Tweezers: If part of the key is still protruding, you can use needle-nose pliers or tweezers to grip and pull the key out. Be careful not to apply too much force, as this can push the key further into the lock or damage the lock mechanism. Heat Application: In cold weather, metal contracts, which can cause the key to get stuck. Gently heating the key with a hairdryer or warm cloth can expand the metal slightly, making it easier to remove. However, avoid using an open flame, as it can damage the lock or key. Preventing Key Stuck Issues Prevention is always better than cure. Here are some tips to prevent keys from getting stuck in the future: Regular Maintenance: Keep your locks and keys clean and well-lubricated with appropriate materials. Regularly inspect for wear and tear, and replace any damaged keys or locks. Use Duplicate Keys: If you notice a key becoming difficult to use, have a duplicate made before it breaks or becomes stuck. This will save you the hassle of dealing with a stuck key. Avoid Excessive Force: Never force a key into a lock. If it doesn’t turn easily, stop and inspect both the key and the lock for damage or obstruction. When to Call a Professional While many stuck key issues can be resolved with the techniques mentioned above, there are times when professional assistance is necessary. If you’ve tried all the methods and the key remains stuck, or if you’re dealing with a high-security lock, it’s best to contact a professional locksmith. They have the tools and expertise to safely remove the key without damaging the lock or key further. Dealing with a stuck key can be frustrating, but understanding the proper techniques can save you time and prevent damage. From basic wiggling and lubrication to more advanced methods like using a key extractor, there are various approaches depending on the severity of the situation. Regular maintenance and careful handling can help prevent these issues from occurring in the first place. When in doubt, don’t hesitate to seek professional help to ensure your lock and key remain in good working condition.

Inside a Key Rescue: How to Salvage a Wet or Flooded Car Key

Inside a Key Rescue: How to Salvage a Wet or Flooded Car Key

Water damage is one of the most common – and most stressful – problems car key owners face. Whether your key fell into a puddle, went through the wash, or was simply caught in a downpour, it can stop working in an instant. But does water exposure always mean you need to buy a new key? Not necessarily. In many cases, a quick and proper response can save your key, restore its function, and spare you an expensive replacement. This guide walks you through how to rescue a wet or flooded car key, what not to do, and how to know when it’s beyond repair. How Car Keys Get Wet Modern car keys, especially keyless remotes and fobs, aren’t designed to be waterproof. Even small amounts of moisture can cause damage if the internal components are exposed. Some of the most common causes of water-damaged keys include: Being left in clothing and run through the washing machine Falling into sinks, toilets, or puddles Exposure to rain, snow, or slush Dropped at the beach or near pools Stored in damp gym bags or jackets Once water enters the key shell, it can corrode the circuit board, damage the battery, or short-circuit the transponder chip. What to Do Immediately After Getting Your Key Wet The first few minutes after exposure are critical. Acting quickly can mean the difference between a working key and a dead one. 1. Remove the Key from the Water Take the key out of the water as quickly as possible. The longer it sits, the more damage can occur inside. 2. Open the Key Shell If your key has a removable shell, gently open it using a small screwdriver or plastic tool. This allows you to access the internal parts and dry them properly. If you’re unsure how to open it, look up a video or guide specific to your car model. 3. Take Out the Battery Immediately remove the battery. A wet battery in contact with electronics can cause short circuits and corrosion. Do not reinstall the same battery later; it may be compromised. 4. Dry the Internal Components Gently pat all visible parts dry with a lint-free cloth. Do not use paper towels, as they can leave behind fibers. Then allow the key to air-dry using one of the following methods: Option A: Use Silica Gel or Desiccant Packs Place the opened key and all components in an airtight container with silica gel packets. Leave it sealed for at least 24 to 48 hours. Option B: Use Uncooked Rice If silica gel isn’t available, uncooked rice can work as an alternative. Place the key in a bowl of rice and cover it completely. Leave it for 2 to 3 days. Do not use a hair dryer, microwave, or place the key near a heater. High heat can warp the plastic shell and damage sensitive electronics. After Drying: Will the Key Work Again? After a full drying period, insert a new battery and test the key. In many cases, it will begin working again — especially if water exposure was brief and the board was not damaged. If the key still doesn’t respond, try the following steps: Inspect the circuit board for corrosion or residue Try replacing the outer shell if buttons feel worn or unresponsive Check if the vehicle recognizes the transponder chip If none of these steps work, the internal chip or electronics may be permanently damaged. When to Replace the Key Sometimes the damage goes beyond what cleaning and drying can fix. You’ll likely need a full replacement if: The key no longer sends a signal The LED light doesn’t flash when pressing buttons There is visible corrosion on the circuit board The transponder chip fails to communicate with the vehicle Buttons are physically damaged or unresponsive The key was underwater for an extended time In these situations, replacing the key is often the most reliable solution. Don’t Wait Until It’s Too Late – Keep a Spare Key If you’ve experienced water damage once, there’s a good chance it could happen again. Keeping a backup key stored in a safe, dry location is one of the best precautions you can take. You can find replacement key shells, blades, batteries, and fully programmed keys for most vehicle brands at mr-key.com . Investing in a spare can save time, money, and stress. Final Tips for Car Key Water Damage Act fast and remove the battery as soon as possible Use silica gel or rice for slow, safe drying Avoid heat, rubbing, or shaking the electronics Replace the shell if it’s worn, cracked, or damaged If in doubt, test with a new battery before replacing the entire key Need Replacement Parts? Whether you need a new shell, battery, or a complete key, visit mr-key.com to find compatible parts for a wide range of vehicles. Our selection includes: Key shells for all major brands CR2032 batteries Key blades and electronics Fully assembled remote keys with chip and programming options If your key has been exposed to water, don’t panic. With the right steps, many keys can be rescued — and if not, we’re here to help you find the right replacement.

Chat with us