Post Name

Losing a key can be a hassle, but the process of getting a replacement becomes much easier if you can locate the key code. The key code is a unique combination of letters and numbers that identifies the specific cut and type of your key. This code is essential for accurately replicating a new key, whether it’s for your car, house, or another type of lock. This guide will help you understand where to find your key code and what steps you can take if the code isn’t easily accessible.

Why the Key Code is Important

The key code is essentially a blueprint for your key. It tells a locksmith or dealer exactly how to cut a new key that will work with your lock. Without this code, creating a replacement key can be a trial-and-error process, which can be time-consuming and costly. Additionally, for certain types of keys, such as those for cars with transponder chips, the key code is necessary for programming the electronic components of the key.

Step 1: Inspect Your Key and Lock

The first and most straightforward step is to inspect your key and lock for the key code. For many keys, especially older models, the code is engraved or stamped directly onto the key itself. This is common with car keys, where the code may be found on the metal part of the key blade. In some cases, the code might be on the plastic casing of the key, especially if it’s a newer model with electronic components.

If the key itself doesn’t have the code, check the lock. The key code is sometimes inscribed on the lock’s cylinder or on a small metal plate attached to the lock. This is more common with padlocks or specialized security locks. If you’re dealing with a door lock, you might need to remove the lock from the door to inspect it closely.

Step 2: Review Documentation and Original Packaging

If you can’t find the key code on the key or lock, the next step is to review any documentation or packaging that came with the key. For vehicles, the key code is often provided in the owner’s manual or on a key tag that was given to you at the time of purchase. This tag is usually small and easily misplaced, so it’s worth checking any old documentation or vehicle paperwork you might have.

For other types of keys, such as those for padlocks, cabinets, or office furniture, the key code might be printed on the original packaging or on warranty cards. These are often overlooked, but they can be invaluable when you need a replacement key.

Step 3: Contact the Manufacturer or Dealer

If the key code isn’t visible on the key, lock, or documentation, your next step should be to contact the manufacturer or dealer. Most car manufacturers, for example, keep a record of key codes based on the Vehicle Identification Number (VIN). By providing your VIN to a dealership, they can usually retrieve the key code and either cut a new key for you or give you the information needed to get one cut elsewhere.

For other types of keys, such as those for cabinets or padlocks, contacting the manufacturer can also be helpful. Provide them with details about the product, such as the model number and any serial numbers, and they may be able to provide the key code or a replacement key directly.

Step 4: Professional Locksmith Assistance

If you’ve exhausted all other options, a professional locksmith is your best bet. Locksmiths have specialized tools and knowledge that allow them to decode locks or determine the correct key code even when it’s not visible or available through documentation. They can often cut a new key based on the lock itself, bypassing the need for the original key code entirely.

Locksmiths are particularly useful if you’re dealing with older locks, unique security systems, or if the key code is no longer accessible through traditional means. They can also help with programming transponder keys for vehicles, ensuring that your new key not only fits the lock but also communicates correctly with your car’s electronic systems.

Additional Tips for Key Code Location

  • Record Key Codes: If you find your key code, make sure to record it somewhere safe. This will save you time if you need another replacement in the future.
  • Ask About Spare Keys: If you’re contacting a dealership or manufacturer, ask if they can provide a spare key at the same time, especially if you’re prone to losing keys.
  • Consider a Key Tracking System: For those who frequently lose keys, consider investing in a key tracking system or a digital key organizer where you can store key codes and important information.

Locating your key code is a crucial step in the process of replacing a lost or broken key. By carefully inspecting your key and lock, reviewing any relevant documentation, contacting the manufacturer or dealer, or seeking help from a professional locksmith, you can ensure that your replacement key is accurate and functional. Taking these steps not only saves time and money but also provides peace of mind in knowing that you have a reliable solution for key replacement.

Related Posts

What You Need To Know About BMW  Swirl Flaps and How To Solve The Problem With Them

What You Need To Know About BMW Swirl Flaps and How To Solve The Problem With Them

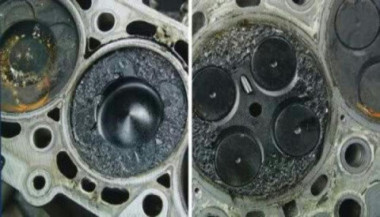
Swirl flaps are a BMW system that has been introduced to help burn the fuel mixture in the cylinder better due to the fact that diesel engines do not have throttle valves and it is not possible to adjust the air-fuel ratio. A diesel engine without vortex valves operates between a poor and a rich fuel mixture, because the only way to regulate it is through fuel injection. Design of the first generation swirl flaps that are made of made of metal. Unfortunately, swirl flaps are responsible for countless damaged engines and costly repairs due to design errors or metal fatigue. Once damaged, the cylinder sucks them in and causes great damage. This is how damaged valves damage the cylinder. Typical swirl flaps suction damage. The vortex valves are positioned in the inlet and are controlled by vacuum (DDE 4.0) or electrically (DDE5.0 / DDE6.4) by the engine ECU. Effects of malfunctioning valves: Swirl valves are stuck in open position: Deterioration of exhaust gas performance at lower speeds. Swirl valves are stuck in closed position: Approximate power loss of 10% at high engine speeds. How swirl flaps work: Performance characteristics: The vortex valves are in the closed position, at low engine speeds and small amounts of fuel injected (controlled by the ECU card). They open under the following conditions: coolant temperature <14 ° C OR * fuel quantity> 24 mg OR engine speed 2250 rpm OR inlet air temperature <-5 ° C BMW and Pierburg have decided to produce diesel engines with metal vortex valves. The speed at which the pistons in the diesel engine operate is at least 60 rpm, so a sucked vortex valve will break and cause a number of damages inside the engine. In most cases, one or more pistons are severely damaged, as a bonus you get valves, in some cases a head or turbocharger. And this combination with a BMW engine is like a cumulative jackpot 🙂 In 2004, BMW began work on the problem and improved the design, however, a number of owners reported ongoing problems in this area. The solution to this problem is by removing the vortex valves and plugging, which does not affect the performance of the engine and at the same time, you can safely pass the exhaust test. Engines: M47 (136hp VP44 fuel pump) has no valves. M47N common rail engine (including M47N / M47TU / M47TUD20) (150hp. Face lift model from 2001 -) has valves. M57 engines (M57D) (525d & 187hp. 330d) cars with manual transmission do not have valves, but those with automatic have. M57N engines (M57TUD) (525d & 330d 204hp) have vortex valves. Ruined swirl flaps: The plugs that replace the vortex valves are easy to find on the internet, but you can also find them here on our website. Typical plugs: Disassembly of vortex valves: The vortex valves can be safely dismantled and in most cases if they are removed properly no loss of power is felt. Final list of models for which vortex valves are installed: Engine: M47N/M47TU/M47TUD20 Applications: * 110 kW (148 hp) and 330 N·m (243 lb·ft) o E46 320d 2001-2005 o E83 X3 2.0d (up to end of 2006) Engine: M47TU2D20 The engine was updated again in 2004 as the M47TU2D20. Still at 1995 cc, it produced more power across the range. Applications: * 120 kW (161 hp) and 340 N·m (251 lb·ft) E60/E61 520d E87 120d E90/E91 320d E83 X3 2.0d (end of 2006 onwards) Engine: M57/M57D25 M57D25 was introduced in 2000. Applications: * 166 PS (122 kW; 164 hp) at 4000 rpm, 350 N·m (260 lb·ft) at 2000-2500 rpm with a 4750 rpm redline, models: 2000-2003 E39 525d *Vehicles With Automatic Transmission ONLY* Engine: M57N/M57TU/M57TUD25 M57TUD25 was introduced in 2004. Applications: * 177 PS (130 kW; 175 hp) at 4000 rpm, 400 N·m (300 lb·ft) at 2000-2750 rpm models: E60/E61 525d Engine: M57/M57D30 M57D30, also called M57D29, was introduced in 1998. Applications: * 184 PS (135 kW; 181 hp)@4000, 390 N·m (290 lb·ft)@1750-3200 models: E39 530d *Vehicles With Automatic Transmission ONLY* E46 330d/330xd *Vehicles With Automatic Transmission ONLY* * 184 PS (135 kW; 181 hp)@4000, 410 N·m (300 lb·ft)@2000-3000 models: E38 730d *Vehicles With Automatic Transmission ONLY* E53 X5 3.0d * 193 PS (142 kW; 190 hp)@4000, 410 N·m (300 lb·ft)@1750-3000 models: E38 730d E39 530d Engine: M57N/M57TU/M57TUD30 M57TUD30 was introduced in 2002. It originally produced 160 kW (215 hp) at 4000 rpm and 500 N·m (370 lb·ft) at 2000-2750 rpm, but was tweaked for 150 kW (201 hp) at 4000 rpm and 410 N·m (300 lb·ft) at 1500-3250 rpm for 2003 and again for 200 kW (268 hp) at 4000 rpm and 560 N·m (410 lb·ft) at 2000-2250 rpm in 2004. Applications: * 204 PS (150 kW; 201 hp)@4000, 410 N·m (300 lb·ft)@1500-3250 models: E46 330d/330Cd/330xd E83 X3 3.0d * 218 PS (160 kW; 215 hp)@4000, 500 N·m (370 lb·ft)@2000-2750 models: E53 X5 3.0d E60/E61 530d/530xd E65 730d * 272 PS (200 kW; 268 hp)@4000, 560 N·m (410 lb·ft)@2000-2250 E60/E61 535d * 245 PS (180 kW; 242 hp)@4000, 500 N·m (370 lb·ft)@2000-2250 * 286 PS (210 kW; 282 hp)@4000, 580 N·m (430 lb·ft)@2000-2250 Engine: M57TU2D30 M57TU2D30 was introduced in 2007, making its debut in the facelifted E60 and E61. * M57TU2D30-UL: 197 PS (145 kW; 194 hp) * M57TU2D30-OL: 235 PS (173 kW; 232 hp)@4000, 500 N·m (370 lb·ft)@2000-2750 * M57TU2D30-TOP: 286 PS (210 kW; 282 hp), 580 N·m (430 lb·ft) Applications: * 197 PS (145 kW; 194 hp), 400 N·m (300 lb·ft) models: E90/E91/E92 325d E60/E61 525d/525xd * 231 PS (170 kW; 228 hp)@4000, 500 N·m (370 lb·ft)@2000-2750 models: E65 730d E90/E91 325d E90/E91 330d/330xd * 235 PS (173 kW; 232 hp) models: E60/E61, BMW E70, BMW E71 * 286 PS (210 kW; 282 hp), 580 N·m (430 lb·ft) models: E60/E61 535d E70 X5 3.0sd E71 X6 xDrive35d E83 X3 3.0sd E90/E91 335d The above models are listed for information only if you want to to make sure your engine has valves installed, please contact a competent person. Please note that the information described above is for informational purposes only and does not claim to be reliable. Mr-key.com is not responsible for any repair work you undertake that is related to the topic described in this article.

How to Rescue Your Car Key After It Gets Wet: A Practical Guide

How to Rescue Your Car Key After It Gets Wet: A Practical Guide

The Modern Dilemma: Wet Car Keys and How to Fix Them Imagine this: you’re caught in an unexpected downpour, and your car key slips from your hand, landing straight into a puddle. Or perhaps you accidentally leave your keys in your pocket while diving into a swimming pool. Whatever the scenario, the moment you realize your car key has been submerged in water can be panic-inducing. With modern car keys embedded with electronic chips and sophisticated technology, exposure to moisture can mean more than just a temporary inconvenience—it could leave you locked out or facing expensive repairs. But before you rush to replace your key, there are several steps you can take to salvage it. Understanding the Risks: What Happens When a Car Key Gets Wet? Car keys today are more than just metal; many include electronic transponders and remote control systems that communicate with the vehicle’s ignition. Water exposure can lead to: Short circuits: Moisture can cause electronic components to malfunction or fail entirely. Corrosion: Over time, water can lead to rust and degradation of internal circuits. Battery failure: Many car keys contain small batteries, and water exposure can lead to leakage or loss of function. While traditional metal keys are less affected by water, smart keys and key fobs are vulnerable. Acting quickly can often save your key from irreparable damage. Immediate Steps to Take When Your Car Key Gets Wet If your car key has been exposed to water, time is of the essence. Here’s what you need to do: Retrieve the key from the water as quickly as possible and wipe off excess moisture using a dry, absorbent cloth or paper towel. Remove the battery if possible since many car key fobs have removable batteries; check your car manual for instructions. If the battery is wet, replace it with a new one rather than attempting to dry and reuse it. Disassemble the key fob if safe to do so, carefully opening the casing to allow internal components to dry. Avoid using force or tools that might damage delicate parts. Use silica gel or rice for drying—place the key fob in a container of silica gel packets (often found in new shoe boxes or electronics packaging) for 24-48 hours; if silica gel is unavailable, uncooked rice can work as an alternative, though it may not be as effective. Avoid using direct heat—do not use hairdryers, microwaves, or ovens to speed up drying, as high temperatures can warp plastic components and damage circuits; instead, allow the key to air dry naturally in a warm, ventilated space. Finally, test the key once you’re confident it is dry by reinserting the battery and testing it on your car; if the key does not work, it may require reprogramming or replacement. When to Seek Professional Help If your key remains unresponsive despite thorough drying, it may have suffered internal damage. In such cases, consider these options: Contact your car manufacturer or dealership—they can provide a replacement key or attempt to reprogram the existing one. Visit a professional locksmith—many automotive locksmiths specialize in repairing and reprogramming electronic keys at a lower cost than dealerships. Check your car insurance policy—some policies cover lost or damaged keys, potentially reducing replacement costs. Global Trends in Key Fob Durability and Waterproofing Car manufacturers are increasingly designing key fobs to withstand water exposure. For example, Tesla’s Model 3 key card eliminates the need for traditional keys by using a waterproof RFID card, Toyota and BMW have introduced water-resistant key fobs, minimizing the risk of damage, and future innovations may include biometric key technology, reducing dependency on physical devices altogether. As technology advances, water-resistant key designs may become the norm, reducing the stress of accidental spills or submersion. Preventative Measures: How to Protect Your Car Key from Water Damage To avoid future incidents, consider these preventative steps: Use a waterproof key case: Available online, these cases provide a protective barrier against water exposure. Designate a dry storage spot: Avoid leaving keys in pockets that may go through the wash or near pools and sinks. Invest in a spare key: Having a backup key can be a lifesaver if your primary key is damaged beyond repair. Check for manufacturer upgrades: Some car brands offer upgraded, water-resistant key fobs for an additional fee. Act Quickly to Save Your Key A wet car key doesn’t necessarily mean it’s the end of the road. By acting swiftly and following proper drying techniques, you may be able to rescue your key without costly replacements. As car technology evolves, so too will key durability, but for now, a little caution and quick thinking can go a long way. If you frequently find yourself around water, taking preventative measures can save time, money, and frustration.

Programming Your Car’s Keyless Remote: A Simple Guide for Every Car Owner

Programming Your Car’s Keyless Remote: A Simple Guide for Every Car Owner

When it comes to convenience, car keyless remotes have revolutionized the way we interact with our vehicles. No more fumbling with traditional keys or worrying about locking yourself out. With just a push of a button, you can lock, unlock, and even start your vehicle. But what happens when your keyless remote stops working, or when you need to program a new one? Here’s a simple guide to help you program your car's keyless remote, regardless of your vehicle's make or model. Understanding Keyless Remotes Before jumping into the programming process, it’s important to understand what a keyless remote is and how it works. Essentially, a keyless remote allows you to interact with your vehicle without needing to physically insert a key. Instead of using a traditional metal key, your car’s electronic system communicates wirelessly with the remote, allowing you to lock, unlock, and sometimes even start your vehicle, all with the push of a button. These remotes typically use a radio frequency to communicate with your car, sending a signal that’s encrypted for security. Most modern cars use transponder technology, which makes the system more secure and resistant to hacking or copying. This means that the remote must be properly programmed to your vehicle’s system to function correctly. When Do You Need to Program a Keyless Remote? There are several situations in which you might need to program your keyless remote: Replacing a Lost or Damaged Remote : If you’ve lost your keyless remote or it’s no longer functioning properly, you’ll need to get a replacement. This may require programming the new remote to sync with your vehicle. Adding a New Remote : If you’ve bought an additional keyless remote for your car (for a spouse, child, or other family member), you’ll need to program it so that it works with your vehicle. Battery Replacement : Sometimes, replacing the battery in your remote can cause the programming to reset, meaning you’ll need to reprogram the remote for it to work again. Changing or Resetting Vehicle Settings : Occasionally, vehicle settings or remotes can be reset or reprogrammed as part of regular maintenance, requiring you to program new or additional remotes. How to Program Your Car’s Keyless Remote Programming a keyless remote is easier than you might think, and in most cases, it can be done by following a few simple steps. The process varies slightly depending on the make and model of your car, but here’s a general overview of the steps involved: Get Your New or Replacement Remote : Ensure that your remote is compatible with your car’s system. If you're not sure, you can check with your car's manufacturer or an authorized dealership. Some remotes require specific codes to be programmed. Sit Inside Your Vehicle : For safety and security reasons, most cars require you to be inside the vehicle while programming the remote. Insert the Key in the Ignition : Insert the key into the ignition and turn it to the "ON" position without starting the engine. For cars with push-to-start systems, you may need to press the start button without pressing the brake pedal. Activate the Programming Mode : Depending on your car’s system, you’ll need to follow a sequence of steps to enter programming mode. This could involve turning the key on and off several times, or pressing certain buttons in a specific order. Refer to your vehicle’s manual for the exact steps, as the process can differ from one model to another. Program the Remote : Once your car is in programming mode, you’ll need to press the button on your keyless remote that you want to program. Usually, you’ll hear a chime or see the lights flash, indicating that the remote has been successfully programmed. Some cars may require you to press the button several times to ensure proper synchronization. Test the Remote : After programming, test the remote to make sure it works properly. Try locking and unlocking the doors or starting the engine. If everything works as expected, you’re done! Exit Programming Mode : To finish the process, simply turn off the ignition and remove the key. This should exit programming mode. If you have additional remotes to program, repeat the steps above for each one. What to Do if Programming Doesn’t Work While programming a keyless remote is usually a straightforward process, there are instances where things don’t go as planned. If your remote isn’t syncing with your car after following the steps, here are a few troubleshooting tips: Check the Battery : If the remote’s battery is dead or weak, it won’t transmit the signal to your car. Replace the battery and try programming again. Verify the Compatibility : Make sure that the remote is compatible with your vehicle’s make, model, and year. Some vehicles require special remotes that can only be programmed by the manufacturer or an authorized locksmith. Reset Your Vehicle’s System : In some cases, you might need to reset the car’s system to clear previous programming attempts. Check your owner’s manual or consult a professional for assistance. Consult a Professional : If you continue to have issues, it might be time to visit a dealership or a certified locksmith. These professionals have the tools and experience to program the remote correctly and ensure everything works seamlessly. Why Programming Your Keyless Remote Is Important Programming your keyless remote is a simple but important task that helps ensure your car’s security and convenience. By understanding how the process works and what to do if things go wrong, you’ll be able to troubleshoot and solve any issues quickly. Whether you’re replacing a lost remote or adding a new one to your collection, knowing how to program your remote saves time and money compared to visiting a dealership or locksmith. With the increased reliance on keyless remotes for unlocking and starting vehicles, it’s essential for every car owner to be familiar with this process. By keeping your remote in good working condition and knowing how to program it when necessary, you’ll enjoy a smoother, more efficient experience with your vehicle.

Simple Tips to Free a Stuck Lock: What You Need to Know

Simple Tips to Free a Stuck Lock: What You Need to Know

Locks are meant to provide security, but when they seize up, they can leave you feeling frustrated and helpless. Dealing with a stuck lock is more common than you might think, and thankfully, there are affordable and effective solutions to get it working smoothly again. Whether it's a car door, trunk, or your home lock, here are some tried-and-true methods to free up a jammed lock. Why Locks Seize Up Understanding the causes behind a stuck lock can help you prevent it from happening in the future. Locks can seize up for various reasons: Dirt and Debris : Over time, dust, grime, or even small particles can accumulate inside the lock mechanism, making it harder for the internal parts to move smoothly. Rust and Corrosion : Exposure to moisture, humidity, or salty air can lead to rust buildup on metal parts within the lock, which can prevent movement. Lack of Lubrication : Locks need to be lubricated occasionally to ensure smooth operation. Without lubrication, friction increases, and the lock may eventually jam. Now, let’s look at some simple steps to tackle a seized lock. Step 1: Use Graphite Powder or Dry Lubricant The first thing to try is applying a lubricant, but be careful about what type you use. Wet or oil-based lubricants can attract dust, which eventually clogs the lock. Graphite Powder : This is one of the best options for freeing up a stuck lock. Sprinkle a small amount of graphite powder into the keyhole, insert the key, and gently move it back and forth. This spreads the graphite, reducing friction and allowing the lock components to move more freely. Dry Lubricants : These are specifically designed for locks and are ideal for situations where you want to avoid residue buildup. Spray a small amount into the lock, then insert the key and gently turn it. Pro Tip : Avoid using regular WD-40 or other oil-based products, as they may lead to a buildup over time, making the problem worse. Step 2: Try the Key with Gentle Force If lubrication alone doesn’t do the trick, the next step is to use a little gentle force with your key. Be cautious here; applying too much force could break the key inside the lock. Insert the Key : Once the lubricant has been applied, insert the key fully into the lock. Wiggle Carefully : Gently wiggle and turn the key without applying too much force. This movement may help distribute the lubricant further and gradually loosen up any stuck components. Caution : If you feel excessive resistance, don’t force the key. Forcing it can cause damage or even snap the key, which would require additional assistance to remove. Step 3: Warm Up the Lock (Especially Useful for Cold Weather) Cold temperatures can cause locks to seize due to ice or metal contraction. If you suspect the cold is the issue, warming up the lock can be effective. Use a Hair Dryer : Direct warm air onto the lock for several minutes to allow the metal to expand and the ice (if any) to melt. Heat the Key : You can also try warming the key slightly with a lighter, but exercise caution and make sure it isn’t too hot before inserting it into the lock. Safety Note : Avoid open flames directly on the lock itself, as this can damage surrounding surfaces or even warp the lock mechanism. Step 4: Use a Vinegar Solution for Corroded Locks If rust is the culprit, vinegar is a great household solution for loosening rust and corrosion in a lock. Apply Vinegar : Put a few drops of vinegar on the key, insert it into the lock, and let it sit for a minute or two. Vinegar can help dissolve light rust, making it easier to turn the key. Follow with Lubricant : After using vinegar, apply a small amount of graphite powder or dry lubricant to ensure the lock remains smooth and functional. Step 5: Work with Compressed Air to Remove Debris If dirt or debris has accumulated inside the lock, compressed air is a quick and efficient way to clear it out. Blow Out Dust : Use a can of compressed air and direct the nozzle into the keyhole. Short bursts of air can blow out dust and small debris that may be obstructing the mechanism. Follow Up : After using compressed air, it’s a good idea to add a dry lubricant to prevent any remaining dust from causing future jams. How to Prevent Lock Seizure in the Future Once you’ve successfully freed a seized lock, it’s helpful to take steps to prevent it from happening again. Here are some preventive tips: Regularly Lubricate : Use a dry lubricant or graphite powder once or twice a year, especially if you live in a humid or dusty area. Keep Locks Clean : Wipe off any visible dirt or dust around the lock mechanism. If the lock is exposed to elements (like outdoor or car locks), covering it can help keep debris and moisture out. Avoid Overusing Keys : If your key shows signs of wear, consider getting a replacement. Worn-out keys can cause more friction inside the lock, leading to jams. When to Seek Professional Help Sometimes, despite your best efforts, a lock just won’t budge. In cases where the lock is significantly damaged, heavily corroded, or if the key breaks inside, it’s best to reach out for professional assistance. A professional has specialized tools and expertise to address these issues without causing further damage. Taking Care of Your Locks A stuck lock can be an inconvenience, but by following these simple steps and using a little patience, you can often resolve the issue without professional help. Keeping locks in good condition with regular care is the key to ensuring they function smoothly for years to come.

Chat with us