Post Name

Thule is the world's best-selling roof rack brand. Their key system is logical, well-documented — and still confusing if you've never dealt with it before.

This guide cuts straight to what you need: how Thule's lock system works, where your code is, and how to order the right key without guesswork.

How Thule's Lock System Works

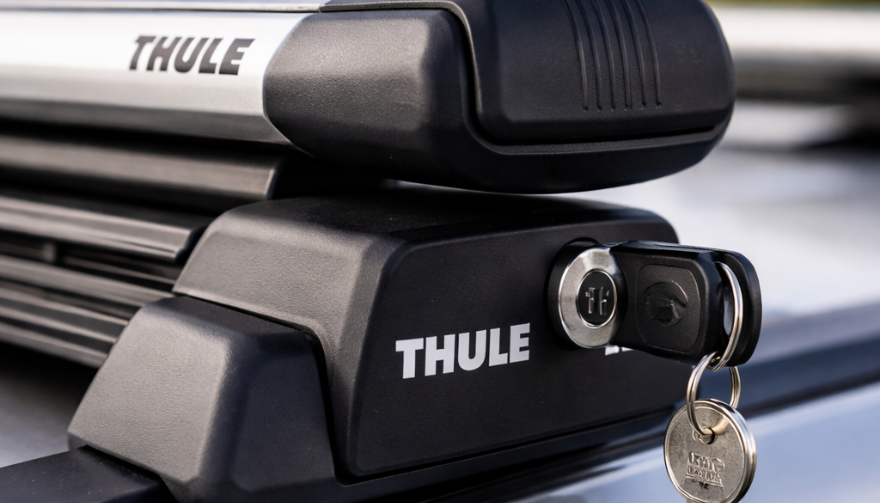
Thule roof racks use a barrel lock system with small flat-profile mechanical keys. There is no electronic component — the key is purely mechanical, cut to a specific profile that matches the lock cylinder.

Every Thule lock is stamped with a code from their N-series range (e.g. N001, N047, N121). That code is all you need to order the correct replacement.

The Thule One-Key System

Thule's One-Key System (also called the Thule Lock System or TLS) lets you set all lock points on your rack to the same key code. This means one key opens every clamp, every bar end, and every accessory lock on your setup.

It's a significant convenience — and it means losing that one key locks you out of everything at once.

If you use the One-Key System, your single N-series code covers all your locks. Order that code and you're back in business.

Where to Find Your Thule Key Code

The code is always present — you just need to know where to look.

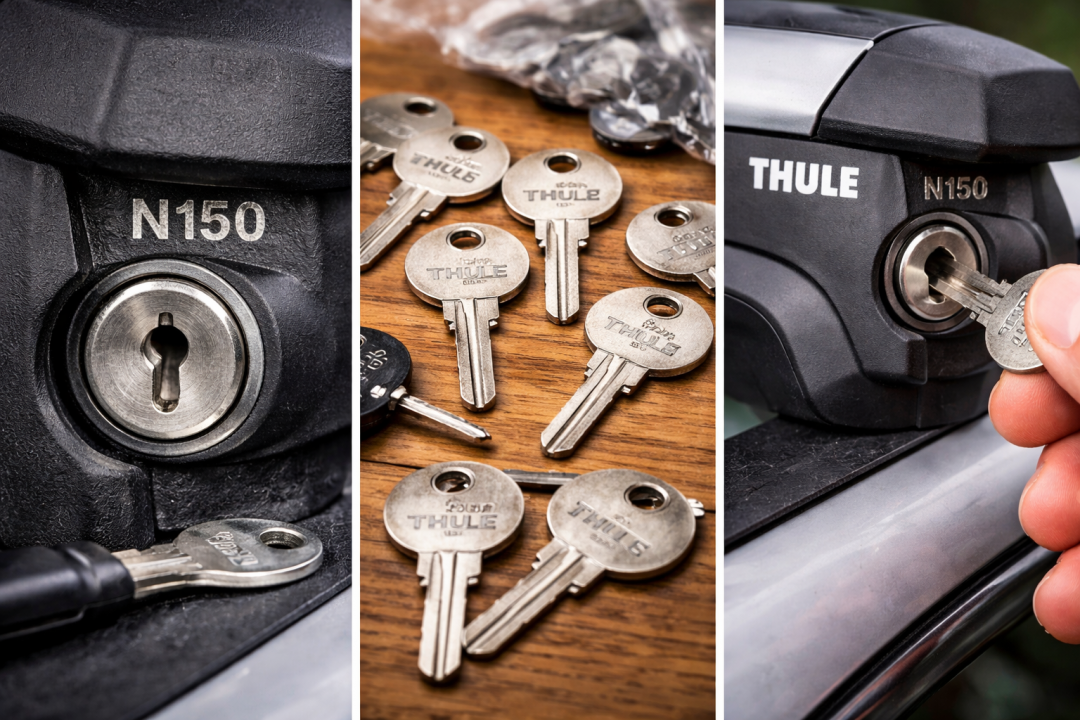
1. On the lock barrel face Look at the front of any Thule lock on your rack. The N-series code is stamped directly on the metal face of the cylinder. It typically reads: N followed by three digits (e.g. N047).

2. On your original key If you still have one working key, the code is usually stamped on the bow (the flat part you grip).

3. On the key card When Thule locks are sold new, they include a small plastic or paper key card with the code. Check your rack's original packaging or documents.

4. Via Thule's website Thule offers a code lookup service on their website for registered products. You'll need the product serial number.

5. Ask your dealer If you bought the rack from a specialist retailer, they may have a record of the code linked to your purchase.

Thule N-Series: Common Codes and What They Cover

Thule N-series codes run from N001 upward. Not all codes are in active use — the range was introduced progressively and some early codes are discontinued.

Commonly requested codes include:

  • N001–N030 — older Thule rack generations, still widely fitted to cars from the 2000s–2010s
  • N031–N100 — mid-generation racks, very common on European vehicles
  • N101–N200+ — current generation, including Thule Evo, Edge, and WingBar systems

If your rack is from 2010 or later and was purchased in Europe, your code almost certainly falls in the N031–N200 range.

Thule Lock Types: Are They All the Same Key?

No. Thule uses more than one lock type depending on the rack system.

Foot locks — secure the rack feet to the car's roof rails or gutters. These use the N-series code.

Bar end locks — secure the crossbars. On newer systems these are integrated into the foot lock and share the same code. On older systems they may be separate.

Accessory locks — Thule bike carriers, ski holders, and box locks can be keyed to match your rack. If they were purchased as part of a One-Key set, they share your N-code.

If your rack has multiple lock types with different codes, you'll need to identify each one separately.

What to Do When You Can't Find the Code

The lock is still on the car and functional: A locksmith can decode the lock — either by reading the key cuts visually or by cutting a new key through impressioning. This is the fastest physical solution.

The lock is damaged or the key is broken inside: You'll need a replacement lock cylinder. Order the correct Thule lock set for your rack model — it will come with two new keys and a new code card.

You have a photo of the lock face: Send it to a specialist supplier like mr-key.com. Experienced teams can often identify the code from the keyway and stamping visible in a photo.

Thule Key Replacement: Step by Step

  1. Locate any Thule lock on your rack
  2. Read the N-series code stamped on the lock face (e.g. N121)
  3. Check how many locks you have — do they all share the same code, or are there different codes?
  4. Order replacement keys by that exact code — one to replace the lost key, one spare
  5. Store your code — photograph it and save it somewhere permanent

Thule Rack Models and Their Lock Compatibility

Rack SystemLock TypeCode Format
Thule Evo (current)Integrated T-trackN-series
Thule EdgeFlush integratedN-series
Thule WingBar EvoBar + foot lockN-series
Thule SmartRackGutter mountN-series
Thule ProBar (older)Separate bar locksN-series
Thule 754 / 751 feetClassic feetN-series

All current Thule lock systems use the N-series. If your rack is a Thule product from the last 20 years, the N-series code applies.

How Many Keys Should You Have?

Thule recommends two. One to use, one to keep somewhere safe — not on your keyring.

A Thule replacement key costs under €10. A Thule lock cylinder costs €25–€40 per point. A full lock set replacement for a four-point rack with accessories can easily reach €150+.

The spare key is the cheapest insurance you'll ever buy for your rack.

FAQ

Q: My Thule key says N047 — is that the same as just "47"? A: Yes. Some suppliers list codes without the N prefix. N047 and 047 refer to the same Thule key. Always include the N prefix when searching to avoid confusion.

Q: Can I rekey my Thule locks to a different code? A: Yes, with Thule's One-Key System. You can purchase new lock cylinders set to a code of your choice and replace the existing cylinders. This is useful when buying a second-hand rack with an unknown code.

Q: Will a Thule key from an old rack open a new one? A: Only if the N-series code matches. The physical code, not the age of the rack, determines compatibility.

Q: I have four lock points but only two show a code — do the other two share the same code? A: On One-Key System setups, yes. All lock points are set to the same code. Read one, you know them all.

Q: My key broke off inside the lock — what do I do? A: Do not force it. A locksmith can extract a broken key from a barrel lock. Once extracted, order your replacement by the code stamped on the lock face.

Q: Can I order just one key or do I need to buy a pair? A: You can order a single key. We recommend ordering two — one replacement and one spare.

Q: How fast can I get a replacement Thule key? A: From mr-key.com, delivery to most European countries takes 2–5 business days. Germany, France, Italy, Greece, Romania: typically 2–4 days.

Order Your Thule Replacement Key (Fast EU Shipping – Same-Day Dispatch)

You have the code. You know the system. There's nothing left to do but order.

Visit mr-key.com and search by your Thule N-series code. We cut and ship Thule replacement keys across Europe — fast, accurate, and at a fraction of dealer prices.

Find Your Thule Key at mr-key.com

Also read: The Complete Guide to Roof Rack Replacement Keys

Related Posts

The Essential Guide to Understanding Detachable Tow Bars

The Essential Guide to Understanding Detachable Tow Bars

Detachable tow bars offer versatility and convenience for car owners who occasionally need to tow. Unlike fixed tow bars, they can be removed when not in use, maintaining your car's aesthetics and avoiding unnecessary bulk. However, understanding how they work, their benefits, and their maintenance requirements is essential to get the most out of your tow bar. Here’s what you need to know. Why Choose a Detachable Tow Bar? A detachable tow bar is an excellent solution if you only tow occasionally or prefer a clean look for your car when the tow bar is not in use. Here are some of its key advantages: Aesthetic Appeal : When removed, the tow bar does not interfere with the car's design. Convenience : Detachable tow bars are easy to attach and remove without tools, making them user-friendly. Versatility : They allow you to tow various loads, from trailers to bike racks, without permanently altering your car's appearance. Legal Compliance : In some regions, a visible, unused tow bar can lead to fines. A detachable option helps you avoid this. Types of Detachable Tow Bars Detachable tow bars come in different types, each suited to specific needs and preferences: Vertical Detachable Tow Bars Design : These tow bars fit seamlessly into your car’s underside, leaving no visible parts when removed. Best For : Those prioritizing aesthetics and a clean finish. Horizontal Detachable Tow Bars Design : These are partially visible but still maintain a low profile. Best For : Easier access and handling without compromising too much on appearance. Swan Neck Tow Bars Design : These have a slim, curved neck, making them stylish and less obtrusive. Best For : European-style vehicles and those who need a compact towing solution. How to Install and Use a Detachable Tow Bar Installing and using a detachable tow bar is straightforward, but following the proper steps ensures safety and efficiency: Read the Manual : Always start by reviewing the manufacturer’s instructions specific to your tow bar. Clean the Mounting Area : Dirt or debris can interfere with secure attachment. Secure the Tow Bar : Align the tow bar with the mounting bracket and ensure it clicks into place. Test Stability : Gently pull the tow bar to confirm it’s securely attached. Remove When Not in Use : Detach the tow bar and store it in a clean, dry place to prevent wear. Common Issues and Troubleshooting While detachable tow bars are convenient, they can occasionally present challenges. Here’s how to address some common problems: Stuck Tow Bar : If the tow bar is difficult to remove, check for rust or dirt in the mounting area. Use a lubricant to loosen it, but avoid using excessive force. Loose Connection : Ensure the tow bar clicks firmly into place during installation. A loose tow bar can be dangerous. Key Issues : If the locking mechanism doesn’t work, inspect the key and lock for dirt or damage. Sometimes, a replacement key may be necessary. Tips for Maintaining Your Detachable Tow Bar Proper maintenance can extend the life of your detachable tow bar and ensure its performance: Regular Cleaning : Clean the tow bar and mounting area to prevent rust and buildup. Lubricate Moving Parts : Apply a small amount of lubricant to the locking mechanism and other moving parts for smooth operation. Inspect for Damage : Check for signs of wear, cracks, or rust, especially if you tow frequently. Store Properly : When not in use, store the tow bar in a protective case or bag in a dry location. Safety Considerations When Towing Towing comes with responsibility. Here are some safety tips to keep in mind: Check Weight Limits : Never exceed your car or tow bar’s towing capacity. Inspect Connections : Ensure the tow bar and trailer hitch are secure before every trip. Test Lights : Verify that your trailer’s brake and signal lights are functioning properly. Drive Cautiously : Towing affects handling and braking. Allow extra time for stopping and maneuvering. Benefits of Investing in a Detachable Tow Bar For many drivers, a detachable tow bar offers the perfect balance of functionality and style. Whether you’re towing for leisure, work, or practicality, this option ensures: A clean car appearance when the tow bar is removed. Versatile use for different towing needs. Easy storage and maintenance. Detachable tow bars are a versatile and practical choice for occasional towing. With proper installation, regular maintenance, and a focus on safety, you can enjoy their convenience without compromising your car's aesthetics. Whether you're hauling a trailer or attaching a bike rack, a detachable tow bar offers flexibility and ease for all your towing needs. What Will You Receive When Your Order is Complete? When you place an order, you’ll receive two perfectly cut keys for Witter, GWD, TOW Trust, or Renz towbars, tailored to your original key code. These keys are compatible with lock codes within the ranges TR01-TR10 or 32001-32200. Simply select your code from the dropdown menu (e.g., TR03), and we’ll take care of the rest. Order Your Keys Today!

The Rise of Smart Car Keys: Revolutionizing Vehicle Access and Security

The Rise of Smart Car Keys: Revolutionizing Vehicle Access and Security

In today’s fast-paced world, convenience and security have become paramount, even when it comes to something as seemingly simple as car keys. Gone are the days when a physical metal key was all you needed to start your car. Smart car keys are at the forefront of a technological revolution, reshaping how we access and secure our vehicles. From push-button starts to remote access via smartphone apps, smart car keys are not just a luxury—they are rapidly becoming the standard in automotive innovation. The Evolution of the Car Key The journey of the car key from a mechanical device to a sophisticated electronic gadget mirrors the evolution of the automotive industry itself. The earliest car keys were simple mechanical tools, designed to fit into and turn a lock. By the mid-20th century, advancements introduced key fobs with remote locking and unlocking capabilities, adding a layer of convenience. Fast forward to the 21st century, and the introduction of smart keys has completely transformed the landscape. These keys leverage advanced technology like RFID (Radio Frequency Identification) and Bluetooth to communicate seamlessly with vehicles. Instead of physically inserting a key, drivers can now unlock, lock, and start their cars with just a push of a button—or even through proximity sensors. Key Features of Smart Car Keys Modern smart car keys are equipped with a host of features that enhance both convenience and security. Here are some of the most notable functionalities: Keyless Entry and Start: Proximity sensors allow you to unlock your car doors simply by approaching your vehicle. Push-button ignition eliminates the need for a traditional key turn. Remote Access: Many smart keys integrate with smartphone apps, enabling you to lock, unlock, and even start your car remotely from anywhere in the world. Enhanced Security Measures: Smart keys often use encrypted signals, making them nearly impossible to duplicate or hack. Some models include biometric authentication, such as fingerprint recognition. Theft Prevention: Advanced systems disable the car’s engine if the smart key is not detected nearby, adding an additional layer of security. These features have not only made life easier for drivers but have also raised the bar for vehicle security standards. A Global Phenomenon The adoption of smart car keys is not limited to any one region—it’s a global trend. In countries like Germany, Japan, and the United States, automotive manufacturers have embraced this technology as a standard feature in most mid-range to high-end vehicles. Emerging markets are also seeing increased adoption, with local manufacturers integrating smart key technology to remain competitive. Internationally, the demand for smart keys is driven by urbanization and the rising importance of connected devices. In Europe, for example, manufacturers are exploring how smart keys can work alongside digital infrastructure, like smart parking systems, to provide a fully integrated driving experience. Challenges and Limitations Despite their many advantages, smart car keys are not without their challenges. The most common issues include: Battery Dependency: Smart keys rely on batteries, which can fail unexpectedly, leaving drivers stranded if they don’t have a backup plan. High Replacement Costs: Losing a smart key can be expensive, as replacements often require reprogramming by a professional. Hacking Risks: While smart keys are more secure than traditional ones, they are not immune to sophisticated cyberattacks. Manufacturers and cybersecurity experts are working tirelessly to address these challenges, ensuring that the technology remains reliable and secure for users. Future Trends in Smart Key Technology The future of smart car keys promises even more exciting advancements. Here’s what to expect in the coming years: Biometric Integration: Fingerprint and facial recognition are likely to become standard features, providing an unmatched level of personalization and security. Smartphone as a Key: Many manufacturers are working on phasing out physical smart keys altogether, replacing them with app-based solutions that integrate seamlessly with your phone. Sustainability: With growing concerns about electronic waste, manufacturers are exploring eco-friendly materials and designs for future smart keys. These innovations are not only about convenience but also about creating a holistic and secure driving experience. What This Means for Car Owners For car owners, the rise of smart car keys represents a shift in how we interact with our vehicles. While the technology offers incredible benefits, it also requires a certain level of awareness and preparedness. Knowing how to maintain your smart key, replace its battery, or troubleshoot issues can save you time and money in the long run. Additionally, investing in protective cases or backup solutions, such as a spare traditional key, can help you avoid potential inconveniences. As this technology evolves, staying informed about new features and security measures will ensure that you get the most out of your smart key. Driving Into the Future Smart car keys are more than just a convenience—they are a testament to how technology can enhance everyday life. By combining cutting-edge security measures with unparalleled ease of use, these keys have redefined the driving experience. As automotive technology continues to evolve, smart car keys will likely play an even more integral role in shaping the future of transportation. Whether you’re an early adopter of the latest innovations or someone considering upgrading to a vehicle with smart key capabilities, understanding the benefits and challenges of this technology is essential. The road ahead is bright, and smart car keys are just the beginning of what promises to be an exciting journey in automotive innovation.

What You Need To Know About BMW  Swirl Flaps and How To Solve The Problem With Them

What You Need To Know About BMW  Swirl Flaps and How To Solve The Problem With Them

Swirl flaps are a BMW system that has been introduced to help burn the fuel mixture in the cylinder better due to the fact that diesel engines do not have throttle valves and it is not possible to adjust the air-fuel ratio. A diesel engine without vortex valves operates between a poor and a rich fuel mixture, because the only way to regulate it is through fuel injection. Design of the first generation swirl flaps that are made of made of metal. Unfortunately, swirl flaps are responsible for countless damaged engines and costly repairs due to design errors or metal fatigue. Once damaged, the cylinder sucks them in and causes great damage. This is how damaged valves damage the cylinder. Typical swirl flaps suction damage. The vortex valves are positioned in the inlet and are controlled by vacuum (DDE 4.0) or electrically (DDE5.0 / DDE6.4) by the engine ECU. Effects of malfunctioning valves: Swirl valves are stuck in open position: Deterioration of exhaust gas performance at lower speeds. Swirl valves are stuck in closed position: Approximate power loss of 10% at high engine speeds. How swirl flaps work: Performance characteristics: The vortex valves are in the closed position, at low engine speeds and small amounts of fuel injected (controlled by the ECU card). They open under the following conditions: coolant temperature <14 ° C OR * fuel quantity> 24 mg OR 2. engine speed 2250 rpm OR 3. inlet air temperature <-5 ° C. BMW and Pierburg have decided to produce diesel engines with metal vortex valves. The speed at which the pistons in the diesel engine operate is at least 60 rpm, so a sucked vortex valve will break and cause a number of damages inside the engine. In most cases, one or more pistons are severely damaged, as a bonus you get valves, in some cases a head or turbocharger. And this combination with a BMW engine is like a cumulative jackpot 🙂 In 2004, BMW began work on the problem and improved the design, however, a number of owners reported ongoing problems in this area. The solution to this problem is by removing the vortex valves and plugging, which does not affect the performance of the engine and at the same time, you can safely pass the exhaust test. Engines: M47 (136hp VP44 fuel pump) has no valves. M47N common rail engine (including M47N / M47TU / M47TUD20) (150hp. Face lift model from 2001 -) has valves. M57 engines (M57D) (525d & 187hp. 330d) cars with manual transmission do not have valves, but those with automatic have. M57N engines (M57TUD) (525d & 330d 204hp) have vortex valves. Ruined swirl flapss: The plugs that replace the vortex valves are easy to find on the internet, but you can also find them here on our website. Typical plugs: Disassembly of vortex valves: The vortex valves can be safely dismantled and in most cases if they are removed properly no loss of power is felt. Final list of models for which vortex valves are installed: Engine: M47N/M47TU/M47TUD20 Applications: * 110 kW (148 hp) and 330 N·m (243 lb·ft) o E46 320d 2001-2005 o E83 X3 2.0d (up to end of 2006) Engine: M47TU2D20 The engine was updated again in 2004 as the M47TU2D20. Still at 1995 cc, it produced more power across the range. Applications: * 120 kW (161 hp) and 340 N·m (251 lb·ft) E60/E61 520d E87 120d E90/E91 320d E83 X3 2.0d (end of 2006 onwards) Engine: M57/M57D25 M57D25 was introduced in 2000. Applications: * 166 PS (122 kW; 164 hp) at 4000 rpm, 350 N·m (260 lb·ft) at 2000-2500 rpm with a 4750 rpm redline, models: 2000-2003 E39 525d *Vehicles With Automatic Transmission ONLY* Engine: M57N/M57TU/M57TUD25 M57TUD25 was introduced in 2004. Applications: * 177 PS (130 kW; 175 hp) at 4000 rpm, 400 N·m (300 lb·ft) at 2000-2750 rpm models: E60/E61 525d Engine: M57/M57D30 M57D30, also called M57D29, was introduced in 1998. Applications: * 184 PS (135 kW; 181 hp)@4000, 390 N·m (290 lb·ft)@1750-3200 models: E39 530d *Vehicles With Automatic Transmission ONLY* E46 330d/330xd *Vehicles With Automatic Transmission ONLY* * 184 PS (135 kW; 181 hp)@4000, 410 N·m (300 lb·ft)@2000-3000 models: E38 730d *Vehicles With Automatic Transmission ONLY* E53 X5 3.0d * 193 PS (142 kW; 190 hp)@4000, 410 N·m (300 lb·ft)@1750-3000 models: E38 730d E39 530d Engine: M57N/M57TU/M57TUD30 M57TUD30 was introduced in 2002. It originally produced 160 kW (215 hp) at 4000 rpm and 500 N·m (370 lb·ft) at 2000-2750 rpm, but was tweaked for 150 kW (201 hp) at 4000 rpm and 410 N·m (300 lb·ft) at 1500-3250 rpm for 2003 and again for 200 kW (268 hp) at 4000 rpm and 560 N·m (410 lb·ft) at 2000-2250 rpm in 2004. Applications: * 204 PS (150 kW; 201 hp)@4000, 410 N·m (300 lb·ft)@1500-3250 models: E46 330d/330Cd/330xd E83 X3 3.0d * 218 PS (160 kW; 215 hp)@4000, 500 N·m (370 lb·ft)@2000-2750 models: E53 X5 3.0d E60/E61 530d/530xd E65 730d * 272 PS (200 kW; 268 hp)@4000, 560 N·m (410 lb·ft)@2000-2250 E60/E61 535d * 245 PS (180 kW; 242 hp)@4000, 500 N·m (370 lb·ft)@2000-2250 * 286 PS (210 kW; 282 hp)@4000, 580 N·m (430 lb·ft)@2000-2250 Engine: M57TU2D30 M57TU2D30 was introduced in 2007, making its debut in the facelifted E60 and E61. * M57TU2D30-UL: 197 PS (145 kW; 194 hp) * M57TU2D30-OL: 235 PS (173 kW; 232 hp)@4000, 500 N·m (370 lb·ft)@2000-2750 * M57TU2D30-TOP: 286 PS (210 kW; 282 hp), 580 N·m (430 lb·ft) Applications: * 197 PS (145 kW; 194 hp), 400 N·m (300 lb·ft) models: E90/E91/E92 325d E60/E61 525d/525xd * 231 PS (170 kW; 228 hp)@4000, 500 N·m (370 lb·ft)@2000-2750 models: E65 730d E90/E91 325d E90/E91 330d/330xd * 235 PS (173 kW; 232 hp) models: E60/E61, BMW E70, BMW E71 * 286 PS (210 kW; 282 hp), 580 N·m (430 lb·ft) models: E60/E61 535d E70 X5 3.0sd E71 X6 xDrive35d E83 X3 3.0sd E90/E91 335d The above models are listed for information only if you want to to make sure your engine has valves installed, please contact a competent person. Please note that the information described above is for informational purposes only and does not claim to be reliable. Mr-key.com is not responsible for any repair work you undertake that is related to the topic described in this article.

Why Your Motorcycle TFT Display Needs a Screen Protector (Before It’s Too Late)

Why Your Motorcycle TFT Display Needs a Screen Protector (Before It’s Too Late)

Modern motorcycles are smarter, more connected, and more expensive than ever. At the center of that evolution sits the TFT display—your bike’s digital command hub. Speed, revs, riding modes, navigation, calls, warnings. One exposed surface controls it all. And it’s far more vulnerable than most riders realise. A motorcycle screen protector isn’t an accessory. It’s preventive maintenance. Ignore it, and you’re gambling with one of the most expensive components on your bike. The Hidden Weak Point on Modern Motorcycles Motorcycle manufacturers invest heavily in engines, frames, and electronics. But the TFT display? It’s still a thin, exposed panel, mounted directly in the line of fire. Unlike a phone, it: Lives outdoors 24/7 Takes direct UV exposure Gets hit by dust, sand, insects, and road debris Is cleaned repeatedly—often incorrectly A single mistake is enough to leave permanent damage. TFT Displays Scratch Far Easier Than You Think Most motorcycle TFT screens are plastic-based or plastic-coated , not hardened glass like premium smartphones. That matters. Plastic scratches: From dust particles wiped across the surface From dry cloths or paper towels From jacket zippers or gloves Even from “careful” cleaning at fuel stops Once scratched, there is no polish, no fix, no reset . The damage is permanent. A motorcycle display protector absorbs this damage instead of the screen itself. Sunlight Is Quietly Destroying Your Display UV exposure doesn’t crack screens overnight. It does something worse. It slowly: Fades colours Reduces contrast Creates uneven patches Permanently dulls brightness After a few summers, the display that once looked sharp now looks tired—especially when riding in direct sunlight. A quality bike screen protector acts as a UV barrier, preserving clarity and colour accuracy for years. Glare Isn’t Just Annoying. It’s Dangerous. A washed-out screen at speed isn’t just inconvenient. It means: Missed warning lights Hard-to-read navigation prompts Delayed reaction times In bright sun, an unprotected TFT can become a mirror. Screen protectors designed for motorcycles reduce reflections and glare, improving readability in real-world riding conditions—not showroom lighting. Cleaning Your Screen Is Probably Damaging It Most riders clean their TFT displays the same way they clean helmets or windscreens. That’s a mistake. Common causes of micro-scratches: Dry wiping Paper towels Window cleaners Cloths contaminated with dust Over time, these tiny marks add up. The screen becomes hazy. Night riding gets worse. Contrast drops. A motorcycle screen protector takes that abuse instead—so you can replace the protector, not the display. The Real Cost of a Damaged Motorcycle TFT Display Here’s what many riders discover too late. Replacing a TFT display typically costs: €800–€1,200 for the part Labour and coding often extra In many cases, the bike must go to an authorised dealer Insurance often won’t cover cosmetic damage. Scratches don’t qualify as “failure.” A screen protector costs a fraction of that—and eliminates the risk entirely. Resale Value Takes a Direct Hit Buyers notice screens immediately. A scratched or faded TFT display: Signals neglect Raises questions about overall maintenance Lowers perceived value Even if the bike is mechanically perfect, a damaged display can knock hundreds off resale or trade-in value. Protecting the screen protects the bike’s future value. Why Motorcycle Displays Are More Vulnerable Than Phones It’s tempting to compare TFT displays to smartphones. That comparison fails. Motorcycle screens: Are permanently exposed to the elements Experience constant vibration Are cleaned in uncontrolled environments Sit at steep angles that catch sunlight They endure more abuse in one riding season than most phones do in five years. A dedicated motorcycle display protector is designed for exactly these conditions. Screen Protectors Don’t Affect Touch or Visibility A common myth: screen protectors reduce clarity or touch response. High-quality motorcycle screen protectors are: Ultra-thin Optically clear Designed for glove interaction Precisely cut for each display shape Once installed, most riders forget it’s even there—until it saves the screen. Installation Is Easier Than You Expect Modern protectors are made for DIY installation. Typically: No liquids required No permanent adhesives No tools beyond what’s included With careful alignment, installation takes minutes—and protects the display for years. Who Should Use a Motorcycle Screen Protector? Short answer: every rider. Especially if you: Park outdoors Ride in bright sun Tour long distances Use navigation or Bluetooth features Plan to keep or resell the bike If your motorcycle has a TFT display, it’s already at risk. FAQ Do motorcycle TFT displays scratch easily? Yes. Most TFT displays use plastic-based surfaces that scratch far more easily than smartphone glass—often from normal cleaning alone. Can a scratched motorcycle display be repaired? No. Scratches are permanent. The only true fix is replacing the entire display unit. How much does it cost to replace a motorcycle TFT screen? Replacement typically costs between €800 and €1,200, excluding labour and dealer programming. Does a screen protector affect brightness or touch sensitivity? No. Quality protectors are optically clear and maintain full touch responsiveness. Is a motorcycle screen protector worth it? Considering the replacement cost of a TFT display, a screen protector is one of the highest-value protective upgrades you can make. Can I remove or replace the protector later? Yes. Screen protectors are removable and replaceable without damaging the original display. Protect the Most Expensive Screen on Your Bike Your motorcycle’s TFT display is essential, fragile, and costly to replace. Damage doesn’t announce itself. It accumulates quietly—scratch by scratch, fade by fade—until it’s too late. Visit our shop at mr-key.com to explore our motorcycle screen protectors and protect your display before the damage becomes permanent.

Chat with us