Post Name

In modern vehicles, the once simple car key has evolved into a sophisticated piece of technology. With built-in electronics, anti-theft features, and remote functions, today’s car key is part of a broader ecosystem designed for both convenience and security.

Yet with all this advancement comes confusion. Many drivers aren’t sure what terms like immobilizer, transponder chip, and key fob actually mean—or how they relate to one another.

This guide breaks down these components in detail, explains how they work together, and clarifies why it matters when you’re replacing, reprogramming, or troubleshooting your car key.

What Is an Immobilizer?

An immobilizer is an electronic security device installed in most modern cars. Its purpose is to prevent the engine from starting unless the correct key—specifically, the correct coded signal—is detected.

When you attempt to start your vehicle, the system searches for a signal from a registered transponder chip. If that signal is missing or incorrect, the immobilizer blocks the ignition system. This means the engine won’t crank or turn over, even if the physical key fits.

Immobilizers are embedded in the car’s engine control unit (ECU) and became standard in vehicles after the late 1990s in many countries, in response to rising car theft.

They offer a silent, invisible layer of protection against common theft techniques like hotwiring. Without the correct digital authentication, the car simply will not start.

What Is a Transponder Chip?

The transponder chip is a small electronic microchip located inside the car key or key fob. The word “transponder” is a combination of “transmitter” and “responder.” It is designed to emit a unique code that the car's immobilizer can recognize.

When you insert the key into the ignition or bring a key fob close to a push-start system, the chip sends a signal to the car’s ECU. If the code matches the one stored in the car’s database, the immobilizer disables itself and allows the engine to start.

Transponder chips are passive. They do not require a battery and are activated by electromagnetic energy from the ignition coil or receiver unit inside the vehicle.

Without a functioning or correctly programmed transponder chip, your car will not start—even if the metal key turns in the ignition.

What Is a Key Fob?

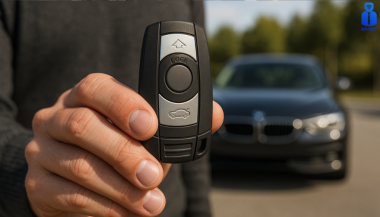
A key fob is the remote control device you carry that allows you to perform functions like locking or unlocking your car, opening the trunk, and activating panic alarms. In modern vehicles, key fobs may also control remote start or proximity-based unlocking features.

While key fobs often include a transponder chip inside them, they serve a different function. The key fob operates remote commands via short-range radio signals. The transponder chip, on the other hand, is responsible for enabling or disabling the engine.

Smart key fobs, found in many recent vehicles, don’t require insertion into the ignition. Instead, the car detects the fob nearby and permits the engine to start with a button press.

If your key fob battery dies, you might still be able to start the car manually if the transponder chip is present and recognized. Most fobs also have a hidden mechanical key inside, which can be used to unlock the door if the electronics fail.

How They Work Together

Although they are distinct components, the immobilizer, transponder chip, and key fob all work in harmony to secure and operate your vehicle.

The immobilizer controls whether the engine is allowed to start.

The transponder chip provides the digital identity that must be verified by the immobilizer.

The key fob provides wireless control of non-engine functions like locking, unlocking, and trunk access.

In most modern cars:

You approach the vehicle with the key fob.

The fob unlocks the doors.

When you start the vehicle, the transponder chip sends a signal to the immobilizer.

If the code matches, the engine is authorized to start.

If the code doesn’t match, or if the chip is missing or damaged, the engine remains disabled—even if the rest of the key’s functions work perfectly.

Why This Knowledge Matters

Understanding how your car key works is essential when:

Replacing a lost or broken key

Buying a spare or duplicate

Diagnosing why your car won’t start

Choosing between locksmith and dealership services

For example, if your key fob unlocks your car but won’t start it, the issue may lie with the transponder chip, not the battery. Conversely, if your fob doesn’t lock or unlock the car remotely, the chip may still be functional, and the issue could simply be a dead battery.

Replacing a key without properly programming the transponder chip will result in a non-starting vehicle, even if the key physically fits and the remote works.

For reliable replacement keys, fobs, batteries, and accessories, visit our Car Key Collection.

Car keys are no longer just mechanical tools. They’re complex, multi-function devices that combine security, convenience, and connectivity. By understanding the role of the immobilizer, transponder chip, and key fob, you’ll not only protect your vehicle better, but also avoid costly mistakes when dealing with repairs or replacements.

Whether you’re troubleshooting a non-starting car or simply trying to replace a damaged key, knowing the difference between these three elements gives you the clarity and confidence to take the right action.

Related Posts

Car Key Replacement: What to Do, How It Works, and When DIY Saves You Money

Car Key Replacement: What to Do, How It Works, and When DIY Saves You Money

Losing or breaking your car key can feel like a full-blown emergency. Whether your key won’t turn in the ignition, your remote suddenly stops responding, or you’ve misplaced the whole thing entirely, one thing is certain: you need a replacement—and fast. While most people assume that replacing a car key requires a trip to the dealership and a hefty bill, that’s no longer the only option. In fact, depending on your situation and car model, you may be able to handle it yourself with minimal cost and effort. Here’s what you need to know. Why Car Keys Are More Complicated Than You Think Gone are the days when a spare key meant heading to your local hardware store and getting a basic metal key cut in minutes. Today’s car keys are advanced devices that often include transponder chips, remote locking systems, and built-in immobilizers. Some even come as proximity fobs that allow push-button starting without ever taking the key out of your pocket. Because of this, replacing a lost or damaged key isn’t just about cutting a new blade—it often involves electronic programming and matching frequencies to your specific vehicle. Dealer, Locksmith, or DIY? Your Replacement Options When it comes to replacing a car key, you typically have three choices: Dealership : Offers official replacements, but often at the highest cost. Auto Locksmith : Generally more affordable and mobile, but availability varies. DIY : Ideal for shell replacements, battery swaps, and some remote keys—if you already have a functioning spare key or understand your model's programming process. If you’ve damaged your key shell or the battery has died, DIY is a surprisingly good option—especially if you’re comfortable working with small components. The Rise of DIY: Save Time, Learn Something, and Avoid Dealer Fees More and more drivers are discovering how easy it can be to fix their own car keys. Whether it’s replacing a worn key case, changing a battery, or even installing electronics into a new shell, DIY key repair is growing in popularity. To support that trend, we’ve created a full library of free video tutorials showing how to disassemble and reassemble key fobs for dozens of car models—from BMW and Audi to Peugeot, Fiat, and Toyota. These easy-to-follow guides show exactly how to change a key battery, switch a shell, or upgrade to a new case in minutes. 👉 Check out the full tutorial playlist on our YouTube channel: Mr-Key DIY Tutorials Step-by-Step: Replacing a Battery or Shell at Home Let’s say your remote still works but the case is cracked or the buttons are worn down. In that case, replacing just the outer shell is often all you need to do. Here’s a quick look at what that might involve: Carefully open the old key shell using a flat screwdriver. Remove the internal electronics and transponder chip. Insert them into your new replacement shell. Reinstall the battery or replace it with a fresh one (typically a CR2032 or CR1620). Snap everything together and test the key. If you already have a functioning key and just want a backup, some car models even allow you to program a new key yourself. Always check your owner’s manual or look up on-board programming methods by vehicle brand. Choosing the Right Key or Shell Not all replacement keys are created equal. Here’s what to consider: Chip Type : Most modern cars use a transponder chip (like ID46, PCF7946, etc.). Make sure your new key has the correct one. Blade Profile : HU83, VA2, TOY43—these are just a few examples. Match your key blade exactly. Frequency : Remote keys operate on specific frequencies (433MHz and 868MHz are most common in Europe). You can find affordable, compatible replacement shells and key fobs at reputable online stores like mr-key.com . When to Call a Pro There are still some situations where professional help is the smarter option: You’ve lost all copies of your key. Your car requires encrypted key coding with dealer-only tools. Your key has a broken or unresponsive transponder chip. In those cases, a locksmith or dealership may be necessary. Don’t Overpay—Just Be Prepared Car key replacement doesn’t have to be expensive, stressful, or time-consuming. In many cases, you can replace the shell, battery, or even the entire fob yourself—especially with a little guidance. Our Mr-Key YouTube channel is here to walk you through it. Whether you’re fixing a key today or preparing for the future, knowing your options puts you in control. And sometimes, the right tutorial is all it takes to save the day (and a lot of money).

How to Program a Car Key: A Step-by-Step Guide

How to Program a Car Key: A Step-by-Step Guide

Lost Your Car Key Programming? Here's What to Do Have you ever lost your car keys or found yourself with a spare key that doesn’t start your vehicle? While the process of programming a car key might seem intimidating, it’s often simpler than you’d expect. In many cases, car owners can program keys themselves without needing a visit to a dealership. This guide walks you through the essentials of car key programming, helping you save time, effort, and potentially a significant amount of money. Understanding Car Key Programming: The Basics Car key programming is the process of syncing a key with a car's internal computer so it can communicate securely. Modern vehicles use transponder keys or smart keys equipped with chips that emit a unique signal. Without proper programming, these keys won’t function, even if they fit perfectly into the ignition. While older mechanical keys didn’t require programming, today’s advanced systems add a layer of security, reducing the risk of car theft. However, this added sophistication means that replacing or reprogramming a key is no longer as simple as cutting a piece of metal. Quick Tip: Check your vehicle’s owner manual to see if programming your car key is a DIY-friendly process, as some models allow self-programming, while others require professional tools. Step-by-Step Guide to Programming a Car Key Before starting, ensure you have all necessary tools and information: The vehicle’s owner manual. All keys that need programming, including the functional ones. Step 1: Access Programming Mode Start by sitting in the driver’s seat with all the doors closed. Insert the already functional key into the ignition and turn it to the “on” position (do not start the engine). Some vehicles require you to cycle the key between “on” and “off” positions a specific number of times to enter programming mode. Step 2: Add the New Key Once in programming mode, remove the functional key and quickly insert the new key into the ignition. Turn it to the “on” position. The vehicle’s security light may flash to indicate the key has been successfully programmed. Step 3: Test the Key After programming, remove the new key and test it to ensure it can start the car and unlock the doors. Note: Each car manufacturer has unique programming steps. Be sure to consult your owner’s manual or the manufacturer’s website for specific instructions. When Professional Help Is Needed While many vehicles allow for DIY key programming, others require specialized equipment or software that only dealerships or locksmiths can access. This is particularly true for luxury or high-end cars with advanced encryption and security features. If your DIY efforts fail, it’s best to seek help from a certified professional. Visiting a dealership is a reliable, albeit more expensive, option. Alternatively, professional locksmiths often provide programming services at a lower cost, making them a practical choice for many drivers. Costs and Considerations The cost of programming a car key varies significantly based on the vehicle’s make and model. For basic models, self-programming might cost nothing if you already have a functional key. However, professional programming can range from $50 to $300 or more, especially for smart keys or proximity fobs. To minimize costs: Have a spare key : Always keep a functional spare to simplify programming if a replacement is needed. Research costs : Call local locksmiths or dealerships to compare pricing. Empower Yourself with Knowledge Programming a car key doesn’t have to be a daunting task. With the right tools and information, many car owners can handle the process themselves, saving time and money. However, it’s essential to recognize when professional assistance is necessary, particularly for complex key systems. By understanding the basics of car key programming and following a step-by-step approach, you can ensure your vehicle remains secure and functional. So, whether it’s a spare key or a replacement, you now have the confidence to tackle the task or know where to turn for help.

How to Take the Perfect Photo of Your Key for Easy Replacement

How to Take the Perfect Photo of Your Key for Easy Replacement

When you need a replacement key , taking a clear, detailed photo of your key can make the process much faster and more accurate. A high-quality image helps key makers understand the exact specifications, cuts, and dimensions of your key, which is especially important if you don’t have a spare. In this guide, we’ll walk you through the best practices for photographing your key so you can get an accurate replacement with ease. Why a Clear Key Photo Matters Photographing a key might sound simple, but it requires a bit of attention to detail. A well-taken photo captures the key’s grooves and unique cuts clearly, helping the key cutter replicate the exact pattern. Saves Time : A high-quality photo reduces the need for multiple attempts to cut a new key . Ensures Accuracy : Clear images help capture specific details, leading to a more precise fit. Convenient Process : With just a smartphone and a few tips, you can photograph your key from home without needing special equipment. Essential Tools for Photographing Your Key To take a clear photo of your key, you don’t need much beyond a few household items. Here’s what you’ll need: Smartphone or Camera : A phone camera is usually sufficient, but a standard digital camera works well too. Plain Background : Choose a neutral, solid-colored background like a piece of white paper or a smooth table surface. Good Lighting : Natural daylight or a bright room light helps capture details without shadows. Small Object for Elevation : A coin or similar item can lift the key slightly, making it easier to photograph. Step-by-Step Guide to Taking the Perfect Key Photo Follow these steps to take a photo that ensures clarity and accuracy for key replacement. 1. Set Up the Background Place a piece of plain white paper or another smooth, light-colored surface under your key. The solid color helps the details of the key stand out without any visual distractions. Tip : Avoid backgrounds with patterns or textures, as these can obscure the key’s features. 2. Position the Key Correctly Lay the key flat on the background, with the grooves and cuts facing up. The key should be positioned horizontally to allow a clear view of all its details. Side Profile : Make sure to capture the side profile that shows the cuts and grooves. Elevate Slightly : Place a coin or small object under one end of the key to angle it slightly toward the camera. This can help reduce shadows and improve focus on the cuts. 3. Adjust Lighting Good lighting is essential for capturing details. If possible, photograph your key in natural daylight near a window or use a well-lit room. Avoid Shadows : Ensure that no shadows fall across the key, as they can obscure details. Diffuse Light : If using a lamp, consider placing a thin cloth over it to diffuse the light and reduce harsh reflections. 4. Focus and Zoom Make sure your camera or smartphone is focused directly on the key. You may need to tap the screen to bring it into sharp focus. Zoom in Carefully : If you’re using a smartphone, zoom in slightly to capture the details, but avoid over-zooming, which can blur the image. Test Multiple Angles : Sometimes a slight adjustment in angle can capture the cuts more effectively, so take a few shots from slightly different perspectives. 5. Capture Multiple Photos It’s always a good idea to take several photos to ensure you have the best one. Try different angles and lighting adjustments to capture as many details as possible. Close-Up of the Grooves : Take one close-up image focusing on the cuts and grooves of the key. Overall Image : Include one full-length photo that shows the entire key from end to end. Try Different Angles : Slightly tilt the key or move the camera to see which angle best captures the detail of the cuts. Common Mistakes to Avoid When Photographing Your Key To get the best results, steer clear of these common issues that can impact the quality of your key photo: Blurry Images : If your hand shakes, use a small tripod or prop your phone on a stable surface. Poor Lighting : Avoid taking photos in dim rooms; use bright light to ensure the key is clearly visible. Obstructed Details : Make sure the entire length of the key is visible, without any part being cut off or covered. Tips for Ensuring a Smooth Replacement Process Once you have a clear photo of your key, there are a few final steps to make the replacement process as efficient as possible. Check the Photos : Look over your photos before sending them to ensure that they’re clear and detailed. Label the Key : If you’re photographing multiple keys, label each one in the image or add a note to avoid confusion. Include Measurements : If possible, add the measurements of the key’s length and width in your notes for added accuracy. A clear, detailed photo of your key can save you time and effort when seeking a replacement. By following these simple steps, you’ll provide all the necessary details to ensure your new key is an accurate match. Remember, good lighting, focus, and capturing all the unique cuts are essential to achieving the best results. With these guidelines, you’re set to take a photo that will make your key replacement process smooth and hassle-free.

How to Rescue Your Car Key After It Gets Wet: A Practical Guide

How to Rescue Your Car Key After It Gets Wet: A Practical Guide

The Modern Dilemma: Wet Car Keys and How to Fix Them Imagine this: you’re caught in an unexpected downpour, and your car key slips from your hand, landing straight into a puddle. Or perhaps you accidentally leave your keys in your pocket while diving into a swimming pool. Whatever the scenario, the moment you realize your car key has been submerged in water can be panic-inducing. With modern car keys embedded with electronic chips and sophisticated technology, exposure to moisture can mean more than just a temporary inconvenience—it could leave you locked out or facing expensive repairs. But before you rush to replace your key, there are several steps you can take to salvage it. Understanding the Risks: What Happens When a Car Key Gets Wet? Car keys today are more than just metal; many include electronic transponders and remote control systems that communicate with the vehicle’s ignition. Water exposure can lead to: Short circuits: Moisture can cause electronic components to malfunction or fail entirely. Corrosion: Over time, water can lead to rust and degradation of internal circuits. Battery failure: Many car keys contain small batteries, and water exposure can lead to leakage or loss of function. While traditional metal keys are less affected by water, smart keys and key fobs are vulnerable. Acting quickly can often save your key from irreparable damage. Immediate Steps to Take When Your Car Key Gets Wet If your car key has been exposed to water, time is of the essence. Here’s what you need to do: Retrieve the key from the water as quickly as possible and wipe off excess moisture using a dry, absorbent cloth or paper towel. Remove the battery if possible since many car key fobs have removable batteries; check your car manual for instructions. If the battery is wet, replace it with a new one rather than attempting to dry and reuse it. Disassemble the key fob if safe to do so, carefully opening the casing to allow internal components to dry. Avoid using force or tools that might damage delicate parts. Use silica gel or rice for drying—place the key fob in a container of silica gel packets (often found in new shoe boxes or electronics packaging) for 24-48 hours; if silica gel is unavailable, uncooked rice can work as an alternative, though it may not be as effective. Avoid using direct heat—do not use hairdryers, microwaves, or ovens to speed up drying, as high temperatures can warp plastic components and damage circuits; instead, allow the key to air dry naturally in a warm, ventilated space. Finally, test the key once you’re confident it is dry by reinserting the battery and testing it on your car; if the key does not work, it may require reprogramming or replacement. When to Seek Professional Help If your key remains unresponsive despite thorough drying, it may have suffered internal damage. In such cases, consider these options: Contact your car manufacturer or dealership—they can provide a replacement key or attempt to reprogram the existing one. Visit a professional locksmith—many automotive locksmiths specialize in repairing and reprogramming electronic keys at a lower cost than dealerships. Check your car insurance policy—some policies cover lost or damaged keys, potentially reducing replacement costs. Global Trends in Key Fob Durability and Waterproofing Car manufacturers are increasingly designing key fobs to withstand water exposure. For example, Tesla’s Model 3 key card eliminates the need for traditional keys by using a waterproof RFID card, Toyota and BMW have introduced water-resistant key fobs, minimizing the risk of damage, and future innovations may include biometric key technology, reducing dependency on physical devices altogether. As technology advances, water-resistant key designs may become the norm, reducing the stress of accidental spills or submersion. Preventative Measures: How to Protect Your Car Key from Water Damage To avoid future incidents, consider these preventative steps: Use a waterproof key case: Available online, these cases provide a protective barrier against water exposure. Designate a dry storage spot: Avoid leaving keys in pockets that may go through the wash or near pools and sinks. Invest in a spare key: Having a backup key can be a lifesaver if your primary key is damaged beyond repair. Check for manufacturer upgrades: Some car brands offer upgraded, water-resistant key fobs for an additional fee. Act Quickly to Save Your Key A wet car key doesn’t necessarily mean it’s the end of the road. By acting swiftly and following proper drying techniques, you may be able to rescue your key without costly replacements. As car technology evolves, so too will key durability, but for now, a little caution and quick thinking can go a long way. If you frequently find yourself around water, taking preventative measures can save time, money, and frustration.

Chat with us