Post Name

Replacing a lost or broken key might seem straightforward, but identifying the correct type of key is crucial to getting an exact replacement. Whether you need a car key, a house key, or even a cabinet key, each type has specific features that determine its function and fit. Here’s a step-by-step guide to understanding your key type, so you can save time and avoid unnecessary frustration when ordering a replacement.

Why Key Identification is Important

Keys come in many shapes and sizes, each designed for specific types of locks. Understanding your key’s unique characteristics ensures you get the right replacement and avoid wasted time or money on mismatched keys.

  • Avoid Extra Costs: Ordering the wrong key can mean additional fees for reordering.
  • Save Time: Getting the right key from the start saves the hassle of sending it back and waiting for the correct replacement.
  • Enhance Security: Accurate key identification ensures your security by avoiding compromised, incorrect key fits.

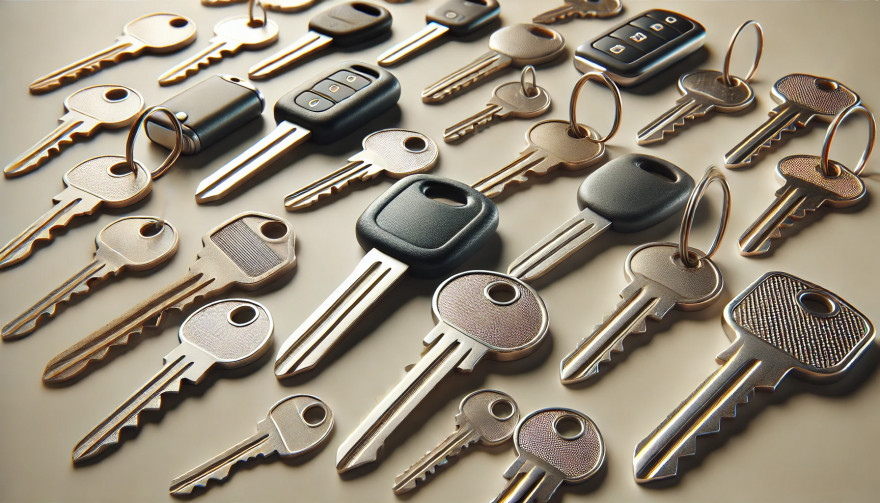
Types of Keys: Which One is Yours?

Understanding the different types of keys can help you determine what you have. Here are the common types and what makes each unique.

1. Household Keys

Household keys are typically designed for residential locks like front doors, back doors, and garage doors. These keys are often small and have either a single or double-sided cut pattern along the edges. Some household keys are unique in design, making them specific to a particular lock type.

  • Common Features: Smaller, single or double-sided cuts.
  • Typical Use: Standard residential door locks, such as deadbolts and knob locks.

Tip: Look for any identifying numbers or letters on the key itself. These may indicate a specific lock series, making it easier to identify.

2. Car Keys

Car keys come in various styles, depending on the make, model, and year of the vehicle. While older cars may use basic metal keys, most modern vehicles use transponder keys or fob keys with embedded chips for added security.

  • Basic Car Keys: Metal keys without electronic components.
  • Transponder Keys: These have a small chip embedded in the head, which communicates with the car to prevent theft.
  • Key Fobs: Some cars use a fob that contains a keyless entry system, which requires programming specific to your vehicle.

Tip: If your car uses a transponder or fob key, you may need assistance programming the replacement.

3. Padlock Keys

Keys for padlocks can be small and compact, with a straightforward design. These keys often have a unique series number printed on them, making it easier to match them to a specific lock model.

  • Common Features: Small size, usually single-sided.
  • Typical Use: Storage units, gym lockers, and outdoor gates.

4. Furniture and Cabinet Keys

Furniture and cabinet keys are typically found on desks, filing cabinets, and other types of lockable furniture. These keys are generally small, with a straight or tubular shaft, and they often have numbers or letters for identification.

  • Common Features: Compact, single or double-sided cuts, often with identification codes.
  • Typical Use: Office furniture, personal storage, and older-style drawers.

5. High-Security Keys

High-security keys are specifically designed to prevent unauthorized duplication. These keys have unique, intricate cut patterns and require special authorization for copying.

  • Common Features: Complex, often multi-sided cuts with additional security features.
  • Typical Use: High-security doors in residential or commercial settings, safes, and secure access points.

Key Identification Tips: What to Look For

Once you know the type of key, you’ll want to examine specific details that will help with identification. Here’s what to look for:

  • Keyway and Shape: The groove pattern, or “keyway,” is specific to the key type. Take note of the key’s shape and groove configuration.
  • Markings and Codes: Look for any numbers or letters printed on the key. These often refer to specific lock brands or key series.
  • Size and Length: Measure your key’s length, as some keys are longer or shorter depending on the lock type.
  • Metal Head Design: Certain keys, like car keys, may have plastic or rubberized heads, which can indicate the need for a transponder or chip inside.

Steps to Identify Your Key Type

  1. Inspect for Markings: Look closely at your key for any stamped numbers, letters, or symbols. These markings can often be referenced to find a matching lock or brand series.
  2. Measure Your Key: Use a ruler or tape measure to record the length and width of your key. These dimensions can help narrow down the exact key type.
  3. Examine the Cut Pattern: Take note of the number of cuts and whether they are on one or both sides.
  4. Identify the Head Style: If it’s a car key with a transponder, the head might be plastic or rubber.
  5. Check for a Code on the Lock: Some padlocks and cabinet locks have codes printed on them that correspond to a specific key model.

What to Do When You Can't Identify the Key

If your key has no visible markings or the cuts are unusual, consider taking a photo to help in the identification process. For specialty keys or hard-to-identify types, you may want to seek professional help or consult a detailed online database for reference.

Preventing Future Key Confusion

Once you’ve identified your key, take a few steps to prevent future issues with identification.

  • Label Your Keys: Adding a small tag with a brief description can help you remember the type of key.
  • Keep Spare Keys in a Safe Place: Having a backup key prevents you from needing a replacement immediately.
  • Store Key Codes or Information: If your key or lock has a series code, store it in a safe place in case you need it for future reference.

Identifying your key type is essential for getting a precise replacement without unnecessary hassle. By taking the time to understand your key’s unique features, you can save both time and money when it’s time to replace it. Following these steps will help ensure that your replacement key works as smoothly as the original.

Related Posts

How to Program a Car Key: A Step-by-Step Guide

How to Program a Car Key: A Step-by-Step Guide

Lost Your Car Key Programming? Here's What to Do Have you ever lost your car keys or found yourself with a spare key that doesn’t start your vehicle? While the process of programming a car key might seem intimidating, it’s often simpler than you’d expect. In many cases, car owners can program keys themselves without needing a visit to a dealership. This guide walks you through the essentials of car key programming, helping you save time, effort, and potentially a significant amount of money. Understanding Car Key Programming: The Basics Car key programming is the process of syncing a key with a car's internal computer so it can communicate securely. Modern vehicles use transponder keys or smart keys equipped with chips that emit a unique signal. Without proper programming, these keys won’t function, even if they fit perfectly into the ignition. While older mechanical keys didn’t require programming, today’s advanced systems add a layer of security, reducing the risk of car theft. However, this added sophistication means that replacing or reprogramming a key is no longer as simple as cutting a piece of metal. Quick Tip: Check your vehicle’s owner manual to see if programming your car key is a DIY-friendly process, as some models allow self-programming, while others require professional tools. Step-by-Step Guide to Programming a Car Key Before starting, ensure you have all necessary tools and information: The vehicle’s owner manual. All keys that need programming, including the functional ones. Step 1: Access Programming Mode Start by sitting in the driver’s seat with all the doors closed. Insert the already functional key into the ignition and turn it to the “on” position (do not start the engine). Some vehicles require you to cycle the key between “on” and “off” positions a specific number of times to enter programming mode. Step 2: Add the New Key Once in programming mode, remove the functional key and quickly insert the new key into the ignition. Turn it to the “on” position. The vehicle’s security light may flash to indicate the key has been successfully programmed. Step 3: Test the Key After programming, remove the new key and test it to ensure it can start the car and unlock the doors. Note: Each car manufacturer has unique programming steps. Be sure to consult your owner’s manual or the manufacturer’s website for specific instructions. When Professional Help Is Needed While many vehicles allow for DIY key programming, others require specialized equipment or software that only dealerships or locksmiths can access. This is particularly true for luxury or high-end cars with advanced encryption and security features. If your DIY efforts fail, it’s best to seek help from a certified professional. Visiting a dealership is a reliable, albeit more expensive, option. Alternatively, professional locksmiths often provide programming services at a lower cost, making them a practical choice for many drivers. Costs and Considerations The cost of programming a car key varies significantly based on the vehicle’s make and model. For basic models, self-programming might cost nothing if you already have a functional key. However, professional programming can range from $50 to $300 or more, especially for smart keys or proximity fobs. To minimize costs: Have a spare key : Always keep a functional spare to simplify programming if a replacement is needed. Research costs : Call local locksmiths or dealerships to compare pricing. Empower Yourself with Knowledge Programming a car key doesn’t have to be a daunting task. With the right tools and information, many car owners can handle the process themselves, saving time and money. However, it’s essential to recognize when professional assistance is necessary, particularly for complex key systems. By understanding the basics of car key programming and following a step-by-step approach, you can ensure your vehicle remains secure and functional. So, whether it’s a spare key or a replacement, you now have the confidence to tackle the task or know where to turn for help.

KEY COVERS: WHAT DO YOU NEED TO KNOW?

KEY COVERS: WHAT DO YOU NEED TO KNOW?

What is a Key Cover? A key cover , often referred to as a key shell or key case, is the outer part of your key. It houses the electronic board, chip, and battery but excludes the internal electronics themselves. If your key casing is damaged, there’s no need to replace the entire key – just changing the key cover can restore its durability and usability while saving you money. When Do You Need a New Key Cover? You might need a key cover replacement when: The buttons on your key become worn out or stop responding. The outer case cracks, exposing the internal electronics. The key mechanism no longer functions smoothly. You want to refresh the appearance of your key with a new, sturdy shell. Instead of struggling with a faulty key, simply replace the cover and extend the lifespan of your original key! How to Choose the Right Key Cover? When selecting a replacement key cover, consider the following factors: Button Layout: Ensure that the number of buttons and their symbols match your existing key. Blade Shape: If your key includes an integrated blade, make sure the new shell accommodates it correctly. Quality: A good-quality key cover ensures a snug fit, smooth functionality, and long-lasting durability. At MR-KEY , we offer a variety of key covers designed to match your specific car model perfectly, providing both aesthetics and functionality. How to Change Your Key Cover? Replacing your key cover is simple and doesn’t require professional assistance. Here’s how: Purchase a compatible key cover from our website. Open your old key case carefully. Transfer the electronic board and chip from your original key to the new key cover . Reassemble the key, ensuring all components fit securely. Test the buttons and functions to confirm everything is working properly. For step-by-step guidance, we provide video tutorials on our website, showing you exactly how to change your key shell and even replace the battery if needed. What Else Can You Change When Replacing the Key Cover? While changing your key cover, it's the perfect time to: Replace non-functional click buttons on your key’s electronic board. Change the battery since you're already disassembling the key, ensuring it lasts longer. At MR-KEY , we strive to make key replacements easy, affordable, and accessible to everyone. Explore our website to find the perfect key cover, key cutting services, and useful video guides to help you maintain your car key like a pro!

How to Install a Hydrogel Navigation Screen Protector

How to Install a Hydrogel Navigation Screen Protector

Nowadays car interiors rely heavily on touchscreens. Whether you drive a BMW 3 Series , VW Golf , Audi A4 , Mercedes A-Class , Peugeot 3008 , or Skoda Octavia , your infotainment display is the centre of navigation, settings, entertainment and safety features. But these screens are also fragile—prone to scratches , fingerprints , micro-abrasions , and glare . A hydrogel navigation screen protector is one of the best ways to protect your car touchscreen without affecting clarity or touch sensitivity. This guide shows you exactly how to install a hydrogel protector , step by step, with expert tips, mistakes to avoid, and a few insider tricks that most guides miss. What Is a Hydrogel Screen Protector? Hydrogel is a soft, self-healing, flexible material used widely in phone protection and now increasingly in automotive displays. Unlike tempered glass, it adapts to curved edges and eliminates small bubbles over time. For more technical background, you can read the scientific definition on hydrogels Hydrogel is ideal for infotainment screen protection because it: Reduces glare Absorbs micro-scratches Maintains full touch sensitivity Adapts to curved and angled car screens Self-heals small marks over 24–48 hours It’s especially useful for European cars where screens are large and glossy, such as: Mercedes MBUX screens (A-Class, C-Class, GLC) Volkswagen MIB systems (Golf, Passat, Tiguan) BMW iDrive displays (3 Series, X1, X3) Audi MMI touchscreens (A4, A3, Q5) Peugeot i-Cockpit models Renault Clio, Captur, Megane Skoda Octavia, Superb, Scala Curious which specific models benefit the most from hydrogel protection? Check out our full guide on which cars benefit most from hydrogel navigation protection . Before You Start: Essential Preparation Installing a hydrogel protector takes only a few minutes, but the preparation stage determines whether the final result looks factory-perfect . You Will Need Hydrogel screen protector Microfiber cloth Screen-cleaning wipe (wet & dry) Dust-removal sticker (optional but recommended) Small squeegee / card Choose the Right Environment Install the protector in: A dust-free space (car parked indoors is ideal) Soft lighting (so dust particles are visible) A still environment (no wind, no blowing air) Avoid doing it outside or while standing near open windows. Step-by-Step: How to Install a Hydrogel Navigation Screen Protector 1. Clean the Navigation Screen Thoroughly Use a wet wipe first, then a dry microfiber cloth. Focus on: Corners Edges Around the frame Any oily fingerprints Tip: Turn the screen off to see dust more easily. 2. Remove All Dust Particles Even one small dust speck can create a permanent bubble. Use: Dust-removal stickers A clean microfiber cloth Hold the screen at an angle and look under the light. If perfectionism matters anywhere, it’s here. 3. Peel the First Protective Layer Most hydrogel protectors have two layers . Peel Layer 1 halfway and align the protector with: Left and right edges Upper frame Any curved edges Do not peel it completely yet. 4. Align and Apply the Protector Once aligned: Press the top centre gently Slowly drag your finger downward Peel off the rest of Layer 1 as you go The film will naturally stick without much force. 5. Use the Squeegee to Push Out Air Work from centre outward , using firm but controlled pressure. Hydrogel is self-healing , so small micro-bubbles usually disappear within 24–48 hours . 6. Remove the Final Top Layer After application: Peel Layer 2 from one corner Pull slowly to avoid lifting the protector This reveals a glossy, clear surface below. 7. Allow 24 Hours for Full Adhesion Do not touch the screen too much during this period. Avoid: Heat exposure Cleaning sprays Aggressive pressing Hydrogel needs time to “settle” and self-heal. Common Mistakes to Avoid Even a perfect protector can be ruined by simple errors. Installing in a dusty environment Fibres, dust and hair easily get trapped. Touching the sticky side This leaves permanent marks. Rushing the alignment Hydrogel is flexible but not stretch-proof. Cleaning with alcohol after installation This can damage the outer coating. Installing on a hot screen Heat weakens adhesion and causes micro-bubbles. For a complete walkthrough , see our guide on how to protect your car’s navigation screen . Why Hydrogel Is Better Than Tempered Glass for Car Screens Tempered glass works well for smartphones—but not for car navigation screens. Hydrogel performs better because: It bends and adapts to curved displays It doesn’t create raised edges It avoids touchscreen sensitivity issues It self-heals micro-abrasions It provides better Anti-Glare performance If you want to see more in depth guide on why hydrogel protectors are better check out our guide on Hydrogel vs Tempered Glass Navigation Protectors Comparison FAQs 1. Does a hydrogel protector reduce screen sensitivity No. Hydrogel maintains full touch responsiveness because the material is soft and pressure-adaptive. 2. Can I reuse a hydrogel screen protector? No. Once removed, it cannot be reinstalled cleanly. 3. How long do micro-bubbles take to disappear? Usually 24–48 hours. Stubborn ones may take up to 72 hours if the screen is curved. 4. Will the protector affect brightness or clarity? High-quality hydrogel preserves original screen clarity. Matte versions reduce glare but may slightly soften reflections. 5. Is hydrogel safe for anti-reflective or coated screens? Yes. Hydrogel adhesive is gentle and does not damage coatings. If you want premium hydrogel protectors for BMW, Audi, Mercedes, VW, Peugeot, Renault, Skoda and more, explore our full selection today. Visit our shop at mr-key.com Related Guides Which cars benefit most from hydrogel navigation protection How to Protect Your Car’s Navigation Screen from Scratches,Glare & Fingerprints Hydrogel vs Tempered Glass Navigation Protectors Comparison

What to Do If You Lose Your Car Keys While Travelling?

What to Do If You Lose Your Car Keys While Travelling?

1. Why this happens and why you must act fast Losing car keys while travelling is more common than you might assume. Whether it’s slipping out of a beach bag, leaving them at a café or dropping in transit, your vehicle becomes vulnerable. In addition, modern keys increasingly contain electronic transponders , chips or fobs—meaning replacement cost and complexity shoot up. When you’re away from home, both the stress and the stakes increase: you may face towing, expensive replacements or worse — being stranded. The sooner you act the less time you give for theft, theft-of-opportunity or further cost escalation. 2. Immediate steps when you realise your keys are missing a) Stay calm and retrace your steps Start by pausing. Panic hampers clear thinking. Consider the last time you remember using your keys: in the car, on unloading luggage, at hotel reception. Retrace your route slowly. As RAC advise, this step often resolves the problem without cost. b) Search systematically Check all pockets, bags, seats, coat hangers, beach bags, under cushions, in and around your car. If you’re staying somewhere temporarily, check hotel rooms, fuelling stations, parking lots. As one travel-site suggests: “Go through all your pockets… look around all surfaces in your hotel room”. c) Contact places you visited Call restaurants, cafés, shops, airport parking or hotels where you parked the vehicle. Key finders are often handed in. d) Assess risk of theft If you suspect the keys were stolen (pick-pocket, hotel burglary or unattended vehicle) you should alert local police and your insurance provider—once a key is missing, your vehicle security is compromised. e) Secure the vehicle If the vehicle is parked in an insecure location, consider moving it (if possible) or arranging towing. Leaving it locked but unattended increases theft risk. 3. How to use replacement key delivery services Replacement key delivery refers to services that cut and program a new car key and deliver it (or have it fitted) to your location—whether your holiday base, airport car park or home driveway. Steps to follow: Have vehicle details ready: make, model, year, registration number, VIN if available. Choose service: For UK and travel users, many auto-locksmiths offer mobile services that come to you. Confirm delivery logistics: Where is the vehicle parked? Will you be present when the key is delivered or fitted? If abroad, is the company able to support your location? Understand key type: Basic mechanical, transponder chip key, keyless fob—all vary in price and logistics. Check old key de-activation: A top provider will delete the lost key’s code so it cannot be used in future—critical for security. Why this is often your best path while travelling Going via your vehicle manufacturer dealer is often slower and pricier — as UK guide notes: “The quickest and least expensive way … is via an auto locksmith.” In a foreign locale, a mobile specialist or key-delivery service saves towing the vehicle and waiting for factory part shipment. 4. Hiring an emergency locksmith: what to look for When you’re locked out or stranded, an emergency locksmith (24-hour) can be your lifeline. But not all are equal. Checklist: Confirm they specialise in auto locksmith / car key replacement , not just domestic locks. Ask for credentials (affiliation with industry body). Insist on proof they will delete/pair the key to your vehicle (so lost key becomes useless). Understand travel/overseas call-out charges. Before arrival, ask for an estimate and payment process (card, cash etc.). Some holiday locales only accept cash. Stay with your vehicle in a safe public place. If you are on a remote vacation site, move to well-lit area before the locksmith arrives. Typical process: The locksmith arrives, verifies ownership (ID + logbook/V5C). They cut and/or program a key, or fix the lock/immobiliser if required. You pay for service and receive the new key — vehicle is back on the road. 5. Insurance, roadside cover and overseas travel issues Insurance/key cover Do you have lost key cover? Most UK car insurance policies don’t include lost keys as standard. You might need a premium add-on. If you claim, your no-claims bonus may be affected. Breakdown/roadside assistance Your breakdown provider (e.g., Motorway or RAC ) may offer key services, but often their vans don’t carry full key-programming equipment. So an auto locksmith still may be needed. Travelling abroad Check if your insurance/cover extends to the country you’re in. Confirm language support and local currency charges with any service you call. If you rented the car: contact the rental company immediately — they may have specific protocols for lost keys (often expensive). 6. Special cases: rental vehicles, keyless entry & fobs Rental vehicles When you lose the keys to a hire car abroad, you are likely to be liable for high fees. Rental companies will likely charge for towing and replacement, not just the locksmith. According to travel forums: “We do not offer coverage for lost keys… The replacement fee of $125 for lost key.” Call the rental agency, follow their instructions, and keep all receipts. Keyless / smart keys & modern cars Most vehicles since 2000 use transponder chips or keyless systems. Replacement these can cost several hundred pounds—UK guides show typical range from £100–£300 or more depending on brand. When you lose a keyless fob, you may need the original still in possession or need the vehicle brought to the dealer. Factor this potential delay into your travel plans. Single key left If you only have one remaining key, treat it as your last key. Get a spare made ASAP once you’re home so you’re not in the same situation again. 7. Preventative measures for your next trip Always carry a spare key at home or with a trusted person. Use a tracker (such as an AirTag or Bluetooth key-tracker) on your keyring. UK blogs suggest this simple tech helps locate lost keys. Establish a routine spot where you place your keys at the start of every journey. If you have old keys (house + car), don’t mix them during travel. Note down your vehicle details (make, model, registration, VIN) in your phone before travelling—so you’re ready if you need a replacement. For holiday car hire, take a photo of the key and keep the rental company’s emergency phone number saved. FAQ Q: What happens if I lose my only car key and I’m abroad? A: You’ll need to contact an auto locksmith or dealer who can cut and program a new key. Have vehicle details ready. Expect cost and waiting time to increase since you have no spare. Q: Can I just use a dealer to replace the key? A: Yes, but often it’s slower and more expensive . UK guides claim mobile auto locksmiths are typically faster and cheaper. Q: How long does replacement take? A: For many modern cars, the physical key can be cut quickly, but programming and blank arrival may take days. Dealers might take up to weeks. Q: Will my car insurance cover a lost key? A: Only if you have key-cover added or your insurance includes it—not standard. Check your policy. Claiming may affect your no-claims status. Q: What should I do if I lose the key and my car is locked in a remote place? A: First make sure you are safe. Then use your breakdown/roadside cover to move the vehicle to a safe area if needed. Then call an emergency auto locksmith to attend and provide a replacement. Need a reliable solution now? Visit our shop at mr-key.com to discover how we can cut and deliver replacement car keys swiftly—even when you’re travelling.

Chat with us