Post Name

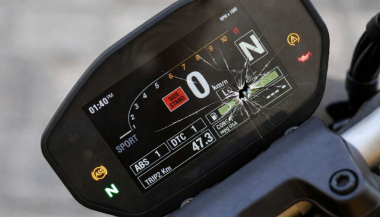
Nowadays car interiors rely heavily on touchscreens. Whether you drive a BMW 3 Series, VW Golf, Audi A4, Mercedes A-Class, Peugeot 3008, or Skoda Octavia, your infotainment display is the centre of navigation, settings, entertainment and safety features.

But these screens are also fragile—prone to scratches, fingerprints, micro-abrasions, and glare. A hydrogel navigation screen protector is one of the best ways to protect your car touchscreen without affecting clarity or touch sensitivity.

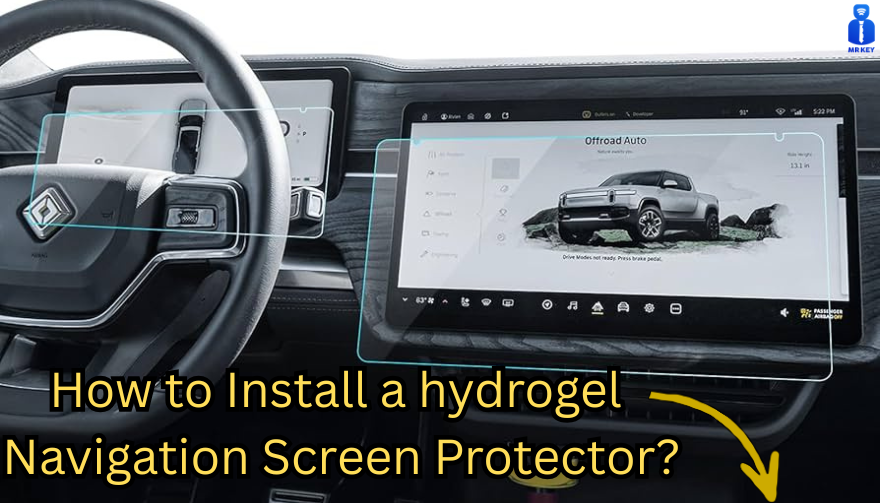
This guide shows you exactly how to install a hydrogel protector, step by step, with expert tips, mistakes to avoid, and a few insider tricks that most guides miss.

What Is a Hydrogel Screen Protector?


Hydrogel is a soft, self-healing, flexible material used widely in phone protection and now increasingly in automotive displays. Unlike tempered glass, it adapts to curved edges and eliminates small bubbles over time.

For more technical background, you can read the scientific definition on hydrogels

Hydrogel is ideal for infotainment screen protection because it:

Reduces glare

Absorbs micro-scratches

Maintains full touch sensitivity

Adapts to curved and angled car screens

Self-heals small marks over 24–48 hours

It’s especially useful for European cars where screens are large and glossy, such as:

Mercedes MBUX screens (A-Class, C-Class, GLC)

Volkswagen MIB systems (Golf, Passat, Tiguan)

BMW iDrive displays (3 Series, X1, X3)

Audi MMI touchscreens (A4, A3, Q5)

Peugeot i-Cockpit models

Renault Clio, Captur, Megane

Skoda Octavia, Superb, Scala


Curious which specific models benefit the most from hydrogel protection?

Check out our full guide on which cars benefit most from hydrogel navigation protection.

Before You Start: Essential Preparation


Installing a hydrogel protector takes only a few minutes, but the preparation stage determines whether the final result looks factory-perfect.

You Will Need


Hydrogel screen protector

Microfiber cloth

Screen-cleaning wipe (wet & dry)

Dust-removal sticker (optional but recommended)

Small squeegee / card 

Choose the Right Environment


Install the protector in:

A dust-free space (car parked indoors is ideal)

Soft lighting (so dust particles are visible)

A still environment (no wind, no blowing air)

Avoid doing it outside or while standing near open windows.

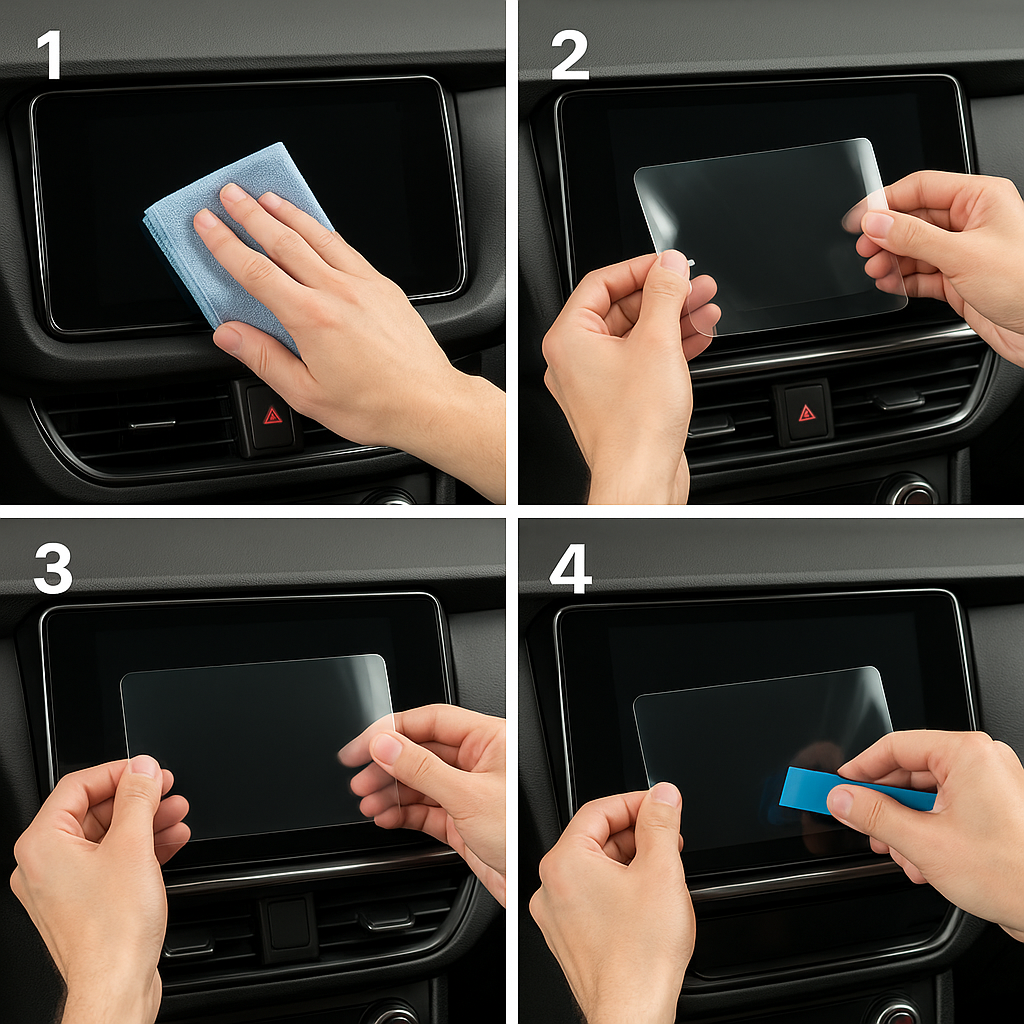
Step-by-Step: How to Install a Hydrogel Navigation Screen Protector


1. Clean the Navigation Screen Thoroughly


Use a wet wipe first, then a dry microfiber cloth.

Focus on:

Corners

Edges

Around the frame

Any oily fingerprints

Tip: Turn the screen off to see dust more easily.

2. Remove All Dust Particles


Even one small dust speck can create a permanent bubble.

Use:

Dust-removal stickers

A clean microfiber cloth

Hold the screen at an angle and look under the light. If perfectionism matters anywhere, it’s here.

3. Peel the First Protective Layer


Most hydrogel protectors have two layers.

Peel Layer 1 halfway and align the protector with:

Left and right edges

Upper frame

Any curved edges

Do not peel it completely yet.

4. Align and Apply the Protector


Once aligned:

Press the top centre gently

Slowly drag your finger downward

Peel off the rest of Layer 1 as you go

The film will naturally stick without much force.

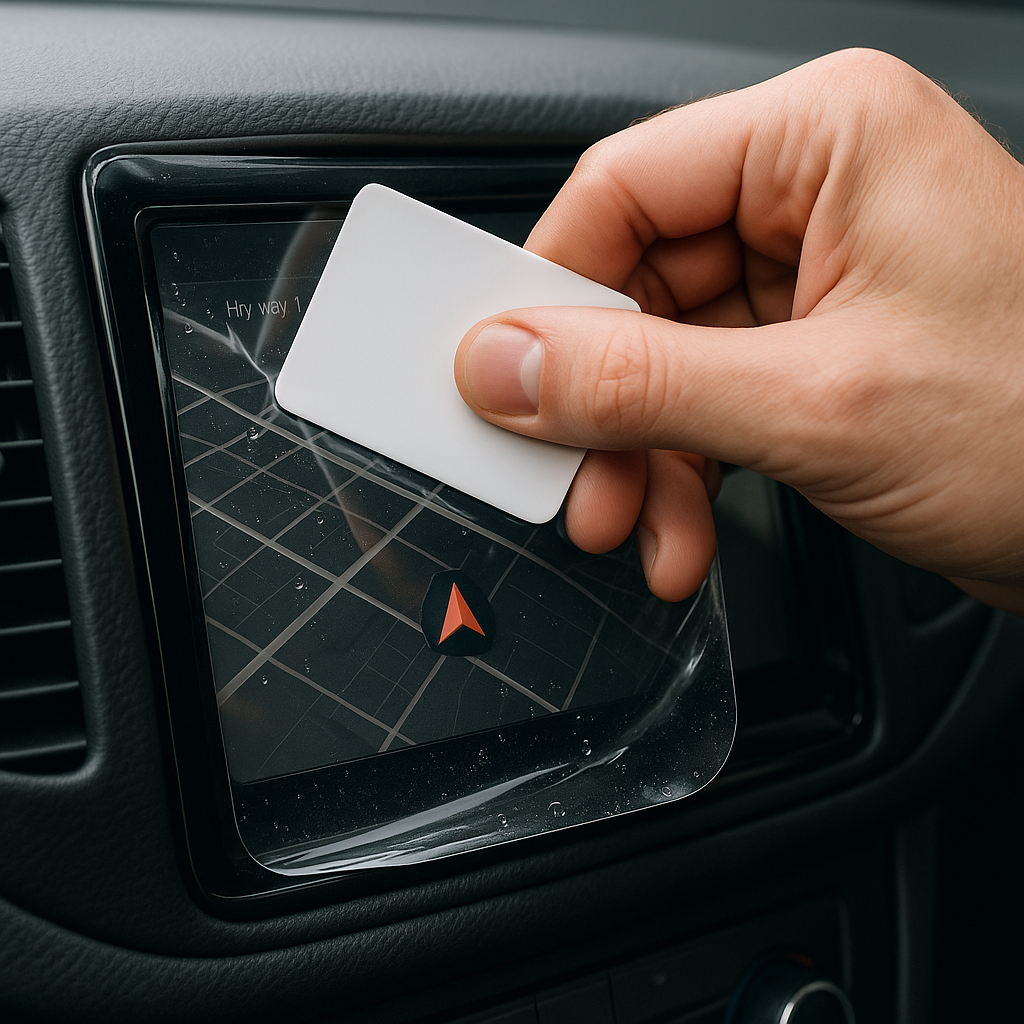
5. Use the Squeegee to Push Out Air


Work from centre outward, using firm but controlled pressure.

Hydrogel is self-healing, so small micro-bubbles usually disappear within 24–48 hours.

6. Remove the Final Top Layer


After application:

Peel Layer 2 from one corner

Pull slowly to avoid lifting the protector

This reveals a glossy, clear surface below.

7. Allow 24 Hours for Full Adhesion


Do not touch the screen too much during this period.

Avoid:

Heat exposure

Cleaning sprays

Aggressive pressing

Hydrogel needs time to “settle” and self-heal.

Common Mistakes to Avoid

Even a perfect protector can be ruined by simple errors.

 Installing in a dusty environment

Fibres, dust and hair easily get trapped.

Touching the sticky side

This leaves permanent marks.

Rushing the alignment

Hydrogel is flexible but not stretch-proof.

Cleaning with alcohol after installation

This can damage the outer coating.

Installing on a hot screen

Heat weakens adhesion and causes micro-bubbles.


For a complete walkthrough, see our guide on how to protect your car’s navigation screen.

Why Hydrogel Is Better Than Tempered Glass for Car Screens


Tempered glass works well for smartphones—but not for car navigation screens.

Hydrogel performs better because:

It bends and adapts to curved displays

It doesn’t create raised edges

It avoids touchscreen sensitivity issues

It self-heals micro-abrasions

It provides better Anti-Glare performance


If you want to see more in depth guide on why hydrogel protectors are better check out our guide on Hydrogel vs Tempered Glass Navigation Protectors Comparison


FAQs


1. Does a hydrogel protector reduce screen sensitivity

No. Hydrogel maintains full touch responsiveness because the material is soft and pressure-adaptive.

2. Can I reuse a hydrogel screen protector?

No. Once removed, it cannot be reinstalled cleanly.

3. How long do micro-bubbles take to disappear?

Usually 24–48 hours.

Stubborn ones may take up to 72 hours if the screen is curved.

4. Will the protector affect brightness or clarity?

High-quality hydrogel preserves original screen clarity.

Matte versions reduce glare but may slightly soften reflections.

5. Is hydrogel safe for anti-reflective or coated screens?

Yes. Hydrogel adhesive is gentle and does not damage coatings.


If you want premium hydrogel protectors for BMW, Audi, Mercedes, VW, Peugeot, Renault, Skoda and more, explore our full selection today.

Visit our shop at mr-key.com


Related Guides

Which cars benefit most from hydrogel navigation protection

How to Protect Your Car’s Navigation Screen from Scratches,Glare & Fingerprints

Hydrogel vs Tempered Glass Navigation Protectors Comparison

Related Posts

The Ultimate Checklist for Maintaining Your Car's Electronic Systems

The Ultimate Checklist for Maintaining Your Car's Electronic Systems

Why Regular Car Maintenance Matters Taking care of your car is more than just keeping it clean; it's about ensuring it stays reliable, safe, and efficient. When you stick to a regular maintenance schedule, you save yourself from costly repairs down the road and improve your vehicle’s lifespan. Whether you drive daily or occasionally, routine maintenance is something every car owner should prioritize. Here’s a simple breakdown of what you should check and when, so you can keep your car in top shape without breaking the bank. The Basics: Monthly Car Maintenance Checklist Think of this checklist as your car’s health routine. Performing these quick checks every month will help catch minor issues before they turn into big (and expensive) problems: Check the Oil Level : Pull out the dipstick, wipe it clean, reinsert, and check the level. Low oil can damage your engine over time. Inspect the Tire Pressure : Use a pressure gauge to ensure your tires are inflated to the recommended PSI. Under-inflated tires wear faster and decrease fuel efficiency. Top Off Windshield Washer Fluid : Keeping your windshield clean improves visibility and safety. Look for Visible Leaks : Check under your car for any oil, coolant, or fluid leaks. If you spot something unusual, it’s time to consult a professional. Test the Lights : Make sure all your lights—headlights, brake lights, and signals—are working properly. These tasks take less than 10 minutes and can help you avoid unexpected surprises on the road. Every 3,000–5,000 Miles: Oil Changes and Inspections Oil is your engine's lifeblood. Over time, oil breaks down, causing it to lose its ability to lubricate and protect your engine. Changing the oil regularly—about every 3,000 to 5,000 miles, depending on your vehicle—is crucial. What to do: Replace the oil filter alongside the oil to ensure clean circulation. Inspect the belts, hoses, and filters for any cracks or wear. Rotate your tires to promote even tread wear and extend their lifespan. Following this schedule will improve engine performance and fuel efficiency while reducing wear and tear. 6-Month Maintenance: A Deeper Look Every six months (or around 6,000–7,500 miles), it’s time to give your car a more thorough inspection. This ensures that everything continues to operate as it should: Check the Battery : Look for corrosion on the terminals and ensure the battery has enough charge. A weak battery can leave you stranded. Inspect Brake Pads and Rotors : Squealing or grinding noises may indicate it’s time for new brake pads. Safe brakes are non-negotiable. Replace Wiper Blades : Worn-out wipers reduce visibility during rain or snow. Swap them out for a clear view. Check Fluid Levels : Inspect coolant, transmission fluid, and brake fluid. Top them off if necessary or replace them according to your vehicle’s manual. Annual Car Maintenance: Keep It Running Like New Your annual maintenance routine focuses on long-term performance and reliability. Here’s what to prioritize: Replace the Air Filter : A clean air filter improves engine efficiency and fuel economy. Examine the Suspension and Alignment : If your car pulls to one side or the ride feels bumpy, it’s time to get your alignment and suspension checked. Flush and Replace Fluids : This includes coolant, brake fluid, and transmission fluid. Over time, these break down and need to be replaced to prevent damage. Inspect the Exhaust System : Check for leaks, damage, or unusual noises. A faulty exhaust can impact fuel efficiency and safety. Annual checkups ensure your car remains reliable for years to come, saving you money on unexpected repairs. Pro Tip: Pay Attention to Your Car’s Warning Signs Your car has built-in systems to tell you when something’s wrong. Ignoring these warning signs could lead to bigger issues down the road: Check Engine Light : Don’t dismiss this. It’s your car’s way of saying it needs immediate attention. Strange Noises : Grinding, squealing, or clunking sounds are often red flags for underlying problems. Vibrations or Pulling : This could signal alignment issues, tire imbalances, or suspension problems. If you notice any of these, act quickly. Addressing small concerns early can prevent expensive breakdowns later. Why Routine Car Maintenance Saves You Money Regular maintenance may seem like an extra expense, but it’s far more affordable than major repairs. For example: A routine oil change costs far less than replacing a damaged engine. Keeping tires properly inflated extends their life and improves fuel efficiency. Replacing brake pads is much cheaper than repairing damaged rotors or calipers. By investing a little time and effort into routine checks, you avoid costly breakdowns and ensure your car stays reliable.

Why Your Car Remote Isn’t Working and How to Fix It

Why Your Car Remote Isn’t Working and How to Fix It

Car remotes have become an essential part of modern vehicle ownership, offering convenience and added security. However, when they stop working, it can lead to frustration and delays. If you’ve ever faced a malfunctioning car remote, don’t worry—you’re not alone. Here’s a guide to help you understand the common reasons why your car remote might fail and how you can fix the issue quickly and affordably. 1. Dead Battery: The Usual Suspect One of the most common reasons for a non-functional car remote is a dead battery. Over time, the small coin batteries in your remote lose their charge, making the remote unusable. Signs of a Dead Battery: Reduced range, inconsistent functionality, or complete failure to respond. How to Fix It: Replace the battery with a compatible CR-type coin battery. Check your car manual or the remote’s casing for the correct battery type. Pro Tip: Always keep a spare battery in your glove compartment to avoid getting stranded. 2. Signal Interference: The Invisible Barrier Signal interference can block communication between your remote and your car. This can happen in areas with high electromagnetic activity or if the remote’s signal is weakened. Common Causes: Proximity to cell towers, Wi-Fi routers, or even other key fobs . How to Resolve It: Move closer to your car and try again. Change your location if you’re in a crowded parking area. Keep your remote away from other electronic devices that might cause interference. Prevention Tip: Avoid storing your car remote near electronics when not in use. 3. Remote Needs Reprogramming Sometimes, a car remote loses its programming, which is essential for communicating with your car. This can happen after battery replacement, electrical system resets, or software glitches. Signs Your Remote Needs Reprogramming: The buttons don’t respond, or the remote only works intermittently. What You Can Do: Check your car manual for DIY reprogramming instructions. If DIY methods fail, consult a professional locksmith or your car dealer for assistance. Pro Tip: Always reprogram your remote immediately after replacing its battery to avoid compatibility issues. 4. Physical Damage: More Than Just Wear and Tear Daily use, accidental drops, or exposure to moisture can damage your car remote, leading to malfunction. The internal components, such as the circuit board, are particularly sensitive. Signs of Damage: Cracks on the casing, loose buttons, or water ingress. How to Address It: For minor issues, replace the remote casing or repair loose buttons. If the circuit board is damaged, you’ll need a replacement remote. Preventative Measures: Use a protective key cover to shield your remote from damage. Keep your remote away from water and extreme temperatures. 5. Faulty Car Receiver: The Problem Isn’t Always the Remote In some cases, the issue lies with your car’s receiver rather than the remote. If the receiver is damaged or malfunctioning, it won’t recognize signals from the remote. How to Diagnose: If multiple remotes fail to work with the same car, the receiver might be the issue. Test your remote on a similar vehicle, if possible, to rule out the remote as the problem. How to Fix It: Consult a professional mechanic to inspect and repair the car’s receiver system. General Tips to Keep Your Car Remote Functional Prevention is better than cure, especially when it comes to car remotes. Here are some tips to avoid future issues: Regular Maintenance: Inspect your remote periodically for wear and tear. Store It Safely: Keep your remote in a safe, dry place to avoid accidental damage. Backup Plan: Always have a spare key or remote handy for emergencies. Invest in a Tracker: Attach a Bluetooth tracker to your remote for easy location if it gets misplaced. When to Seek Professional Help While many car remote issues can be resolved with DIY methods, some problems require professional assistance. If your remote still doesn’t work after troubleshooting, consult a locksmith or an automotive specialist. They can help with repairs, replacements, and reprogramming at an affordable cost. Don’t Let a Faulty Remote Slow You Down A malfunctioning car remote can be a hassle, but most issues are fixable with a little know-how. Whether it’s a dead battery, signal interference, or physical damage, understanding the root cause will help you resolve the problem efficiently. With proper care and maintenance, your car remote will continue to offer the convenience and security you rely on every day.

Top 10 Interesting Facts About Mercedes: A Journey of Luxury, Innovation, and Performance

Top 10 Interesting Facts About Mercedes: A Journey of Luxury, Innovation, and Performance

When you think of Mercedes-Benz , images of luxury, precision engineering, and cutting-edge technology come to mind. As one of the world’s most iconic car manufacturers, Mercedes has a rich history filled with groundbreaking achievements and innovations. Whether you’re an owner or an admirer of the brand, there’s always more to learn. Let’s dive into the top 10 interesting facts about Mercedes-Benz that you might not know. 1. The First Car Ever Made Was a Mercedes-Benz Mercedes-Benz holds the distinction of having created the world’s first automobile. In 1886, Karl Benz invented the Benz Patent Motorwagen, a three-wheeled vehicle powered by an internal combustion engine. This invention marked the beginning of the modern automotive industry. A Pioneer in Mobility : Mercedes-Benz didn’t just create cars; they invented the concept of personal motorized transportation. The company’s innovative spirit started at the very dawn of the industry. 2. The Name "Mercedes" Comes from a Young Girl The name "Mercedes" comes from Mercedes Jellinek, the daughter of a wealthy Austrian businessman and car enthusiast, Emil Jellinek. Jellinek was a major investor in Daimler’s vehicles and convinced the company to use his daughter’s name for a new line of cars in 1901. A Legacy in a Name : The Mercedes brand has since become synonymous with elegance, luxury, and performance, and it all began with the name of a young girl. 3. Mercedes Introduced the First Modern Car Safety Features Mercedes has always been at the forefront of automotive safety. In 1951, the company invented the "crumple zone," a revolutionary design that allows the car to absorb impact in a collision, protecting passengers inside. Pioneering Safety : Mercedes-Benz has led the way in developing safety features that have since become standard in the auto industry, such as airbags, anti-lock brakes, and electronic stability control. 4. The Famous Three-Pointed Star Has a Unique Meaning The iconic Mercedes-Benz logo—the three-pointed star—represents the company’s vision of motorized dominance on land, sea, and air. It’s more than just a logo; it symbolizes Mercedes’ ambition to excel in all forms of transportation. A Symbol of Ambition : Each point of the star represents a different domain, showing how Mercedes is not just focused on cars but has had aspirations in all areas of engineering. 5. Mercedes-Benz Was the First to Offer Diesel Passenger Cars In 1936, Mercedes-Benz was the first automaker to introduce a diesel-powered passenger car. The Mercedes 260D was not only more fuel-efficient than gasoline cars at the time, but it also laid the foundation for diesel technology in passenger vehicles. A Milestone in Efficiency : Mercedes’ commitment to innovation is clear in their early adoption of diesel technology, which became crucial in later years for fuel efficiency and performance. 6. Mercedes-Benz Develops Eco-Friendly Technology Mercedes-Benz has been a leader in developing eco-friendly technologies. From hybrid systems to fully electric vehicles, the brand’s innovation is helping pave the way for a greener automotive future. Green Innovation : The introduction of models like the EQ series, which are fully electric, demonstrates Mercedes’ dedication to reducing carbon footprints without sacrificing luxury or performance. 7. The Gullwing Doors of the Mercedes 300SL Were a Sensation The Mercedes-Benz 300SL, introduced in 1954, became famous for its distinctive "gullwing" doors that opened upwards like the wings of a bird. This innovative design not only gave the car its iconic look but also revolutionized sports car design. A Design Icon : The 300SL is still regarded as one of the most beautiful and innovative cars ever made, and its gullwing doors are a major reason why. 8. Mercedes Has a Rich Racing History Mercedes-Benz has a storied history in motorsports, particularly Formula 1. Mercedes’ F1 team has dominated the sport in recent years, winning numerous Constructors' and Drivers' Championships. Racing Royalty : From the legendary "Silver Arrows" of the 1930s to the modern-day dominance in Formula 1, Mercedes has cemented its place as one of the top names in motorsport. 9. Mercedes Introduced the First Autonomous Driving Features Mercedes-Benz has been a pioneer in autonomous driving technology. In 2013, they introduced a self-driving concept vehicle called the S-Class Intelligent Drive. This was a major step forward in the journey towards fully autonomous cars. Leading the Future : Mercedes continues to push the boundaries with advanced driver assistance systems, leading the way towards a future where autonomous cars may become the norm. 10. Mercedes-Benz Offers Personalization Like No Other Mercedes-Benz offers a wide range of customization options through its "Designo" program, allowing customers to personalize their vehicle’s paint, interior materials, and more. This ensures that each Mercedes is as unique as its owner. Tailored to Perfection : Whether you prefer a bold exterior color or a more refined leather interior, Mercedes gives you the opportunity to create a car that reflects your personality. Mercedes-Benz—A Legacy of Innovation and Luxury Mercedes-Benz has earned its place as one of the most prestigious and innovative automotive brands in the world. From creating the first car to leading the way in safety, performance, and eco-friendly technologies, Mercedes continues to set the standard. Whether you’re fascinated by their history or drawn to their luxurious design, owning a Mercedes is about embracing a legacy of excellence. As a car owner, it’s essential to be prepared for any situation. And while Mercedes may have perfected the art of driving, having a spare key for your vehicle is one practical step to ensure you’re never caught off guard.

The Complete Guide to Car Key Cutting: Everything You Need to Know

The Complete Guide to Car Key Cutting: Everything You Need to Know

Unlocking the Mysteries of Car Key Cutting Have you ever been in a situation where you needed a spare car key or had to replace a lost one? Car key cutting is an essential process for creating duplicate keys or replacements, but it’s often misunderstood. From traditional keys to modern transponder and smart keys, the art of key cutting has evolved dramatically with advancements in technology. This guide will walk you through the key cutting process, its types, and when professional help is required, helping you navigate the complexities of car key duplication with confidence. What Is Car Key Cutting? Car key cutting is the process of creating a new key that matches the physical shape and specifications of your vehicle’s locks and ignition. This process involves cutting the metal key blade to fit the car’s lock mechanism precisely. For modern cars, this may also include programming the electronic components of the key, such as transponder chips or remote controls. The method used for cutting a car key depends on the type of key and the car model. Traditional keys are simpler to cut, while transponder and smart keys require specialized tools and expertise. Types of Car Keys and Cutting Methods Traditional Keys These are the classic mechanical keys used in older vehicles. Cutting these keys involves duplicating the grooves and ridges of the original key using a key-cutting machine. Transponder Keys Found in most modern cars, transponder keys contain a microchip that communicates with the car’s computer. After cutting the blade, these keys must also be programmed to function. Smart Keys These advanced keys use wireless communication to interact with the car. They don’t require physical cutting but involve programming to sync with the vehicle. Each type of key requires a different approach and level of expertise, making it essential to know what kind of key you have before proceeding with duplication. The Key Cutting Process: Step by Step Identify the Key Type Determine whether you have a traditional, transponder, or smart key. This will dictate the tools and process needed for cutting and programming. Gather Required Information Provide the key cutter with details about your car, such as the make, model, and year. For some keys, a Vehicle Identification Number (VIN) may be required. Cutting the Key Blade For traditional and transponder keys, the blade is cut using a key duplicator or a laser key-cutting machine. Precision is crucial to ensure the key fits perfectly in the lock. Programming (if required) For transponder and smart keys, the key must be programmed to the car’s computer system. This step may require specialized equipment or professional expertise. When to Seek Professional Help While traditional keys can often be duplicated at local hardware stores, transponder and smart keys typically require specialized tools and knowledge. Professional locksmiths and dealerships are equipped to handle these advanced key types, ensuring proper cutting and programming. Reasons to choose a professional: Complexity: Smart and transponder keys require technical expertise. Accuracy: Professionals use precise equipment to ensure the key functions flawlessly. Programming Needs: Only trained specialists can program keys to sync with your vehicle. Cost of Car Key Cutting The cost of cutting a car key varies depending on the type of key and the service provider. Traditional keys are the most affordable, typically costing between $10 and $50. Transponder and smart keys, however, can range from $50 to $300 or more due to the additional programming required. Tips to save money: Have a spare key: This simplifies the duplication process and reduces costs. Compare prices: Contact multiple locksmiths or dealerships to find the best deal. Be Prepared for Every Key Emergency Car key cutting is a vital service for any car owner, whether you’re duplicating a spare key or replacing a lost one. Understanding the process and knowing when to seek professional help can save you time, money, and frustration. By staying informed and proactive, you can ensure that your vehicle remains accessible and secure, no matter what challenges arise.

Chat with us