Post Name

Get ready for the road ahead with our collection of 15 essential car hacks for 2026. From daily driver tips to clever car life hacks, these practical tricks will help every driver – new or experienced – save time, money and stress behind the wheel.

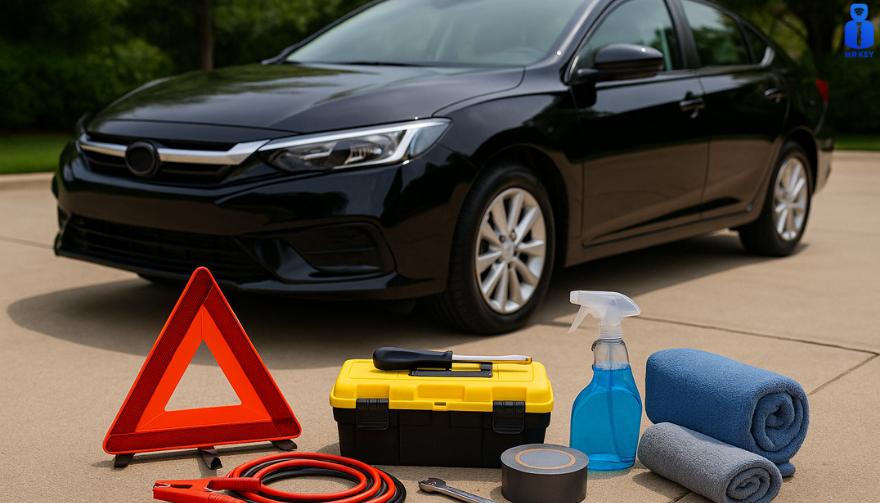
1. Pack a Smart Emergency Kit


Never be caught unprepared. Your car’s emergency kit should include basic tools and supplies: jumper cables, flashlight, first-aid kit and a blanket. Don’t skip the abrasive material – keep a bag of sand or cat litter on hand to spread under icy wheels for traction . Store these items in a sturdy box or duffel in the trunk. For example, AAA recommends keeping sand, salt or kitty litter for tire grip, and even suggests using a floor mat under a spinning tire to get out of snow.

Jumper cables: A dead battery can ruin your day.

Kitty litter or sand: Sprinkle under spinning tires for grip .

Flashlight & flares: Stay visible at night or in breakdowns.

Tools & blanket: Basic tools (multi-tool, duct tape) plus a warm blanket.

2. Boost Your Traction Tricks


If you ever get stuck in snow or mud, common household items can help you move. AAA specifically recommends carrying a bag of sand, rock salt or kitty litter for traction. You can also use your car’s own items: slide one of your floor mats under a stuck wheel to give the tire something to grab . With a gentle back-and-forth rocking of the vehicle, you’ll likely be back on the road in no time.

3. Track Your Maintenance History


Keep a log of every oil change, brake service and repair. When selling or trading in your car, a documented history proves you cared for it. In fact, buyers will pay more for a vehicle with clear service records . Use a small notebook in the glovebox or a smartphone app to note dates and mileage for each service. This simple habit boosts resale value and prevents overlooked maintenance.

4. Check for Recalls Often


Automakers sometimes issue safety recalls, and driving with an unresolved recall can be dangerous. Make it a habit to check your vehicle’s VIN on NHTSA’s website or app at least twice a year . NHTSA even offers email alerts and a “SaferCar” app to notify you of new recalls . If there’s a recall, visit your local dealer for a free fix. Regular recall checks keep you safely on the road.

5. Don’t Idle to Warm Up the Engine


In cold weather, skip the long idling. Modern fuel-injected engines warm up faster when you drive, not when idling. In fact, idling too long can foul plugs and degrade engine oil . Start the car and drive away gently after about 30 seconds – you’ll reach operating temperature faster and waste less fuel. The EPA even advises limiting idling to 30 seconds or less to reduce pollution.

6. Keep the Car Organized


A clutter-free car is a stress-free car. Use simple containers and organizers to tame the mess. For example, putting a couple of laundry baskets in the trunk lets you group items (gym gear in one, groceries in another) . Hang an over-seat organizer or shower caddy on the back of a front seat to stash toys, chargers and snacks. A tidy cabin means you’ll spend less time hunting for what you need.

Laundry baskets: Sort trunk items by category .

Seatback pockets: Store phones, maps, sunglasses and cables.

Cupholder liners: (silicone or paper muffin liners) to catch crumbs for easy cleanup.

7. Leverage Your Smartphone Apps


Your phone is a powerful co-pilot. Navigation apps (Google Maps, Waze) give real-time traffic alerts and fastest routes. For parking, use Apple Maps’ “parked car” feature or apps like iParked to mark your location. Fuel apps like GasBuddy or Gas Guru can find the cheapest gas nearby. Just use a hands-free mount or voice commands so your eyes stay on the road. These daily driver tips can save time and money on every trip

8. Clean Headlights with Toothpaste


Faded, cloudy headlights don’t just look old – they reduce night visibility. An easy remedy: apply non-gel toothpaste to a damp cloth and scrub the headlight lens in circular motions . The mild abrasives polish away grime and small scratches. Rinse and wipe clean – your headlights will shine clearer, improving safety and curb appeal.

9. Polish the Dashboard with Kitchen Oil


Dull, dusty dashboards can be revived with items you already have. Pour a bit of olive oil (or baby oil) onto a coffee filter and gently wipe the dash . The oil lifts dust and adds a light shine without harsh chemicals. It’s a cheap, scratch-free way to keep your interior looking sharp.

10. Thaw Frozen Door Locks


Winter mornings often mean frozen locks. Keep an alcohol-based hand sanitizer (gel) in the glove box or door pocket. A small squirt into the lock’s keyhole will melt ice on contact , letting your key turn again. This quick hack saves time and frustration on cold days.

11. Protect Doors in the Garage


Tight garages often mean dinged doors. A simple hack: attach foam pool noodles or strips to the garage wall at car-door height. When you open the door, it bumps the soft foam instead of your paint. This DIY bumper protects against scratches and dents during parking.

12. Use Gas-Saving Habits


Fuel economy hacks can save real money. In hot weather, try to fill up in the cool of early morning or late evening – gasoline is denser when it’s cold, so you get slightly more fuel per gallon. Smooth acceleration and maintaining steady speeds also boost mileage. Over time, good habits and using gas-price apps make a noticeable difference in your wallet.

13. Photograph Rentals Before Driving


Always take photos of any rental or loaner car (or even a valet-parked car) before you drive off . Capture all sides, bumpers and interiors. Those timestamped photos document pre-existing scratches or dings, protecting you from false damage claims later.

14. Store Spare Change and Documents Wisely


Keep a small change container in the car for parking meters and tolls – an empty gum or Tic-Tac box works well. Also organize your paperwork: put your vehicle registration, insurance and roadside assistance info in the glovebox or a designated pouch. Being able to grab these without panic is a true life hack when you need them.

15. Park Strategically


When possible, face east during winter. The morning sun will hit your windshield first and help defrost it. In summer, park in shade if you can, or use a sunshade on the dash to keep the interior cooler. These little parking hacks make getting into your car more comfortable.


FAQ


Q: What should I include in a basic car emergency kit?

A: At minimum, pack jumper cables, a flashlight with extra batteries, a first-aid kit, warm blankets, and a basic tool kit. Add jumper cables and an auto tool kit. AAA and NHTSA advise including sand or kitty litter (for tire traction) plus flares or a reflective triangle in winter . Store all supplies in a waterproof box or bag in your trunk.


Q: How often should I check my tire pressure?

A: Check tire pressure at least once a month and before long trips . Temperature changes affect pressure: tires lose about 1-2 psi when it’s cold. Proper pressure improves mileage and handling, so use a gauge or have it done when you gas up.


Q: Is it really bad to let my car idle in winter?

A: Yes. Modern cars warm up faster by driving than by idling . Extended idling wastes fuel and increases engine wear. Start the car, let it run ~30 seconds, then drive gently until it reaches normal temperature. This gets you on the road sooner, saves gas, and reduces emissions.


Q: How can I defrost my windshield faster?

A: Aside from using the car’s defroster, park facing the rising sun (east) on cold mornings to let sunlight help melt ice. An ice scraper is essential. You can also spread a non-clumping cat litter or sand on the windshield while it’s cold (before icing) to help break up ice in the morning. In a pinch, pour lukewarm (not hot) water carefully on the glass to speed defrosting.


Q: What’s a quick way to clean foggy headlights?

A: Toothpaste to the rescue! Apply a dab of toothpaste on a soft cloth and scrub the headlights in circles . The mild abrasive will polish the plastic lens, removing haze and minor scratches. Rinse off and buff with a clean cloth. This simple hack can dramatically restore headlight clarity.


Ready to put these hacks to use? For more car essentials and tools, visit our shop at mr-key.com. Safe driving!

Related Posts

How to Tell If Your Car Key Needs a Battery or a Full Replacement

How to Tell If Your Car Key Needs a Battery or a Full Replacement

In an age where technology is at the core of almost every part of a vehicle, car keys are no longer simple pieces of metal. They’ve become compact, electronic tools that combine convenience with security — from remote locking systems to transponder chips and push-start capabilities. However, like any piece of technology, car keys are not immune to wear, damage, or electronic failure. And when they stop working, most drivers are left with one essential question: does my key just need a new battery, or is it time for a full replacement? This article dives deep into that very question. Understanding how to recognize the early signs of battery failure versus a complete key malfunction can save drivers from unnecessary frustration and expensive dealership visits. Whether you're dealing with a FIAT flip key, a HYUNDAI remote, or any modern fob, this guide will help you identify the issue and make an informed decision on what to do next. The Anatomy of a Modern Car Key To understand why a key might stop working, it’s helpful to know what’s actually inside it. Most modern car keys—especially those from brands like FIAT, Hyundai, Kia, Peugeot, or Volkswagen—are composed of several key components. At the core is a small lithium coin battery , typically a CR2032 or CR2025, which powers the key's remote functions. There's also a circuit board that contains the remote buttons and signal transmission systems. Some keys include a transponder chip , a tiny RFID device that communicates with your vehicle’s immobilizer system. Then there's the key blade —mechanical or flip-style—and the outer shell , which holds it all together and includes physical buttons. When something goes wrong, the issue can stem from any one of these components. But most commonly, the culprit is either a drained battery or damage to the internal electronics or casing . Early Warning Signs: Is It Just the Battery? Many car key issues start with subtle signs that most drivers overlook. The key may still work occasionally, or it might only respond when standing close to the car. These are common indicators that the battery is on its way out, but hasn’t failed completely yet. One of the first things a driver might notice is that the range of the remote decreases . You may find yourself needing to stand much closer to the vehicle than usual to lock or unlock it. In some cases, the key might require multiple button presses to get a response. If the key has a small LED light (common in many models), you might see it flicker weakly or stop lighting up altogether. These are signs that the battery still has some life, but it's not providing the power needed for consistent performance. The good news? Replacing the battery is often a quick and inexpensive fix, especially if there are no signs of physical damage or moisture exposure. How Long Does a Key Battery Last? The battery inside your key is designed to last between 2 to 3 years under regular use. Factors like frequent use, temperature changes, or prolonged storage can reduce that lifespan. If your key has never had a battery change and it's approaching that age, a weak battery is the most likely cause of any issues. Changing the battery is a simple task in most cases. Many key fobs can be gently pried open using a flathead screwdriver or a plastic tool. Inside, you’ll find the round battery, which can be swapped out for a new one. Always use a high-quality battery from a trusted brand like Panasonic or Maxell to ensure optimal performance. After inserting a fresh battery, the key should immediately start functioning normally again. If it doesn't, then the issue likely runs deeper. When It’s More Than Just the Battery So what happens if you've replaced the battery and the key still doesn't work? This is when it’s time to look at other possibilities. A complete key failure doesn’t just affect the remote functions—it can also affect the chip, the buttons, or even the mechanical components. For instance, if your car uses a push-to-start system and it no longer recognizes your key after a battery replacement, the issue may lie with the transponder chip . This chip is essential for starting the engine, and if it’s been damaged by a drop or water exposure, the car may not respond at all. Keys that have been exposed to moisture , such as rain or accidental washing, are also at high risk. Even small amounts of water can short out the internal electronics or cause corrosion on the contacts, rendering the key useless. Similarly, keys that have been dropped or stepped on can suffer internal damage even if the outer shell looks fine. Another common reason for total failure is button wear . Over time, the rubber buttons on a key can wear down or detach completely, making it difficult to send a signal to the car—even if the electronics are still working underneath. Shell Damage vs. Internal Failure It's important to distinguish between cosmetic damage and a true functional failure. A key with a cracked or broken shell may still work perfectly well, but using it daily becomes inconvenient—or risky, as it can fall apart further over time. In these cases, replacing only the key shell is often the most cost-effective solution. Shell replacement kits are available for most makes and models, including popular FIAT and Hyundai keys. They allow users to transfer the internal electronics and battery into a new casing, restoring the look and feel of the original key without needing reprogramming or electronic parts. However, if the circuit board inside the key is broken , or the transponder chip is no longer recognized by the vehicle , a complete key replacement will be necessary. This often requires purchasing a new key and having it programmed to your vehicle , either through a locksmith or via dealership-level tools. Identifying the Right Replacement Solution The path forward depends entirely on the root cause of the issue. Here’s how to decide: If your key works intermittently and shows no physical damage, start with a battery replacement . If the buttons are worn or the casing is cracked , but the electronics are fine, consider a shell replacement . If the key doesn’t respond at all , even with a new battery, and has no LED or signal , a full replacement is likely needed. If the mechanical blade is damaged , but the remote still functions, you can often just replace the key blade . Replacing just the parts you need can save time and money. Reliable sellers, like mr-key.com , offer a wide range of high-quality key shells, batteries, blades, and even full replacement keys—including options for programming and compatibility details. When your car key stops working, it’s natural to panic. But in most cases, the fix is far simpler than expected. A weak or dead battery accounts for the majority of key-related issues, and replacing it can restore full function within minutes. However, when the damage goes beyond the battery, identifying whether it’s the shell, chip, or internal electronics at fault will determine whether a full replacement is necessary. Being able to recognize the difference between a temporary battery issue and a deeper hardware failure empowers car owners to take quick, cost-effective action. With the right tools and parts—and a little guidance—almost anyone can resolve a car key issue without visiting a dealership. For a full range of replacement parts, including key shells, blades, batteries, and complete remote keys, visit mr-key.com and explore quality products that help restore your car key to like-new condition.

Dead Pixels on a Motorcycle TFT Display: What They Mean & When Replacement Is Inevitable

Dead Pixels on a Motorcycle TFT Display: What They Mean & When Replacement Is Inevitable

Dead pixels on a motorcycle TFT display are rarely “just cosmetic”. On modern bikes, the TFT dashboard is a sealed, laminated electronic unit exposed to sun, heat, vibration, rain, and pressure washing . When pixels fail, it often signals structural damage inside the display , not a surface defect. This article explains what TFT display dead pixels really mean, why they appear, how to diagnose them correctly, and the point where replacement becomes unavoidable . What riders mean by “dead pixels” — and why it matters The term motorcycle display dead pixels is used loosely. In practice, three very different faults exist. True dead pixels (permanently black) A true dead pixel is a pixel transistor that no longer functions. It stays black on all backgrounds and during startup screens. This is a hardware failure inside the LCD matrix . It does not self-heal. Stuck pixels (fixed bright color) A stuck pixel remains red, green, blue, or white. On phones or TVs, this can sometimes be intermittent. On motorcycle TFTs, stuck pixels are often caused by heat stress or internal pressure and frequently progress into permanent failure. Lines or blocks of dead pixels A vertical or horizontal line of missing pixels is not a pixel issue. It indicates row or column driver failure inside the panel — a structural defect of the display module. Once this appears, replacement is usually inevitable. Why TFT dead pixels appear on motorcycles Dead pixels on a dashboard are rarely random. They follow consistent mechanical and environmental causes. Heat and UV exposure Motorcycle TFTs sit in direct sunlight. Daily heat cycles expand and contract the laminated layers inside the display. Over time, this stresses internal bonds and pixel drivers. A single failed pixel can become a cluster. Micro-impact and pressure A light impact that doesn’t crack the glass can still damage the internal LCD stack. This is common on naked bikes and adventure models where the display is more exposed. Moisture ingress and condensation Condensation inside a TFT display is a critical warning sign. It means the factory seal has been compromised. Moisture accelerates corrosion on connectors and display drivers, often leading to dead pixels followed by total blackout. Electrical stress Voltage fluctuations or grounding issues can contribute, but if the pixel defect appears in the same physical location across reboots , the issue is almost always panel-level, not wiring. Brand examples: how this appears in real motorcycles Dead pixel reports follow similar patterns across brands. BMW TFT clusters: pixel lines or dark zones often appear after heat exposure or condensation events. Clusters are fully integrated and typically replaced as a unit. Yamaha TFT dashboards: isolated dead pixels may appear first, followed by spreading rows on models parked outdoors long-term. Kawasaki TFT displays: line failures are commonly reported after pressure washing or heavy rain use. Honda TFT dashboards: less frequent, but once pixel clusters appear, dealers usually recommend full replacement. Across all brands, panel repair is not part of standard dealer service . Fast diagnosis: how to tell if the damage is permanent You can determine the seriousness in minutes. Check startup screens If the pixel defect appears during the boot logo or splash screen, it is hardware, not software. Test multiple backgrounds Switch themes or display modes: Always black → dead pixel Always bright or colored → stuck pixel Straight line → driver failure Look for progression A defect that grows over weeks is not stable. Progression is a replacement signal. Inspect for condensation Any fogging or haze inside the screen means moisture ingress. Pixel failure combined with condensation almost always worsens. When TFT display replacement is inevitable Replacement is not about annoyance. It’s about predictable failure . Replacement becomes inevitable when any of the following occur: A row or column of dead pixels appears Dead pixels spread over time Dead pixels appear together with condensation The defect blocks speed, warnings, or riding data The bike relies on the TFT for ride modes or system alerts At this stage, the TFT is no longer a reliable instrument cluster. Why TFT displays are rarely repaired A motorcycle TFT is not a standalone screen. It is: Laminated glass + LCD + polarizer Sealed against weather Electronically paired to the motorcycle Separating and rebuilding this stack requires specialized industrial equipment. As a result, OEMs replace the entire unit . Used clusters introduce risks: coding issues, immobilizer pairing, mileage discrepancies, and unknown moisture history. Cost reality in Europe In Europe, OEM motorcycle TFT replacement typically ranges from: €600–€1,200 for mid-range models €1,500–€2,500+ for premium or integrated systems This includes coding and calibration, not just the display itself. That’s why a small dashboard pixel issue deserves early attention. Can dead pixels be prevented? You cannot prevent internal electronic aging. You can reduce the most common triggers: Surface scratches that weaken seals Micro-impacts UV exposure Moisture pooling around edges A properly fitted screen protector does not fix dead pixels, but it reduces the external damage pathways that often lead to full TFT failure. If you want to reduce the risk of turning a small pixel defect into a four-figure repair, you can protect the display surface early — explore motorcycle TFT screen protectors at mr-key.com FAQ: TFT display dead pixels Are dead pixels dangerous? They are not dangerous by themselves, but they often indicate deeper display degradation. Can software updates fix dead pixels? No. If the defect appears in the same physical location during startup, it is hardware. Will one dead pixel spread? Sometimes. Spread is common when heat or moisture is involved. Is condensation inside the TFT serious? Yes. Condensation indicates seal failure and greatly increases the risk of progressive damage. Is replacement always required? Not for a single stable pixel. Replacement becomes unavoidable with progression, lines, or moisture involvement.

5 Reasons Why Your Car Remote Isn’t Working and How to Fix It

5 Reasons Why Your Car Remote Isn’t Working and How to Fix It

In an age where convenience is king, keyless entry systems have revolutionized how we interact with our vehicles. Gone are the days of fumbling for physical keys—today’s drivers rely heavily on the sleek, compact functionality of car remotes. However, what happens when this modern convenience fails you? Few things are more frustrating than standing beside your car, repeatedly pressing your remote, only to be met with silence. Understanding why your car remote isn’t working can save you from unnecessary panic, costly repairs, and inconvenient lockouts. This comprehensive guide explores the five most common reasons your remote may malfunction and offers in-depth, actionable solutions to get you back on the road quickly. 1. Battery Depletion: The Silent Saboteur The number one reason for car remote failure is, unsurprisingly, a dead or depleted battery. Though seemingly small, the battery inside your remote plays a crucial role in its operation. Most key fobs use lithium coin batteries (commonly CR2025 or CR2032), known for their durability and longevity. But even these reliable power sources don’t last forever. Factors contributing to faster battery depletion include: Frequent use (especially for remote start and lock/unlock functions) Extreme temperature exposure (both heat and cold reduce battery life) Long periods of inactivity (leading to gradual discharge) Solution: Replacing your key fob battery is a simple, cost-effective fix. Always consult your vehicle’s manual to identify the correct battery type. When replacing, ensure the new battery is seated correctly to avoid poor contact. Proactively changing the battery every 1-2 years, even before it’s fully drained, can prevent sudden failures. 2. Signal Interference: The Invisible Obstacle Key fobs communicate with your vehicle via radio frequencies. However, various external factors can interfere with this communication. Living in urban environments, parking in underground garages, or being near large electronic devices (such as cell towers, Wi-Fi routers, or even other vehicles) can disrupt the signal between your remote and car. Solution: If you suspect signal interference: Move closer to your vehicle or try unlocking it from a different angle. Step away from potential sources of interference like electronic devices or heavy machinery. Hold the key fob higher or away from your body to improve signal transmission. While occasional interference is common, if the problem persists across multiple locations, consider resetting or reprogramming your fob. 3. Desynchronization: Losing Connection Sometimes, your key fob may lose synchronization with your vehicle’s receiver—especially after events like a battery change or extended periods of non-use. When this happens, the fob and vehicle are essentially "speaking different languages," resulting in non-responsiveness. Solution: Check your vehicle's manual, as many manufacturers provide step-by-step instructions to manually re-sync the fob. Typically, this involves a sequence like inserting and turning the ignition key, pressing specific buttons, or opening and closing the doors in a set pattern. If manual reprogramming fails, you may need assistance from a dealership or certified locksmith equipped with the necessary diagnostic tools. 4. Physical Damage: The Wear and Tear Factor Remote key fobs, despite their solid appearance, are not invincible. Everyday handling—dropping the remote, spilling liquids, or even rough storage—can cause internal components to malfunction. Moisture exposure, in particular, is a key offender, leading to corrosion or short-circuiting of the circuitry inside. Solution: Inspect your remote regularly for: Visible cracks, chips, or signs of wear Sticky buttons or unresponsive keys Water damage indicators If damage is evident, replacing the remote may be your best bet. For minor issues, cleaning the interior components (after carefully opening the casing) with a soft cloth and isopropyl alcohol can sometimes restore functionality. Consider investing in a protective cover to prevent future damage. 5. Vehicle Receiver Issues: The Hidden Problem While the key fob often gets the blame, sometimes the issue lies within your vehicle’s receiver system. If the receiver—which detects and processes the signal from your remote—is malfunctioning, your remote will appear useless regardless of its condition. Solution: One telltale sign of a faulty receiver is if multiple remotes fail to operate the car. In this case, the problem is likely internal. Diagnosing and fixing receiver issues typically requires professional assistance, either from a dealership or an experienced automotive technician equipped with specialized diagnostic tools. Global Context: Keyless Challenges Worldwide The rise of keyless systems isn't limited to one region—it’s a global phenomenon. However, as technology advances, so do the challenges. For instance, key signal cloning and relay attacks have become prevalent, particularly in Europe and North America, prompting manufacturers to enhance security measures continually. Understanding the basics of how your key fob works and its vulnerabilities can help protect against both everyday failures and more sophisticated threats. Stay Ahead of the Problem Modern car remotes offer unmatched convenience, but when they fail, the disruption can be significant. Whether it’s a dead battery, signal interference, synchronization glitch, physical damage, or vehicle receiver issue, knowing how to identify and fix the problem puts you in control. Take proactive steps—replace batteries regularly, handle your remote with care, and familiarize yourself with your vehicle’s reprogramming process. A small investment of time today could save you from major headaches tomorrow. Stay informed. Stay prepared. And keep your car remote working seamlessly, wherever the road takes you.

What You Need To Know About BMW  Swirl Flaps and How To Solve The Problem With Them

What You Need To Know About BMW Swirl Flaps and How To Solve The Problem With Them

Swirl flaps are a BMW system that has been introduced to help burn the fuel mixture in the cylinder better due to the fact that diesel engines do not have throttle valves and it is not possible to adjust the air-fuel ratio. A diesel engine without vortex valves operates between a poor and a rich fuel mixture, because the only way to regulate it is through fuel injection. Design of the first generation swirl flaps that are made of made of metal. Unfortunately, swirl flaps are responsible for countless damaged engines and costly repairs due to design errors or metal fatigue. Once damaged, the cylinder sucks them in and causes great damage. This is how damaged valves damage the cylinder. Typical swirl flaps suction damage. The vortex valves are positioned in the inlet and are controlled by vacuum (DDE 4.0) or electrically (DDE5.0 / DDE6.4) by the engine ECU. Effects of malfunctioning valves: Swirl valves are stuck in open position: Deterioration of exhaust gas performance at lower speeds. Swirl valves are stuck in closed position: Approximate power loss of 10% at high engine speeds. How swirl flaps work: Performance characteristics: The vortex valves are in the closed position, at low engine speeds and small amounts of fuel injected (controlled by the ECU card). They open under the following conditions: coolant temperature <14 ° C OR * fuel quantity> 24 mg OR engine speed 2250 rpm OR inlet air temperature <-5 ° C BMW and Pierburg have decided to produce diesel engines with metal vortex valves. The speed at which the pistons in the diesel engine operate is at least 60 rpm, so a sucked vortex valve will break and cause a number of damages inside the engine. In most cases, one or more pistons are severely damaged, as a bonus you get valves, in some cases a head or turbocharger. And this combination with a BMW engine is like a cumulative jackpot 🙂 In 2004, BMW began work on the problem and improved the design, however, a number of owners reported ongoing problems in this area. The solution to this problem is by removing the vortex valves and plugging, which does not affect the performance of the engine and at the same time, you can safely pass the exhaust test. Engines: M47 (136hp VP44 fuel pump) has no valves. M47N common rail engine (including M47N / M47TU / M47TUD20) (150hp. Face lift model from 2001 -) has valves. M57 engines (M57D) (525d & 187hp. 330d) cars with manual transmission do not have valves, but those with automatic have. M57N engines (M57TUD) (525d & 330d 204hp) have vortex valves. Ruined swirl flaps: The plugs that replace the vortex valves are easy to find on the internet, but you can also find them here on our website. Typical plugs: Disassembly of vortex valves: The vortex valves can be safely dismantled and in most cases if they are removed properly no loss of power is felt. Final list of models for which vortex valves are installed: Engine: M47N/M47TU/M47TUD20 Applications: * 110 kW (148 hp) and 330 N·m (243 lb·ft) o E46 320d 2001-2005 o E83 X3 2.0d (up to end of 2006) Engine: M47TU2D20 The engine was updated again in 2004 as the M47TU2D20. Still at 1995 cc, it produced more power across the range. Applications: * 120 kW (161 hp) and 340 N·m (251 lb·ft) E60/E61 520d E87 120d E90/E91 320d E83 X3 2.0d (end of 2006 onwards) Engine: M57/M57D25 M57D25 was introduced in 2000. Applications: * 166 PS (122 kW; 164 hp) at 4000 rpm, 350 N·m (260 lb·ft) at 2000-2500 rpm with a 4750 rpm redline, models: 2000-2003 E39 525d *Vehicles With Automatic Transmission ONLY* Engine: M57N/M57TU/M57TUD25 M57TUD25 was introduced in 2004. Applications: * 177 PS (130 kW; 175 hp) at 4000 rpm, 400 N·m (300 lb·ft) at 2000-2750 rpm models: E60/E61 525d Engine: M57/M57D30 M57D30, also called M57D29, was introduced in 1998. Applications: * 184 PS (135 kW; 181 hp)@4000, 390 N·m (290 lb·ft)@1750-3200 models: E39 530d *Vehicles With Automatic Transmission ONLY* E46 330d/330xd *Vehicles With Automatic Transmission ONLY* * 184 PS (135 kW; 181 hp)@4000, 410 N·m (300 lb·ft)@2000-3000 models: E38 730d *Vehicles With Automatic Transmission ONLY* E53 X5 3.0d * 193 PS (142 kW; 190 hp)@4000, 410 N·m (300 lb·ft)@1750-3000 models: E38 730d E39 530d Engine: M57N/M57TU/M57TUD30 M57TUD30 was introduced in 2002. It originally produced 160 kW (215 hp) at 4000 rpm and 500 N·m (370 lb·ft) at 2000-2750 rpm, but was tweaked for 150 kW (201 hp) at 4000 rpm and 410 N·m (300 lb·ft) at 1500-3250 rpm for 2003 and again for 200 kW (268 hp) at 4000 rpm and 560 N·m (410 lb·ft) at 2000-2250 rpm in 2004. Applications: * 204 PS (150 kW; 201 hp)@4000, 410 N·m (300 lb·ft)@1500-3250 models: E46 330d/330Cd/330xd E83 X3 3.0d * 218 PS (160 kW; 215 hp)@4000, 500 N·m (370 lb·ft)@2000-2750 models: E53 X5 3.0d E60/E61 530d/530xd E65 730d * 272 PS (200 kW; 268 hp)@4000, 560 N·m (410 lb·ft)@2000-2250 E60/E61 535d * 245 PS (180 kW; 242 hp)@4000, 500 N·m (370 lb·ft)@2000-2250 * 286 PS (210 kW; 282 hp)@4000, 580 N·m (430 lb·ft)@2000-2250 Engine: M57TU2D30 M57TU2D30 was introduced in 2007, making its debut in the facelifted E60 and E61. * M57TU2D30-UL: 197 PS (145 kW; 194 hp) * M57TU2D30-OL: 235 PS (173 kW; 232 hp)@4000, 500 N·m (370 lb·ft)@2000-2750 * M57TU2D30-TOP: 286 PS (210 kW; 282 hp), 580 N·m (430 lb·ft) Applications: * 197 PS (145 kW; 194 hp), 400 N·m (300 lb·ft) models: E90/E91/E92 325d E60/E61 525d/525xd * 231 PS (170 kW; 228 hp)@4000, 500 N·m (370 lb·ft)@2000-2750 models: E65 730d E90/E91 325d E90/E91 330d/330xd * 235 PS (173 kW; 232 hp) models: E60/E61, BMW E70, BMW E71 * 286 PS (210 kW; 282 hp), 580 N·m (430 lb·ft) models: E60/E61 535d E70 X5 3.0sd E71 X6 xDrive35d E83 X3 3.0sd E90/E91 335d The above models are listed for information only if you want to to make sure your engine has valves installed, please contact a competent person. Please note that the information described above is for informational purposes only and does not claim to be reliable. Mr-key.com is not responsible for any repair work you undertake that is related to the topic described in this article.

Chat with us