Simple Tips to Free a Stuck Lock: What You Need to Know
29.10.2024
Locks are meant to provide security, but when they seize up, they can leave you feeling frustrated and helpless. Dealing with a stuck lock is more common than you might think, and thankfully, there are affordable and effective solutions to get it working smoothly again. Whether it's a car door, trunk, or your home lock, here are some tried-and-true methods to free up a jammed lock.
Why Locks Seize Up
Understanding the causes behind a stuck lock can help you prevent it from happening in the future. Locks can seize up for various reasons:
Dirt and Debris: Over time, dust, grime, or even small particles can accumulate inside the lock mechanism, making it harder for the internal parts to move smoothly.
Rust and Corrosion: Exposure to moisture, humidity, or salty air can lead to rust buildup on metal parts within the lock, which can prevent movement.
Lack of Lubrication: Locks need to be lubricated occasionally to ensure smooth operation. Without lubrication, friction increases, and the lock may eventually jam.
Now, let’s look at some simple steps to tackle a seized lock.
Step 1: Use Graphite Powder or Dry Lubricant
The first thing to try is applying a lubricant, but be careful about what type you use. Wet or oil-based lubricants can attract dust, which eventually clogs the lock.
Graphite Powder: This is one of the best options for freeing up a stuck lock. Sprinkle a small amount of graphite powder into the keyhole, insert the key, and gently move it back and forth. This spreads the graphite, reducing friction and allowing the lock components to move more freely.
Dry Lubricants: These are specifically designed for locks and are ideal for situations where you want to avoid residue buildup. Spray a small amount into the lock, then insert the key and gently turn it.
Pro Tip: Avoid using regular WD-40 or other oil-based products, as they may lead to a buildup over time, making the problem worse.
Step 2: Try the Key with Gentle Force
If lubrication alone doesn’t do the trick, the next step is to use a little gentle force with your key. Be cautious here; applying too much force could break the key inside the lock.
Insert the Key: Once the lubricant has been applied, insert the key fully into the lock.
Wiggle Carefully: Gently wiggle and turn the key without applying too much force. This movement may help distribute the lubricant further and gradually loosen up any stuck components.
Caution: If you feel excessive resistance, don’t force the key. Forcing it can cause damage or even snap the key, which would require additional assistance to remove.
Step 3: Warm Up the Lock (Especially Useful for Cold Weather)
Cold temperatures can cause locks to seize due to ice or metal contraction. If you suspect the cold is the issue, warming up the lock can be effective.
Use a Hair Dryer: Direct warm air onto the lock for several minutes to allow the metal to expand and the ice (if any) to melt.
Heat the Key: You can also try warming the key slightly with a lighter, but exercise caution and make sure it isn’t too hot before inserting it into the lock.
Safety Note: Avoid open flames directly on the lock itself, as this can damage surrounding surfaces or even warp the lock mechanism.
Step 4: Use a Vinegar Solution for Corroded Locks
If rust is the culprit, vinegar is a great household solution for loosening rust and corrosion in a lock.
Apply Vinegar: Put a few drops of vinegar on the key, insert it into the lock, and let it sit for a minute or two. Vinegar can help dissolve light rust, making it easier to turn the key.
Follow with Lubricant: After using vinegar, apply a small amount of graphite powder or dry lubricant to ensure the lock remains smooth and functional.
Step 5: Work with Compressed Air to Remove Debris
If dirt or debris has accumulated inside the lock, compressed air is a quick and efficient way to clear it out.
Blow Out Dust: Use a can of compressed air and direct the nozzle into the keyhole. Short bursts of air can blow out dust and small debris that may be obstructing the mechanism.
Follow Up: After using compressed air, it’s a good idea to add a dry lubricant to prevent any remaining dust from causing future jams.
How to Prevent Lock Seizure in the Future
Once you’ve successfully freed a seized lock, it’s helpful to take steps to prevent it from happening again. Here are some preventive tips:
Regularly Lubricate: Use a dry lubricant or graphite powder once or twice a year, especially if you live in a humid or dusty area.
Keep Locks Clean: Wipe off any visible dirt or dust around the lock mechanism. If the lock is exposed to elements (like outdoor or car locks), covering it can help keep debris and moisture out.
Avoid Overusing Keys: If your key shows signs of wear, consider getting a replacement. Worn-out keys can cause more friction inside the lock, leading to jams.
When to Seek Professional Help
Sometimes, despite your best efforts, a lock just won’t budge. In cases where the lock is significantly damaged, heavily corroded, or if the key breaks inside, it’s best to reach out for professional assistance. A professional has specialized tools and expertise to address these issues without causing further damage.
Taking Care of Your Locks
A stuck lock can be an inconvenience, but by following these simple steps and using a little patience, you can often resolve the issue without professional help. Keeping locks in good condition with regular care is the key to ensuring they function smoothly for years to come.
Your car keys are more than just tools to unlock and start your vehicle—they’re essential components for your car's convenience and security. Taking proper care of them can prevent unexpected failures and ensure they last for years. Here are seven easy and practical tips to help you keep your car keys in the best condition possible. 1. Keep Your Keys Clean and Dry Why It Matters: Moisture and dirt are the biggest enemies of car keys, particularly electronic fobs. Exposure to these elements can cause internal corrosion and failure. How to Do It: Avoid Moisture: Keep your keys away from water, rain, and high humidity. If they accidentally get wet, dry them immediately with a soft, absorbent cloth. Regular Cleaning: Gently wipe your keys with a clean cloth to remove dirt and dust. For crevices around buttons, use a cotton swab to clean hard-to-reach areas. 2. Handle Your Keys with Care Why It Matters: Dropping, tossing, or mishandling your keys can cause physical damage or misalign internal components, rendering them unusable. How to Do It: Avoid Drops: Be mindful when handling your keys. Attach them to a lanyard or key holder for better grip and to reduce accidental drops. Use a Protective Key Cover: A well-fitted key cover adds an extra layer of protection against scratches, drops, and general wear and tear. Plus, they’re available in various styles to match your preferences. 3. Replace Key Fob Batteries on Time Why It Matters: A weak battery can lead to your car key fob failing to work when you need it most, leaving you stranded or locked out. How to Do It: Watch for Warning Signs: If your key fob’s range decreases or requires multiple presses to function, the battery is likely weak and needs replacement. Replace Properly: Follow your car’s manual for step-by-step instructions on changing the battery. Using the correct battery type ensures reliable performance. 4. Protect Your Keys from Extreme Temperatures Why It Matters: Excessive heat or cold can harm the electronic components inside your key fob or damage the metal of traditional keys. How to Do It: Avoid Direct Sunlight and Heat: Don’t leave your keys exposed to the sun on your dashboard or near heaters. Extreme heat can warp materials and damage internal circuits. Keep Away from Freezing Temperatures: In colder months, avoid leaving your keys in your car or outside for prolonged periods, as freezing conditions can impact their functionality. 5. Rotate and Use Spare Keys Why It Matters: Spare keys can deteriorate if left unused for long periods. Regularly using them ensures they remain functional and ready in emergencies. How to Do It: Alternate Keys: Use your spare key occasionally to keep it in good working condition. This prevents any surprises when you actually need it. Safe Storage: Store spare keys in a dry, cool place, away from moisture, heat, or any magnetic devices that could interfere with their programming. 6. Avoid Overloading Your Keychain Why It Matters: A heavy keychain might seem harmless, but the extra weight can wear down your car’s ignition switch or damage your key over time. How to Do It: Limit What You Carry: Stick to the essentials—remove unnecessary keys, charms, or heavy accessories. Use Lightweight Keychains: Choose minimalistic and lightweight keychains to prevent undue stress on the ignition and the key itself. 7. Regularly Inspect for Wear and Tear Why It Matters: Keys, especially those with buttons or electronic components, can show signs of wear over time. Early detection helps avoid complete failure. How to Do It: Look for Physical Damage: Check for cracks, faded buttons, or scratches that might affect functionality. Seek Professional Help: If you notice significant wear or damage, consult a professional locksmith or dealership for repairs or replacement. Ignoring issues could lead to bigger, costlier problems down the line. Why Car Key Maintenance is Worth Your Effort Properly maintaining your car keys ensures they stay reliable, functional, and secure for years to come. Whether it’s a traditional key or a modern electronic fob, these small actions can save you from costly replacements or inconvenient malfunctions. Taking care of your keys isn’t just about preventing problems—it’s also about convenience, peace of mind, and getting the most out of your vehicle’s features. By following these simple tips, you’ll keep your car keys in top shape and avoid the stress of unexpected failures.
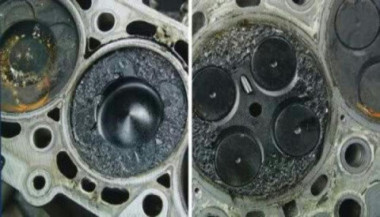
Swirl flaps are a BMW system that has been introduced to help burn the fuel mixture in the cylinder better due to the fact that diesel engines do not have throttle valves and it is not possible to adjust the air-fuel ratio. A diesel engine without vortex valves operates between a poor and a rich fuel mixture, because the only way to regulate it is through fuel injection. Design of the first generation swirl flaps that are made of made of metal. Unfortunately, swirl flaps are responsible for countless damaged engines and costly repairs due to design errors or metal fatigue. Once damaged, the cylinder sucks them in and causes great damage. This is how damaged valves damage the cylinder. Typical swirl flaps suction damage. The vortex valves are positioned in the inlet and are controlled by vacuum (DDE 4.0) or electrically (DDE5.0 / DDE6.4) by the engine ECU. Effects of malfunctioning valves: Swirl valves are stuck in open position: Deterioration of exhaust gas performance at lower speeds. Swirl valves are stuck in closed position: Approximate power loss of 10% at high engine speeds. How swirl flaps work: Performance characteristics: The vortex valves are in the closed position, at low engine speeds and small amounts of fuel injected (controlled by the ECU card). They open under the following conditions: coolant temperature <14 ° C OR * fuel quantity> 24 mg OR engine speed 2250 rpm OR inlet air temperature <-5 ° C BMW and Pierburg have decided to produce diesel engines with metal vortex valves. The speed at which the pistons in the diesel engine operate is at least 60 rpm, so a sucked vortex valve will break and cause a number of damages inside the engine. In most cases, one or more pistons are severely damaged, as a bonus you get valves, in some cases a head or turbocharger. And this combination with a BMW engine is like a cumulative jackpot 🙂 In 2004, BMW began work on the problem and improved the design, however, a number of owners reported ongoing problems in this area. The solution to this problem is by removing the vortex valves and plugging, which does not affect the performance of the engine and at the same time, you can safely pass the exhaust test. Engines: M47 (136hp VP44 fuel pump) has no valves. M47N common rail engine (including M47N / M47TU / M47TUD20) (150hp. Face lift model from 2001 -) has valves. M57 engines (M57D) (525d & 187hp. 330d) cars with manual transmission do not have valves, but those with automatic have. M57N engines (M57TUD) (525d & 330d 204hp) have vortex valves. Ruined swirl flaps: The plugs that replace the vortex valves are easy to find on the internet, but you can also find them here on our website. Typical plugs: Disassembly of vortex valves: The vortex valves can be safely dismantled and in most cases if they are removed properly no loss of power is felt. Final list of models for which vortex valves are installed: Engine: M47N/M47TU/M47TUD20 Applications: * 110 kW (148 hp) and 330 N·m (243 lb·ft) o E46 320d 2001-2005 o E83 X3 2.0d (up to end of 2006) Engine: M47TU2D20 The engine was updated again in 2004 as the M47TU2D20. Still at 1995 cc, it produced more power across the range. Applications: * 120 kW (161 hp) and 340 N·m (251 lb·ft) E60/E61 520d E87 120d E90/E91 320d E83 X3 2.0d (end of 2006 onwards) Engine: M57/M57D25 M57D25 was introduced in 2000. Applications: * 166 PS (122 kW; 164 hp) at 4000 rpm, 350 N·m (260 lb·ft) at 2000-2500 rpm with a 4750 rpm redline, models: 2000-2003 E39 525d *Vehicles With Automatic Transmission ONLY* Engine: M57N/M57TU/M57TUD25 M57TUD25 was introduced in 2004. Applications: * 177 PS (130 kW; 175 hp) at 4000 rpm, 400 N·m (300 lb·ft) at 2000-2750 rpm models: E60/E61 525d Engine: M57/M57D30 M57D30, also called M57D29, was introduced in 1998. Applications: * 184 PS (135 kW; 181 hp)@4000, 390 N·m (290 lb·ft)@1750-3200 models: E39 530d *Vehicles With Automatic Transmission ONLY* E46 330d/330xd *Vehicles With Automatic Transmission ONLY* * 184 PS (135 kW; 181 hp)@4000, 410 N·m (300 lb·ft)@2000-3000 models: E38 730d *Vehicles With Automatic Transmission ONLY* E53 X5 3.0d * 193 PS (142 kW; 190 hp)@4000, 410 N·m (300 lb·ft)@1750-3000 models: E38 730d E39 530d Engine: M57N/M57TU/M57TUD30 M57TUD30 was introduced in 2002. It originally produced 160 kW (215 hp) at 4000 rpm and 500 N·m (370 lb·ft) at 2000-2750 rpm, but was tweaked for 150 kW (201 hp) at 4000 rpm and 410 N·m (300 lb·ft) at 1500-3250 rpm for 2003 and again for 200 kW (268 hp) at 4000 rpm and 560 N·m (410 lb·ft) at 2000-2250 rpm in 2004. Applications: * 204 PS (150 kW; 201 hp)@4000, 410 N·m (300 lb·ft)@1500-3250 models: E46 330d/330Cd/330xd E83 X3 3.0d * 218 PS (160 kW; 215 hp)@4000, 500 N·m (370 lb·ft)@2000-2750 models: E53 X5 3.0d E60/E61 530d/530xd E65 730d * 272 PS (200 kW; 268 hp)@4000, 560 N·m (410 lb·ft)@2000-2250 E60/E61 535d * 245 PS (180 kW; 242 hp)@4000, 500 N·m (370 lb·ft)@2000-2250 * 286 PS (210 kW; 282 hp)@4000, 580 N·m (430 lb·ft)@2000-2250 Engine: M57TU2D30 M57TU2D30 was introduced in 2007, making its debut in the facelifted E60 and E61. * M57TU2D30-UL: 197 PS (145 kW; 194 hp) * M57TU2D30-OL: 235 PS (173 kW; 232 hp)@4000, 500 N·m (370 lb·ft)@2000-2750 * M57TU2D30-TOP: 286 PS (210 kW; 282 hp), 580 N·m (430 lb·ft) Applications: * 197 PS (145 kW; 194 hp), 400 N·m (300 lb·ft) models: E90/E91/E92 325d E60/E61 525d/525xd * 231 PS (170 kW; 228 hp)@4000, 500 N·m (370 lb·ft)@2000-2750 models: E65 730d E90/E91 325d E90/E91 330d/330xd * 235 PS (173 kW; 232 hp) models: E60/E61, BMW E70, BMW E71 * 286 PS (210 kW; 282 hp), 580 N·m (430 lb·ft) models: E60/E61 535d E70 X5 3.0sd E71 X6 xDrive35d E83 X3 3.0sd E90/E91 335d The above models are listed for information only if you want to to make sure your engine has valves installed, please contact a competent person. Please note that the information described above is for informational purposes only and does not claim to be reliable. Mr-key.com is not responsible for any repair work you undertake that is related to the topic described in this article.
In an age where convenience is king, keyless entry systems have revolutionized how we interact with our vehicles. Gone are the days of fumbling for physical keys—today’s drivers rely heavily on the sleek, compact functionality of car remotes. However, what happens when this modern convenience fails you? Few things are more frustrating than standing beside your car, repeatedly pressing your remote, only to be met with silence. Understanding why your car remote isn’t working can save you from unnecessary panic, costly repairs, and inconvenient lockouts. This comprehensive guide explores the five most common reasons your remote may malfunction and offers in-depth, actionable solutions to get you back on the road quickly. 1. Battery Depletion: The Silent Saboteur The number one reason for car remote failure is, unsurprisingly, a dead or depleted battery. Though seemingly small, the battery inside your remote plays a crucial role in its operation. Most key fobs use lithium coin batteries (commonly CR2025 or CR2032), known for their durability and longevity. But even these reliable power sources don’t last forever. Factors contributing to faster battery depletion include: Frequent use (especially for remote start and lock/unlock functions) Extreme temperature exposure (both heat and cold reduce battery life) Long periods of inactivity (leading to gradual discharge) Solution: Replacing your key fob battery is a simple, cost-effective fix. Always consult your vehicle’s manual to identify the correct battery type. When replacing, ensure the new battery is seated correctly to avoid poor contact. Proactively changing the battery every 1-2 years, even before it’s fully drained, can prevent sudden failures. 2. Signal Interference: The Invisible Obstacle Key fobs communicate with your vehicle via radio frequencies. However, various external factors can interfere with this communication. Living in urban environments, parking in underground garages, or being near large electronic devices (such as cell towers, Wi-Fi routers, or even other vehicles) can disrupt the signal between your remote and car. Solution: If you suspect signal interference: Move closer to your vehicle or try unlocking it from a different angle. Step away from potential sources of interference like electronic devices or heavy machinery. Hold the key fob higher or away from your body to improve signal transmission. While occasional interference is common, if the problem persists across multiple locations, consider resetting or reprogramming your fob. 3. Desynchronization: Losing Connection Sometimes, your key fob may lose synchronization with your vehicle’s receiver—especially after events like a battery change or extended periods of non-use. When this happens, the fob and vehicle are essentially "speaking different languages," resulting in non-responsiveness. Solution: Check your vehicle's manual, as many manufacturers provide step-by-step instructions to manually re-sync the fob. Typically, this involves a sequence like inserting and turning the ignition key, pressing specific buttons, or opening and closing the doors in a set pattern. If manual reprogramming fails, you may need assistance from a dealership or certified locksmith equipped with the necessary diagnostic tools. 4. Physical Damage: The Wear and Tear Factor Remote key fobs, despite their solid appearance, are not invincible. Everyday handling—dropping the remote, spilling liquids, or even rough storage—can cause internal components to malfunction. Moisture exposure, in particular, is a key offender, leading to corrosion or short-circuiting of the circuitry inside. Solution: Inspect your remote regularly for: Visible cracks, chips, or signs of wear Sticky buttons or unresponsive keys Water damage indicators If damage is evident, replacing the remote may be your best bet. For minor issues, cleaning the interior components (after carefully opening the casing) with a soft cloth and isopropyl alcohol can sometimes restore functionality. Consider investing in a protective cover to prevent future damage. 5. Vehicle Receiver Issues: The Hidden Problem While the key fob often gets the blame, sometimes the issue lies within your vehicle’s receiver system. If the receiver—which detects and processes the signal from your remote—is malfunctioning, your remote will appear useless regardless of its condition. Solution: One telltale sign of a faulty receiver is if multiple remotes fail to operate the car. In this case, the problem is likely internal. Diagnosing and fixing receiver issues typically requires professional assistance, either from a dealership or an experienced automotive technician equipped with specialized diagnostic tools. Global Context: Keyless Challenges Worldwide The rise of keyless systems isn't limited to one region—it’s a global phenomenon. However, as technology advances, so do the challenges. For instance, key signal cloning and relay attacks have become prevalent, particularly in Europe and North America, prompting manufacturers to enhance security measures continually. Understanding the basics of how your key fob works and its vulnerabilities can help protect against both everyday failures and more sophisticated threats. Stay Ahead of the Problem Modern car remotes offer unmatched convenience, but when they fail, the disruption can be significant. Whether it’s a dead battery, signal interference, synchronization glitch, physical damage, or vehicle receiver issue, knowing how to identify and fix the problem puts you in control. Take proactive steps—replace batteries regularly, handle your remote with care, and familiarize yourself with your vehicle’s reprogramming process. A small investment of time today could save you from major headaches tomorrow. Stay informed. Stay prepared. And keep your car remote working seamlessly, wherever the road takes you.
When it comes to car ownership, most of us are pretty diligent. We make sure our insurance is up to date, change the oil like clockwork, and even rotate our tires to avoid any wear and tear. But there’s one crucial aspect that many car owners overlook: having a spare key . It seems like a small detail, right? Yet, nearly 40% of car owners don’t have a backup key for their vehicle. And that’s a huge risk. Why? Because losing your only car key can cause a headache you’re not prepared for—and it’s a lot more common than you might think. The Hidden Dangers of Only Having One Car Key It’s easy to get comfortable with just one key. After all, it’s always in your pocket, bag, or hanging on your keychain. But life happens. Keys get lost, misplaced, or even stolen, and when that happens, you’re looking at a nightmare scenario. Here’s why: Costly Lockouts : Lose your key, and you’re locked out of your car, stranded until you can get help. Calling a tow truck or emergency locksmith is not only frustrating but can cost you hundreds of dollars. Inconvenient Delays : Have an important meeting? Picking the kids up from school? With only one key, losing it means your entire day—or week—grinds to a halt. Damaged Key, No Backup : Keys wear down over time, and if you only have one, a damaged key could lead to ignition problems. Suddenly, your car won’t start, and now you’re stuck paying for both a repair and a replacement. Security Risk : Lost keys are more than just a hassle—they’re a potential security threat. If your key falls into the wrong hands, your vehicle becomes vulnerable. The Pricey Locksmith Option Once you’re locked out or your key is lost, your options become limited—and expensive. Going to a local locksmith is one route, but here’s what you’re facing: High Prices : Traditional locksmiths can charge anywhere from €150 to €400 just to cut and program a new car key. Depending on your car model, it could be even more. Inconvenient : Many locksmiths don’t work around your schedule, and waiting for them to arrive or driving to their location takes time you don’t have. The Smart, Affordable Solution: Mr-Key.com Fortunately, there’s an easier and much more affordable option— Mr-Key.com . Instead of paying top dollar and wasting time, here’s how you can get a spare key in just a few simple steps: Take a Picture : Simply snap a photo of your existing key. Send It to Us : Upload the picture to Mr-Key.com using our secure service. Get Your Key Delivered : We’ll cut a perfect match and deliver it right to your door at a fraction of the cost of a traditional locksmith. Don’t Wait for a Crisis—Get Your Spare Key Now! Why risk being locked out or paying hundreds when you can have peace of mind for less? Visit Mr-Key.com today and get a spare car key cut from just a picture. It’s quick, it’s easy, and it’s affordable. Don’t be part of the 40% that gambles with just one key—protect your car and your schedule with Mr-Key.com!
We use cookies to personalise content and ads, to provide social media features and to analyse our traffic. We also share information about your use of our site with our social media, advertising and analytics partners who may combine it with other information that you’ve provided to them or that they’ve collected from your use of their services.
Basic
Cookies necessary for the proper functioning of the online store (such as storing products in the cart, sending a forgotten cart reminder by e-mail, etc. )
Ensures security for visitors by preventing cross-site request forgery. This cookie is essential for website and visitor security.
1 day
1st Party
laravel_session
PHP
To store the username of the logged in user. This information is necessary to allow the user to remain logged in to a website without having to submit their username and password for each page visited. Without this cookie, the user cannot move to areas of the website that require authenticated access.
Up to 2 hours
1st Party
__stripe_mid
Stripe
Serves to provide fraud prevention when attempting to shop on the site.
Up to 1 year
3rd Party
Advertisement
Advertising on other websites or platforms, retargeting, remarketing.
This cookie is set by Facebook to deliver advertising when they are on Facebook or a digital platform powered by advertising on Facebook after you visit this website.
2 months
3rd Party
fr
Facebook
The cookie also tracks a user's web behavior on sites that have a Facebook pixel or Facebook social plugin.
-
3rd Party
Analytics
Web controlling, conversion tracking of marketing tools.
Used to reduce the query rate. If Google Analytics is implemented via Google Tag Manager, this cookie will be named _dc_gtm_ .
1 minute
3rd Party
_gac_<property-id>
Google Analytics
Contains campaign-related information about the user. Linked Google Analytics and Google Ads accounts, Google Ads website conversion tags will read this cookie.
90 days
3rd Party
Google Remarketing
Google Analytics
Used to track pages viewed by users that are sent to Google Ads
-
3rd Party
dynx_itemid
Google Analytics
Used to track product ID in Google Ads
-
3rd Party
dynx_pagetype
Google Analytics
Used to track page type in Google Ads
-
3rd Party
dynx_totalvalue
Google Analytics
Used to track product value in Google Ads
3rd Party
dynx_category
Google Analytics
Used for category tracking in Google Ads
-
3rd Party
ga4_analytics
Google Analytics
Serves to process behavior such as setting Google Analytics cookies, sending automatic and enhanced measurement events, and declaring common settings.
3rd Party
Google Conversion Tracking
Google Ads.
Used to transmit order information to Google Ads.
-
3rd Party
conversion ID
Google Ads.
An identification number used to transmit order information to Google Ads.
-
3rd Party
conversion labеl
Google Ads.
A label used to transmit information about successful orders to Google Ads.
-
3rd Party
Additional software
Other external services and software to personalize the user experience.
Cookies are small text files that can be used by websites to make a user's experience more efficient.
The law states that we can store cookies on your device if they are strictly necessary for the operation of this site. For all other types of cookies we need your permission.
This site uses different types of cookies. Some cookies are placed by third party services that appear on our pages.
You can at any time change or withdraw your consent from the Cookie Declaration on our website.
Learn more about who we are, how you can contact us and how we process personal data in our Privacy Policy.
Please state your consent ID and date when you contact us regarding your consent.


 (1)_1736344659.jpg)
_1742479499.jpg)