Post Name


Swirl flaps are a BMW system that has been introduced to help burn the fuel mixture in the cylinder better due to the fact that diesel engines do not have throttle valves and it is not possible to adjust the air-fuel ratio. A diesel engine without vortex valves operates between a poor and a rich fuel mixture, because the only way to regulate it is through fuel injection.

Design of the first generation swirl flaps that are made of made of metal.


Unfortunately, swirl flaps are responsible for countless damaged engines and costly repairs due to design errors or metal fatigue. Once damaged, the cylinder sucks them in and causes great damage.

This is how damaged valves damage the cylinder.



Typical swirl flaps  suction damage.


The vortex valves are positioned in the inlet and are controlled by vacuum (DDE 4.0) or electrically (DDE5.0 / DDE6.4) by the engine ECU.

Effects of malfunctioning valves:

  • Swirl valves are  stuck in open position: Deterioration of exhaust gas performance at lower speeds.
  • Swirl valves are stuck in closed position: Approximate power loss of 10% at high engine speeds.

How swirl flaps work:


Performance characteristics:

The vortex valves are in the closed position, at low engine speeds and small amounts of fuel injected (controlled by the ECU card).

They open under the following conditions:

  1. coolant temperature <14 ° C OR * fuel quantity> 24 mg OR
    2. engine speed 2250 rpm OR
    3. inlet air temperature <-5 ° C.

BMW and Pierburg have decided to produce diesel engines with metal vortex valves. The speed at which the pistons in the diesel engine operate is at least 60 rpm, so a sucked vortex valve will break and cause a number of damages inside the engine.

In most cases, one or more pistons are severely damaged, as a bonus you get valves, in some cases a head or turbocharger. And this combination with a BMW engine is like a cumulative jackpot  🙂

In 2004, BMW began work on the problem and improved the design, however, a number of owners reported ongoing problems in this area.

The solution to this problem is by removing the vortex valves and plugging, which does not affect the performance of the engine and at the same time, you can safely pass the exhaust test.

Engines:

M47 (136hp VP44 fuel pump) has no valves.

M47N common rail engine (including M47N / M47TU / M47TUD20) (150hp. Face lift model from 2001 -) has valves.

M57 engines (M57D) (525d & 187hp. 330d) cars with manual transmission do not have valves, but those with automatic have.

M57N engines (M57TUD) (525d & 330d 204hp) have vortex valves.

Ruined swirl flapss:


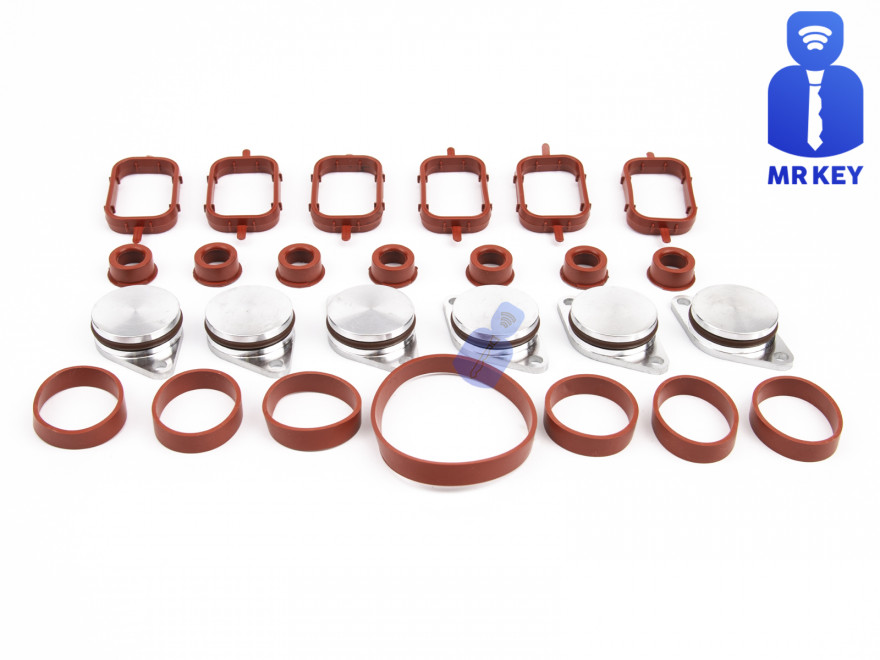
The plugs that replace the vortex valves are easy to find on the internet, but you can also find them here on our website.

Typical plugs:

Disassembly of vortex valves:


The vortex valves can be safely dismantled and in most cases if they are  removed properly no loss of power is felt.

Final list of models for which vortex valves are installed:

Engine: M47N/M47TU/M47TUD20

Applications:

* 110 kW (148 hp) and 330 N·m (243 lb·ft)

o E46 320d 2001-2005

o E83 X3 2.0d (up to end of 2006)

Engine: M47TU2D20

The engine was updated again in 2004 as the M47TU2D20. Still at 1995 cc, it produced more power across the range.

Applications:

* 120 kW (161 hp) and 340 N·m (251 lb·ft)

E60/E61 520d

E87 120d

E90/E91 320d

E83 X3 2.0d (end of 2006 onwards)

Engine: M57/M57D25

M57D25 was introduced in 2000.

Applications:

* 166 PS (122 kW; 164 hp) at 4000 rpm, 350 N·m (260 lb·ft) at 2000-2500 rpm with a 4750 rpm redline, models:

2000-2003 E39 525d *Vehicles With Automatic Transmission ONLY*

Engine: M57N/M57TU/M57TUD25

M57TUD25 was introduced in 2004.

Applications:

* 177 PS (130 kW; 175 hp) at 4000 rpm, 400 N·m (300 lb·ft) at 2000-2750 rpm models:

E60/E61 525d

Engine: M57/M57D30

M57D30, also called M57D29, was introduced in 1998.

Applications:

* 184 PS (135 kW; 181 hp)@4000, 390 N·m (290 lb·ft)@1750-3200 models:

E39 530d *Vehicles With Automatic Transmission ONLY*

E46 330d/330xd *Vehicles With Automatic Transmission ONLY*

* 184 PS (135 kW; 181 hp)@4000, 410 N·m (300 lb·ft)@2000-3000 models:

E38 730d *Vehicles With Automatic Transmission ONLY*

E53 X5 3.0d

* 193 PS (142 kW; 190 hp)@4000, 410 N·m (300 lb·ft)@1750-3000 models:

E38 730d

E39 530d

Engine: M57N/M57TU/M57TUD30

M57TUD30 was introduced in 2002. It originally produced 160 kW (215 hp) at 4000 rpm and 500 N·m (370 lb·ft) at 2000-2750 rpm, but was tweaked for 150 kW (201 hp) at 4000 rpm and 410 N·m (300 lb·ft) at 1500-3250 rpm for 2003 and again for 200 kW (268 hp) at 4000 rpm and 560 N·m (410 lb·ft) at 2000-2250 rpm in 2004.

Applications:

* 204 PS (150 kW; 201 hp)@4000, 410 N·m (300 lb·ft)@1500-3250 models:

E46 330d/330Cd/330xd

E83 X3 3.0d

* 218 PS (160 kW; 215 hp)@4000, 500 N·m (370 lb·ft)@2000-2750 models:

E53 X5 3.0d

E60/E61 530d/530xd

E65 730d

* 272 PS (200 kW; 268 hp)@4000, 560 N·m (410 lb·ft)@2000-2250

E60/E61 535d

* 245 PS (180 kW; 242 hp)@4000, 500 N·m (370 lb·ft)@2000-2250

* 286 PS (210 kW; 282 hp)@4000, 580 N·m (430 lb·ft)@2000-2250

Engine: M57TU2D30

M57TU2D30 was introduced in 2007, making its debut in the facelifted E60 and E61.

* M57TU2D30-UL: 197 PS (145 kW; 194 hp)

* M57TU2D30-OL: 235 PS (173 kW; 232 hp)@4000, 500 N·m (370 lb·ft)@2000-2750

* M57TU2D30-TOP: 286 PS (210 kW; 282 hp), 580 N·m (430 lb·ft)

Applications:

* 197 PS (145 kW; 194 hp), 400 N·m (300 lb·ft) models:

E90/E91/E92 325d

E60/E61 525d/525xd

* 231 PS (170 kW; 228 hp)@4000, 500 N·m (370 lb·ft)@2000-2750 models:

E65 730d

E90/E91 325d

E90/E91 330d/330xd

* 235 PS (173 kW; 232 hp) models:

E60/E61, BMW E70, BMW E71

* 286 PS (210 kW; 282 hp), 580 N·m (430 lb·ft) models:

E60/E61 535d

E70 X5 3.0sd

E71 X6 xDrive35d

E83 X3 3.0sd

E90/E91 335d

The above models are listed for information only if you want to to make sure your engine has valves installed, please contact a competent person.

Please note that the information described above is for informational purposes only and does not claim to be reliable. Mr-key.com is not responsible for any repair work you undertake that is related to the topic described in this article.

Related Posts

Key Lock Standards for Ultimate Vehicle Security

Key Lock Standards for Ultimate Vehicle Security

In today’s world, where vehicle security is more important than ever, understanding the various key lock standards is crucial for protecting your car against theft. Whether you own a luxury vehicle, a family car, or a fleet of commercial vehicles, knowing how different key locking systems work and what standards are in place can ensure that your vehicle remains secure. In this article, we’ll explore the key lock standards that every car owner should know, what makes a secure system, and how they help protect your car from potential threats. Understanding Key Lock Standards Key lock systems play an essential role in vehicle security. Modern car locks are not just about preventing unauthorized entry but also about preventing the car from being started or stolen. A well-designed key lock system integrates advanced technologies that enhance the protection of your vehicle. There are several key lock standards in the automotive industry, each with its specific focus on improving security and minimizing risks. These standards include traditional mechanical key locks, transponder keys, keyless entry systems, and smart keys. Mechanical Key Locks: The Traditional Standard Mechanical key locks are the most basic and traditional form of car locking systems. For many years, these locks were the standard, and they are still widely used today, particularly in older vehicles. A mechanical key lock involves a physical key that is inserted into the door or ignition switch to gain access to the car or start the engine. While simple, mechanical locks are not as secure as newer systems. Over time, thieves have developed methods to bypass or pick mechanical locks, making them less effective for modern vehicle security. However, many vehicles still rely on these locks, and they remain a crucial part of the overall security system. Transponder Keys: A Step Up in Security In response to the vulnerabilities of mechanical key locks, the automotive industry introduced transponder keys in the 1990s. A transponder key is equipped with a microchip embedded inside the key fob. When the key is inserted into the ignition, the microchip sends a signal to the vehicle's engine control unit (ECU), verifying that the key is legitimate and authorized to start the car. Transponder keys significantly enhance vehicle security by making it much more difficult for thieves to clone the key. Without the proper code, the car won’t start, even if the thief has an exact replica of the physical key. This added layer of security has made transponder keys the industry standard in many vehicles. Keyless Entry Systems: Convenience Meets Security Keyless entry systems, also known as remote entry systems, are now common in modern vehicles. These systems allow you to unlock or lock your car without inserting a key. Instead, the car communicates wirelessly with a key fob, sending a unique signal that grants access. The key fob typically includes buttons to lock or unlock the doors and sometimes to start the engine remotely. The convenience of keyless entry is undeniable, but it also introduces certain vulnerabilities. Keyless entry systems rely on wireless signals, which can sometimes be intercepted or duplicated by thieves using sophisticated equipment. To counteract these risks, manufacturers have developed enhanced encryption protocols and rolling codes that change each time the system is used, making it more challenging to hack into the system. Smart Keys: The Next Level of Vehicle Security Smart keys represent the latest evolution in vehicle security. These keys go beyond the capabilities of traditional key fobs and keyless entry systems by offering features like proximity sensing and push-to-start functionality. Smart keys allow you to unlock and start your vehicle without physically touching the key fob. The system detects when the key fob is near the car and grants access automatically. Smart keys are highly secure, as they use advanced encryption methods and rolling codes to protect the vehicle from unauthorized access. In addition, the vehicle can be programmed to disable the engine if an unauthorized key is detected, providing an additional layer of security. International Security Standards for Vehicle Locks To ensure the security of vehicles globally, several international standards have been developed to guide manufacturers in creating secure key lock systems. Some of the most important standards include: ISO 9001 : This standard focuses on the quality management of products, including vehicle locking systems. It ensures that manufacturers meet specific quality control guidelines, which helps ensure the reliability and security of key lock systems. ISO 14298 : This is a more specific standard related to secure key management for vehicles, focusing on preventing unauthorized duplication and tampering with vehicle keys. EC Regulation 1303/2014 : This European regulation outlines the technical specifications for car security systems, including locking systems. It provides a framework to protect vehicles against unauthorized access, theft, and other security risks. Adhering to these standards ensures that vehicle manufacturers meet global security requirements and offer their customers reliable and effective security systems. Why Secure Key Locks Are Essential for Vehicle Protection With increasing car theft rates and sophisticated methods used by criminals, investing in a secure key lock system is no longer optional—it’s essential. A secure key lock system prevents unauthorized access to the vehicle and ensures that only legitimate owners or authorized individuals can use the vehicle. Each level of security, from mechanical locks to smart keys, offers a different degree of protection, and modern vehicles often incorporate multiple systems to strengthen security. The combination of these advanced technologies, alongside international security standards, provides vehicle owners with peace of mind knowing their vehicle is well-protected. Key lock standards have come a long way from the traditional mechanical locks of the past. Today’s vehicles rely on advanced technologies like transponder keys, keyless entry systems, and smart keys to provide higher levels of security. These systems are designed to make it as difficult as possible for thieves to bypass them, giving car owners confidence that their vehicles are protected. By understanding the different key lock standards and their capabilities, you can make informed decisions about your vehicle’s security and take steps to ensure that your car remains safe from theft. Whether you’re driving a new model or an older vehicle, upgrading or maintaining your key lock system can help safeguard your investment and provide peace of mind on the road.

How to Take the Perfect Photo of Your Key for Easy Replacement

How to Take the Perfect Photo of Your Key for Easy Replacement

When you need a replacement key , taking a clear, detailed photo of your key can make the process much faster and more accurate. A high-quality image helps key makers understand the exact specifications, cuts, and dimensions of your key, which is especially important if you don’t have a spare. In this guide, we’ll walk you through the best practices for photographing your key so you can get an accurate replacement with ease. Why a Clear Key Photo Matters Photographing a key might sound simple, but it requires a bit of attention to detail. A well-taken photo captures the key’s grooves and unique cuts clearly, helping the key cutter replicate the exact pattern. Saves Time : A high-quality photo reduces the need for multiple attempts to cut a new key. Ensures Accuracy : Clear images help capture specific details, leading to a more precise fit. Convenient Process : With just a smartphone and a few tips, you can photograph your key from home without needing special equipment. Essential Tools for Photographing Your Key To take a clear photo of your key, you don’t need much beyond a few household items. Here’s what you’ll need: Smartphone or Camera : A phone camera is usually sufficient, but a standard digital camera works well too. Plain Background : Choose a neutral, solid-colored background like a piece of white paper or a smooth table surface. Good Lighting : Natural daylight or a bright room light helps capture details without shadows. Small Object for Elevation : A coin or similar item can lift the key slightly, making it easier to photograph. Step-by-Step Guide to Taking the Perfect Key Photo Follow these steps to take a photo that ensures clarity and accuracy for key replacement. 1. Set Up the Background Place a piece of plain white paper or another smooth, light-colored surface under your key. The solid color helps the details of the key stand out without any visual distractions. Tip : Avoid backgrounds with patterns or textures, as these can obscure the key’s features. 2. Position the Key Correctly Lay the key flat on the background, with the grooves and cuts facing up. The key should be positioned horizontally to allow a clear view of all its details. Side Profile : Make sure to capture the side profile that shows the cuts and grooves. Elevate Slightly : Place a coin or small object under one end of the key to angle it slightly toward the camera. This can help reduce shadows and improve focus on the cuts. 3. Adjust Lighting Good lighting is essential for capturing details. If possible, photograph your key in natural daylight near a window or use a well-lit room. Avoid Shadows : Ensure that no shadows fall across the key, as they can obscure details. Diffuse Light : If using a lamp, consider placing a thin cloth over it to diffuse the light and reduce harsh reflections. 4. Focus and Zoom Make sure your camera or smartphone is focused directly on the key. You may need to tap the screen to bring it into sharp focus. Zoom in Carefully : If you’re using a smartphone, zoom in slightly to capture the details, but avoid over-zooming, which can blur the image. Test Multiple Angles : Sometimes a slight adjustment in angle can capture the cuts more effectively, so take a few shots from slightly different perspectives. 5. Capture Multiple Photos It’s always a good idea to take several photos to ensure you have the best one. Try different angles and lighting adjustments to capture as many details as possible. Close-Up of the Grooves : Take one close-up image focusing on the cuts and grooves of the key. Overall Image : Include one full-length photo that shows the entire key from end to end. Try Different Angles : Slightly tilt the key or move the camera to see which angle best captures the detail of the cuts. Common Mistakes to Avoid When Photographing Your Key To get the best results, steer clear of these common issues that can impact the quality of your key photo: Blurry Images : If your hand shakes, use a small tripod or prop your phone on a stable surface. Poor Lighting : Avoid taking photos in dim rooms; use bright light to ensure the key is clearly visible. Obstructed Details : Make sure the entire length of the key is visible, without any part being cut off or covered. Tips for Ensuring a Smooth Replacement Process Once you have a clear photo of your key, there are a few final steps to make the replacement process as efficient as possible. Check the Photos : Look over your photos before sending them to ensure that they’re clear and detailed. Label the Key : If you’re photographing multiple keys, label each one in the image or add a note to avoid confusion. Include Measurements : If possible, add the measurements of the key’s length and width in your notes for added accuracy. A clear, detailed photo of your key can save you time and effort when seeking a replacement. By following these simple steps, you’ll provide all the necessary details to ensure your new key is an accurate match. Remember, good lighting, focus, and capturing all the unique cuts are essential to achieving the best results. With these guidelines, you’re set to take a photo that will make your key replacement process smooth and hassle-free.

How to Program a Car Key: A Step-by-Step Guide

How to Program a Car Key: A Step-by-Step Guide

Lost Your Car Key Programming? Here's What to Do Have you ever lost your car keys or found yourself with a spare key that doesn’t start your vehicle? While the process of programming a car key might seem intimidating, it’s often simpler than you’d expect. In many cases, car owners can program keys themselves without needing a visit to a dealership. This guide walks you through the essentials of car key programming, helping you save time, effort, and potentially a significant amount of money. Understanding Car Key Programming: The Basics Car key programming is the process of syncing a key with a car's internal computer so it can communicate securely. Modern vehicles use transponder keys or smart keys equipped with chips that emit a unique signal. Without proper programming, these keys won’t function, even if they fit perfectly into the ignition. While older mechanical keys didn’t require programming, today’s advanced systems add a layer of security, reducing the risk of car theft. However, this added sophistication means that replacing or reprogramming a key is no longer as simple as cutting a piece of metal. Quick Tip: Check your vehicle’s owner manual to see if programming your car key is a DIY-friendly process, as some models allow self-programming, while others require professional tools. Step-by-Step Guide to Programming a Car Key Before starting, ensure you have all necessary tools and information: The vehicle’s owner manual. All keys that need programming, including the functional ones. Step 1: Access Programming Mode Start by sitting in the driver’s seat with all the doors closed. Insert the already functional key into the ignition and turn it to the “on” position (do not start the engine). Some vehicles require you to cycle the key between “on” and “off” positions a specific number of times to enter programming mode. Step 2: Add the New Key Once in programming mode, remove the functional key and quickly insert the new key into the ignition. Turn it to the “on” position. The vehicle’s security light may flash to indicate the key has been successfully programmed. Step 3: Test the Key After programming, remove the new key and test it to ensure it can start the car and unlock the doors. Note: Each car manufacturer has unique programming steps. Be sure to consult your owner’s manual or the manufacturer’s website for specific instructions. When Professional Help Is Needed While many vehicles allow for DIY key programming, others require specialized equipment or software that only dealerships or locksmiths can access. This is particularly true for luxury or high-end cars with advanced encryption and security features. If your DIY efforts fail, it’s best to seek help from a certified professional. Visiting a dealership is a reliable, albeit more expensive, option. Alternatively, professional locksmiths often provide programming services at a lower cost, making them a practical choice for many drivers. Costs and Considerations The cost of programming a car key varies significantly based on the vehicle’s make and model. For basic models, self-programming might cost nothing if you already have a functional key. However, professional programming can range from $50 to $300 or more, especially for smart keys or proximity fobs. To minimize costs: Have a spare key : Always keep a functional spare to simplify programming if a replacement is needed. Research costs : Call local locksmiths or dealerships to compare pricing. Empower Yourself with Knowledge Programming a car key doesn’t have to be a daunting task. With the right tools and information, many car owners can handle the process themselves, saving time and money. However, it’s essential to recognize when professional assistance is necessary, particularly for complex key systems. By understanding the basics of car key programming and following a step-by-step approach, you can ensure your vehicle remains secure and functional. So, whether it’s a spare key or a replacement, you now have the confidence to tackle the task or know where to turn for help.

How to Know If Your Car Key Has a Hidden Transponder Chip

How to Know If Your Car Key Has a Hidden Transponder Chip

Modern car keys are more than just simple tools to unlock doors—they're powerful components of your vehicle’s security system. Hidden inside many keys is a small yet crucial piece of technology known as a transponder chip . But how can you tell if your car key has one? Whether you’ve lost your key, are looking to replace it, or simply want to understand your vehicle better, knowing if your key contains a transponder chip is essential. This guide will explain what a transponder is, why it matters, and how you can easily check if your key is equipped with one. What Is a Transponder Chip? A transponder chip, short for "transmitter + responder," is a small electronic microchip embedded inside the plastic head of the car key or within a smart key fob. When you insert the key into the ignition—or have it nearby in a push-button start system—the chip emits a unique signal. The vehicle’s onboard computer must recognize this signal before it will allow the engine to start. Without the correct signal, even if the key physically fits into the ignition, the car won’t move. Transponders have been a game-changer in reducing car theft, and today, nearly all vehicles produced after the late 1990s are equipped with them. Learn more about how modern keys work and find replacement options in our car keys collection. Why It’s Critical to Know If Your Key Has a Chip If your key has a hidden transponder chip, replacing it is more complicated than simply cutting a new metal key. You will need a key that not only matches the cut but also includes the correct programming to communicate with your car’s immobilizer system. Failing to recognize this can lead to frustration, extra dealership fees, or even being stranded. Moreover, understanding your key's technology helps you make smarter choices when buying a spare, upgrading your security setup, or troubleshooting ignition issues. How to Check If Your Car Key Has a Transponder Chip Fortunately, you don’t need expensive equipment to find out. Start by considering the age of your vehicle: if your car was manufactured after 1995 (in Europe) or 1998 (in the USA), chances are very high it uses a transponder system. Next, examine the physical key. Keys with large, bulky plastic heads usually house a chip inside. In contrast, purely metallic keys without plastic parts tend to belong to older, non-transponder vehicles. You can also perform a simple foil test. Wrap the head of your key in aluminum foil and try to start the car. Since foil blocks radio frequencies, if the car refuses to start, it’s likely that a transponder chip is present. If you want absolute certainty, consult your vehicle’s manual or speak with a professional locksmith. Many locksmiths use specialized tools to detect whether a chip exists. For additional technical explanation, you can refer to this guide on how immobilizer systems work. What Happens If the Transponder Signal Is Missing? If you try to start your car without the proper transponder signal, the immobilizer system kicks in. Most vehicles will either not crank at all or crank without allowing the engine to fire. Some models will display a warning light on the dashboard, often shaped like a padlock or a car with a key icon. Without a valid transponder signal, you won't be going anywhere—no matter how new or well-cut the key is. Can You Program a Transponder Key Yourself? Depending on the make and model of your car, some basic keys can be programmed at home—especially if you already have one working key available. However, many newer vehicles require professional diagnostic tools connected directly to the car’s computer to program keys securely. Attempting DIY programming on these systems without the right knowledge can lock your car’s immobilizer and lead to expensive repairs. Always consult your car’s manual or seek professional help before attempting any programming yourself. Knowledge = Protection Understanding whether your car key contains a hidden transponder chip isn’t just a fun fact—it's essential for protecting your vehicle and saving yourself time, money, and hassle. Whether you're planning to replace a worn-out key, add a backup, or upgrade your security, knowing what’s inside your key helps you make better, safer decisions. If you ever need a spare key, a battery replacement, or advice on key maintenance, you can explore more in our online store at Mr Key . Remember: a smart driver is a secure driver. Stay informed, stay prepared, and you'll always stay one step ahead.

Chat with us