Post Name

Losing a key can be a hassle, but the process of getting a replacement becomes much easier if you can locate the key code. The key code is a unique combination of letters and numbers that identifies the specific cut and type of your key. This code is essential for accurately replicating a new key, whether it’s for your car, house, or another type of lock. This guide will help you understand where to find your key code and what steps you can take if the code isn’t easily accessible.

Why the Key Code is Important

The key code is essentially a blueprint for your key. It tells a locksmith or dealer exactly how to cut a new key that will work with your lock. Without this code, creating a replacement key can be a trial-and-error process, which can be time-consuming and costly. Additionally, for certain types of keys, such as those for cars with transponder chips, the key code is necessary for programming the electronic components of the key.

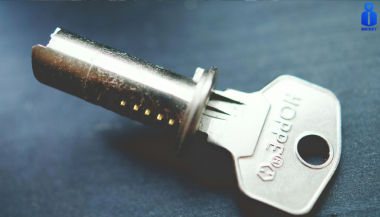
Step 1: Inspect Your Key and Lock

The first and most straightforward step is to inspect your key and lock for the key code. For many keys, especially older models, the code is engraved or stamped directly onto the key itself. This is common with car keys, where the code may be found on the metal part of the key blade. In some cases, the code might be on the plastic casing of the key, especially if it’s a newer model with electronic components.

If the key itself doesn’t have the code, check the lock. The key code is sometimes inscribed on the lock’s cylinder or on a small metal plate attached to the lock. This is more common with padlocks or specialized security locks. If you’re dealing with a door lock, you might need to remove the lock from the door to inspect it closely.

Step 2: Review Documentation and Original Packaging

If you can’t find the key code on the key or lock, the next step is to review any documentation or packaging that came with the key. For vehicles, the key code is often provided in the owner’s manual or on a key tag that was given to you at the time of purchase. This tag is usually small and easily misplaced, so it’s worth checking any old documentation or vehicle paperwork you might have.

For other types of keys, such as those for padlocks, cabinets, or office furniture, the key code might be printed on the original packaging or on warranty cards. These are often overlooked, but they can be invaluable when you need a replacement key.

Step 3: Contact the Manufacturer or Dealer

If the key code isn’t visible on the key, lock, or documentation, your next step should be to contact the manufacturer or dealer. Most car manufacturers, for example, keep a record of key codes based on the Vehicle Identification Number (VIN). By providing your VIN to a dealership, they can usually retrieve the key code and either cut a new key for you or give you the information needed to get one cut elsewhere.

For other types of keys, such as those for cabinets or padlocks, contacting the manufacturer can also be helpful. Provide them with details about the product, such as the model number and any serial numbers, and they may be able to provide the key code or a replacement key directly.

Step 4: Professional Locksmith Assistance

If you’ve exhausted all other options, a professional locksmith is your best bet. Locksmiths have specialized tools and knowledge that allow them to decode locks or determine the correct key code even when it’s not visible or available through documentation. They can often cut a new key based on the lock itself, bypassing the need for the original key code entirely.

Locksmiths are particularly useful if you’re dealing with older locks, unique security systems, or if the key code is no longer accessible through traditional means. They can also help with programming transponder keys for vehicles, ensuring that your new key not only fits the lock but also communicates correctly with your car’s electronic systems.

Additional Tips for Key Code Location

  • Record Key Codes: If you find your key code, make sure to record it somewhere safe. This will save you time if you need another replacement in the future.
  • Ask About Spare Keys: If you’re contacting a dealership or manufacturer, ask if they can provide a spare key at the same time, especially if you’re prone to losing keys.
  • Consider a Key Tracking System: For those who frequently lose keys, consider investing in a key tracking system or a digital key organizer where you can store key codes and important information.

Locating your key code is a crucial step in the process of replacing a lost or broken key. By carefully inspecting your key and lock, reviewing any relevant documentation, contacting the manufacturer or dealer, or seeking help from a professional locksmith, you can ensure that your replacement key is accurate and functional. Taking these steps not only saves time and money but also provides peace of mind in knowing that you have a reliable solution for key replacement.

Related Posts

The Ultimate Guide to Opel, Peugeot, and Citroën Car Keys: Battery Replacement, Flip Key Issues, and Shell Compatibility

The Ultimate Guide to Opel, Peugeot, and Citroën Car Keys: Battery Replacement, Flip Key Issues, and Shell Compatibility

Car keys have come a long way from simple metal tools to advanced electronic devices. While they offer convenience and security, they're also prone to wear and tear over time. If you own an Opel, Peugeot, or Citroën, you've likely encountered a dead battery, faulty buttons, or a cracked key shell. These issues, though frustrating, are easy to fix with the right approach. This guide explores everything you need to know to maintain or restore your car key's functionality—without unnecessary expense. From understanding how these keys work, to step-by-step maintenance practices, we'll walk you through all the essentials to keep your keys working like new. How Car Keys Work Today Modern car keys are more than just tools to unlock and start your vehicle. They are miniaturized computers embedded with microchips, transponders, and signal systems that communicate with your car's onboard electronics. Most Opel, Peugeot, and Citroën models feature flip keys with integrated remote buttons, and inside each key fob lies a delicate configuration of electronics that perform critical functions like remote unlocking and engine ignition authorization. These keys depend heavily on power from a small coin-cell battery, usually the CR2032. While small and seemingly insignificant, the battery is the heart of your key fob. When it begins to fail, even slightly, the symptoms can range from reduced signal range to complete unresponsiveness. That’s why it’s crucial to replace it in time. Replacing the Battery in Opel Car Keys Your Opel car key is essential to your daily routine. Over time, the lithium CR2032 battery inside may weaken, resulting in slower response or reduced range. The good news is that replacing it is straightforward and requires only a few tools. Once you identify your key type—typically a flip key with two or three buttons—you can open the casing using a small screwdriver or plastic tool. Inside, you'll find a battery nestled within the key's internal framework. Carefully remove the old battery and insert a new CR2032, ideally a reliable model like the Panasonic CR2032 . Proper alignment is crucial; the wrong orientation can prevent the key from functioning entirely. Align the shell halves carefully and press them back together until they click into place. If your key shell is also showing signs of damage or wear, consider replacing it with this Opel 3-button key housing . Replacing the battery is a quick job, but it makes a world of difference in reliability and peace of mind. Plus, it spares you the inconvenience of getting stranded or needing dealer intervention. Common Peugeot Flip Key Issues and How to Fix Them Peugeot flip keys are compact and stylish, but frequent use can expose a few recurring problems. The flip mechanism may lose tension, buttons may stop responding, or the outer shell may crack. In many cases, the spring inside wears down, and the plastic buttons may degrade over time. Exposure to moisture, dirt, or accidental drops can also damage the key fob. These symptoms can often be resolved by replacing both the battery and the key shell. Thankfully, most replacement shells come with a new flip mechanism already installed, making the process quick and cost-effective. If you're dealing with a damaged shell or non-functional buttons, a compatible Peugeot key shell can restore both the look and performance of your key. To repair your key, begin by opening the shell using a thin screwdriver. Remove the internal circuit board and transponder chip carefully. Transfer them into the new shell, ensuring everything fits snugly. Insert a fresh CR2032 battery before closing the key shell, then test all functions. Unlike dealer replacements, this DIY approach is affordable and efficient, putting the control in your hands. Understanding Citroën Key Shell Compatibility Citroën keys often resemble Peugeot models but feature subtle design differences that can impact shell compatibility. Before purchasing a replacement shell, it's important to examine a few key details. First, confirm that the button layout matches exactly—some models include a trunk release, while others do not. Next, check the blade type, usually HU83 or VA2, and make sure your new shell supports that configuration. You’ll also need to ensure there’s a space for the transponder chip, as without it, your car won’t start. Lastly, confirm that your circuit board (PCB) fits securely in the new housing. If you're unsure, compare your key with this Citroën 3-button shell for reference. A mismatched shell can result in poor fitment, misaligned buttons, or failure to lock and unlock your car. That’s why it's important to compare your current key closely to any replacement product. Shell replacements are not one-size-fits-all—small deviations in size or design can render them useless. Going Beyond: Caring for Your Car Key Long-Term Maintaining your car key goes beyond occasional repairs. Think of it as part of your overall vehicle care routine. Keep your key clean by regularly wiping it down with a soft cloth. Avoid exposing it to moisture or extreme temperatures, which can damage the battery and internal electronics. If your key starts to feel loose or if the blade no longer flips smoothly, it's a sign that maintenance is due. Another often-overlooked aspect is the condition of your key ring. Overloaded or heavy keychains can put unnecessary strain on the ignition switch and the key’s blade over time. Keeping your key light and secure can prolong both the key and the ignition system’s lifespan. If you find yourself frequently pressing buttons or experiencing lag in signal response, don't ignore it. These early symptoms are usually signs that a new battery is needed, or the shell's contacts are worn. Addressing small problems before they escalate can save you from full key failure. Car Key Maintenance Caring for your car key doesn’t have to be a daunting task. Whether you drive an Opel, a Peugeot, or a Citroën, regular maintenance and minor DIY repairs can significantly extend the life of your key. Replacing a worn battery and upgrading a broken shell not only restores functionality but also revives the overall appearance of your key. Use quality components, take your time during repairs, and always test your key before final assembly. By taking these small steps, you can avoid costly replacements and enjoy reliable key performance for years to come. Explore trusted replacement parts and accessories online at mr-key.com to keep your car keys in top condition year-round.

Exploring the Future of Car Key Technology: What’s Next?

Exploring the Future of Car Key Technology: What’s Next?

In the rapidly evolving world of automotive technology, car keys have transformed from simple metal tools into sophisticated electronic devices. As vehicles become smarter, so do their keys. From keyless entry to biometric authentication, car key technology continues to push boundaries. Let’s explore the next frontier of car key innovations and how they’ll impact convenience, security, and vehicle ownership. 1. Digital Keys: Unlocking with Your Smartphone One of the most exciting advancements is the rise of digital keys. These allow you to unlock and start your car using just your smartphone. How It Works: Digital keys rely on Bluetooth or NFC (Near Field Communication) technology to securely transmit signals between your phone and the car. Convenience: No more fumbling for keys. Your phone acts as your all-in-one device. Security Features: Many digital key apps offer encrypted access and the ability to revoke permissions instantly if your phone is lost or stolen. This innovation is gaining traction among automakers and is expected to become standard in the near future. 2. Biometric Authentication: Keys That Recognize You Biometric car keys are already starting to appear in premium vehicles. These keys use your unique physical features to grant access. Fingerprint Recognition: Similar to unlocking your phone, some car keys now scan your fingerprint to unlock the car. Facial Recognition: Cameras built into the vehicle can identify you and automatically unlock the doors. Why It Matters: Biometrics provide an additional layer of security, making it nearly impossible for thieves to gain unauthorized access. This cutting-edge technology ensures that only you—and those you authorize—can start your vehicle. 3. Smart Key Customization: Personalization at Its Best The future of car keys isn’t just about unlocking cars; it’s about creating personalized driving experiences. Pre-Set Preferences: Smart keys can remember your seat position, climate control settings, and even your preferred music playlist. User Profiles: In households with multiple drivers, smart keys can switch profiles based on who’s using the car. Why It’s Useful: This feature saves time and enhances comfort, making every drive tailored to your needs. As vehicles become more personalized, smart keys will play a vital role in delivering these conveniences. 4. Ultra-Secure Encryption: Fighting Key Hacking As technology advances, so do the tactics of cybercriminals. To combat this, car key technology is embracing stronger encryption. Rolling Codes: Modern key fobs use rolling codes that change with every use, making it harder for hackers to intercept signals. Blockchain Technology: Some experts predict that blockchain could be integrated into car key systems for unbreakable security. Impact on Security: These measures aim to eliminate vulnerabilities, ensuring that only the rightful owner can access the vehicle. Advanced encryption is a critical step in securing the future of car ownership. 5. Integration with Smart Homes: A Connected Lifestyle Imagine your car keys working seamlessly with your smart home devices. This future is closer than you think. Examples: Unlock your car and have your home’s lights turn on simultaneously. Use voice commands to lock your car doors through your home assistant. Convenience Factor: This integration enhances the interconnectedness of your daily routines, saving you time and effort. As smart ecosystems grow, car keys will become a pivotal part of a connected lifestyle. 6. Eco-Friendly Innovations: Sustainable Car Keys Sustainability is a growing concern in all industries, including automotive technology. Car keys are no exception. Recyclable Materials: Future car keys could be made from eco-friendly or recycled materials. Energy-Efficient Batteries: Expect longer-lasting, rechargeable batteries that reduce waste. Why It Matters: These changes not only benefit the environment but also align with the broader push toward sustainable vehicle manufacturing. As the industry shifts toward greener practices, even car keys are becoming part of the solution. A New Era of Car Keys Car key technology is on the cusp of incredible transformations, combining convenience, security, and sustainability. Whether through digital keys, biometrics, or smart home integration, the future holds endless possibilities for making your driving experience safer and more seamless. For car owners, these innovations mean less hassle, greater control, and enhanced peace of mind. As car key technology evolves, so does the way we interact with our vehicles—ushering in a new era of smarter and more secure mobility.

What You Need To Know About BMW  Swirl Flaps and How To Solve The Problem With Them

What You Need To Know About BMW  Swirl Flaps and How To Solve The Problem With Them

Swirl flaps are a BMW system that has been introduced to help burn the fuel mixture in the cylinder better due to the fact that diesel engines do not have throttle valves and it is not possible to adjust the air-fuel ratio. A diesel engine without vortex valves operates between a poor and a rich fuel mixture, because the only way to regulate it is through fuel injection. Design of the first generation swirl flaps that are made of made of metal. Unfortunately, swirl flaps are responsible for countless damaged engines and costly repairs due to design errors or metal fatigue. Once damaged, the cylinder sucks them in and causes great damage. This is how damaged valves damage the cylinder. Typical swirl flaps suction damage. The vortex valves are positioned in the inlet and are controlled by vacuum (DDE 4.0) or electrically (DDE5.0 / DDE6.4) by the engine ECU. Effects of malfunctioning valves: Swirl valves are stuck in open position: Deterioration of exhaust gas performance at lower speeds. Swirl valves are stuck in closed position: Approximate power loss of 10% at high engine speeds. How swirl flaps work: Performance characteristics: The vortex valves are in the closed position, at low engine speeds and small amounts of fuel injected (controlled by the ECU card). They open under the following conditions: coolant temperature <14 ° C OR * fuel quantity> 24 mg OR 2. engine speed 2250 rpm OR 3. inlet air temperature <-5 ° C. BMW and Pierburg have decided to produce diesel engines with metal vortex valves. The speed at which the pistons in the diesel engine operate is at least 60 rpm, so a sucked vortex valve will break and cause a number of damages inside the engine. In most cases, one or more pistons are severely damaged, as a bonus you get valves, in some cases a head or turbocharger. And this combination with a BMW engine is like a cumulative jackpot 🙂 In 2004, BMW began work on the problem and improved the design, however, a number of owners reported ongoing problems in this area. The solution to this problem is by removing the vortex valves and plugging, which does not affect the performance of the engine and at the same time, you can safely pass the exhaust test. Engines: M47 (136hp VP44 fuel pump) has no valves. M47N common rail engine (including M47N / M47TU / M47TUD20) (150hp. Face lift model from 2001 -) has valves. M57 engines (M57D) (525d & 187hp. 330d) cars with manual transmission do not have valves, but those with automatic have. M57N engines (M57TUD) (525d & 330d 204hp) have vortex valves. Ruined swirl flapss: The plugs that replace the vortex valves are easy to find on the internet, but you can also find them here on our website. Typical plugs: Disassembly of vortex valves: The vortex valves can be safely dismantled and in most cases if they are removed properly no loss of power is felt. Final list of models for which vortex valves are installed: Engine: M47N/M47TU/M47TUD20 Applications: * 110 kW (148 hp) and 330 N·m (243 lb·ft) o E46 320d 2001-2005 o E83 X3 2.0d (up to end of 2006) Engine: M47TU2D20 The engine was updated again in 2004 as the M47TU2D20. Still at 1995 cc, it produced more power across the range. Applications: * 120 kW (161 hp) and 340 N·m (251 lb·ft) E60/E61 520d E87 120d E90/E91 320d E83 X3 2.0d (end of 2006 onwards) Engine: M57/M57D25 M57D25 was introduced in 2000. Applications: * 166 PS (122 kW; 164 hp) at 4000 rpm, 350 N·m (260 lb·ft) at 2000-2500 rpm with a 4750 rpm redline, models: 2000-2003 E39 525d *Vehicles With Automatic Transmission ONLY* Engine: M57N/M57TU/M57TUD25 M57TUD25 was introduced in 2004. Applications: * 177 PS (130 kW; 175 hp) at 4000 rpm, 400 N·m (300 lb·ft) at 2000-2750 rpm models: E60/E61 525d Engine: M57/M57D30 M57D30, also called M57D29, was introduced in 1998. Applications: * 184 PS (135 kW; 181 hp)@4000, 390 N·m (290 lb·ft)@1750-3200 models: E39 530d *Vehicles With Automatic Transmission ONLY* E46 330d/330xd *Vehicles With Automatic Transmission ONLY* * 184 PS (135 kW; 181 hp)@4000, 410 N·m (300 lb·ft)@2000-3000 models: E38 730d *Vehicles With Automatic Transmission ONLY* E53 X5 3.0d * 193 PS (142 kW; 190 hp)@4000, 410 N·m (300 lb·ft)@1750-3000 models: E38 730d E39 530d Engine: M57N/M57TU/M57TUD30 M57TUD30 was introduced in 2002. It originally produced 160 kW (215 hp) at 4000 rpm and 500 N·m (370 lb·ft) at 2000-2750 rpm, but was tweaked for 150 kW (201 hp) at 4000 rpm and 410 N·m (300 lb·ft) at 1500-3250 rpm for 2003 and again for 200 kW (268 hp) at 4000 rpm and 560 N·m (410 lb·ft) at 2000-2250 rpm in 2004. Applications: * 204 PS (150 kW; 201 hp)@4000, 410 N·m (300 lb·ft)@1500-3250 models: E46 330d/330Cd/330xd E83 X3 3.0d * 218 PS (160 kW; 215 hp)@4000, 500 N·m (370 lb·ft)@2000-2750 models: E53 X5 3.0d E60/E61 530d/530xd E65 730d * 272 PS (200 kW; 268 hp)@4000, 560 N·m (410 lb·ft)@2000-2250 E60/E61 535d * 245 PS (180 kW; 242 hp)@4000, 500 N·m (370 lb·ft)@2000-2250 * 286 PS (210 kW; 282 hp)@4000, 580 N·m (430 lb·ft)@2000-2250 Engine: M57TU2D30 M57TU2D30 was introduced in 2007, making its debut in the facelifted E60 and E61. * M57TU2D30-UL: 197 PS (145 kW; 194 hp) * M57TU2D30-OL: 235 PS (173 kW; 232 hp)@4000, 500 N·m (370 lb·ft)@2000-2750 * M57TU2D30-TOP: 286 PS (210 kW; 282 hp), 580 N·m (430 lb·ft) Applications: * 197 PS (145 kW; 194 hp), 400 N·m (300 lb·ft) models: E90/E91/E92 325d E60/E61 525d/525xd * 231 PS (170 kW; 228 hp)@4000, 500 N·m (370 lb·ft)@2000-2750 models: E65 730d E90/E91 325d E90/E91 330d/330xd * 235 PS (173 kW; 232 hp) models: E60/E61, BMW E70, BMW E71 * 286 PS (210 kW; 282 hp), 580 N·m (430 lb·ft) models: E60/E61 535d E70 X5 3.0sd E71 X6 xDrive35d E83 X3 3.0sd E90/E91 335d The above models are listed for information only if you want to to make sure your engine has valves installed, please contact a competent person. Please note that the information described above is for informational purposes only and does not claim to be reliable. Mr-key.com is not responsible for any repair work you undertake that is related to the topic described in this article.

How to Take the Perfect Photo of Your Key for Easy Replacement

How to Take the Perfect Photo of Your Key for Easy Replacement

When you need a replacement key , taking a clear, detailed photo of your key can make the process much faster and more accurate. A high-quality image helps key makers understand the exact specifications, cuts, and dimensions of your key, which is especially important if you don’t have a spare. In this guide, we’ll walk you through the best practices for photographing your key so you can get an accurate replacement with ease. Why a Clear Key Photo Matters Photographing a key might sound simple, but it requires a bit of attention to detail. A well-taken photo captures the key’s grooves and unique cuts clearly, helping the key cutter replicate the exact pattern. Saves Time : A high-quality photo reduces the need for multiple attempts to cut a new key . Ensures Accuracy : Clear images help capture specific details, leading to a more precise fit. Convenient Process : With just a smartphone and a few tips, you can photograph your key from home without needing special equipment. Essential Tools for Photographing Your Key To take a clear photo of your key, you don’t need much beyond a few household items. Here’s what you’ll need: Smartphone or Camera : A phone camera is usually sufficient, but a standard digital camera works well too. Plain Background : Choose a neutral, solid-colored background like a piece of white paper or a smooth table surface. Good Lighting : Natural daylight or a bright room light helps capture details without shadows. Small Object for Elevation : A coin or similar item can lift the key slightly, making it easier to photograph. Step-by-Step Guide to Taking the Perfect Key Photo Follow these steps to take a photo that ensures clarity and accuracy for key replacement. 1. Set Up the Background Place a piece of plain white paper or another smooth, light-colored surface under your key. The solid color helps the details of the key stand out without any visual distractions. Tip : Avoid backgrounds with patterns or textures, as these can obscure the key’s features. 2. Position the Key Correctly Lay the key flat on the background, with the grooves and cuts facing up. The key should be positioned horizontally to allow a clear view of all its details. Side Profile : Make sure to capture the side profile that shows the cuts and grooves. Elevate Slightly : Place a coin or small object under one end of the key to angle it slightly toward the camera. This can help reduce shadows and improve focus on the cuts. 3. Adjust Lighting Good lighting is essential for capturing details. If possible, photograph your key in natural daylight near a window or use a well-lit room. Avoid Shadows : Ensure that no shadows fall across the key, as they can obscure details. Diffuse Light : If using a lamp, consider placing a thin cloth over it to diffuse the light and reduce harsh reflections. 4. Focus and Zoom Make sure your camera or smartphone is focused directly on the key. You may need to tap the screen to bring it into sharp focus. Zoom in Carefully : If you’re using a smartphone, zoom in slightly to capture the details, but avoid over-zooming, which can blur the image. Test Multiple Angles : Sometimes a slight adjustment in angle can capture the cuts more effectively, so take a few shots from slightly different perspectives. 5. Capture Multiple Photos It’s always a good idea to take several photos to ensure you have the best one. Try different angles and lighting adjustments to capture as many details as possible. Close-Up of the Grooves : Take one close-up image focusing on the cuts and grooves of the key. Overall Image : Include one full-length photo that shows the entire key from end to end. Try Different Angles : Slightly tilt the key or move the camera to see which angle best captures the detail of the cuts. Common Mistakes to Avoid When Photographing Your Key To get the best results, steer clear of these common issues that can impact the quality of your key photo: Blurry Images : If your hand shakes, use a small tripod or prop your phone on a stable surface. Poor Lighting : Avoid taking photos in dim rooms; use bright light to ensure the key is clearly visible. Obstructed Details : Make sure the entire length of the key is visible, without any part being cut off or covered. Tips for Ensuring a Smooth Replacement Process Once you have a clear photo of your key, there are a few final steps to make the replacement process as efficient as possible. Check the Photos : Look over your photos before sending them to ensure that they’re clear and detailed. Label the Key : If you’re photographing multiple keys, label each one in the image or add a note to avoid confusion. Include Measurements : If possible, add the measurements of the key’s length and width in your notes for added accuracy. A clear, detailed photo of your key can save you time and effort when seeking a replacement. By following these simple steps, you’ll provide all the necessary details to ensure your new key is an accurate match. Remember, good lighting, focus, and capturing all the unique cuts are essential to achieving the best results. With these guidelines, you’re set to take a photo that will make your key replacement process smooth and hassle-free.

Chat with us