Post Name

When it comes to convenience, car keyless remotes have revolutionized the way we interact with our vehicles. No more fumbling with traditional keys or worrying about locking yourself out. With just a push of a button, you can lock, unlock, and even start your vehicle. But what happens when your keyless remote stops working, or when you need to program a new one? Here’s a simple guide to help you program your car's keyless remote, regardless of your vehicle's make or model.

Understanding Keyless Remotes

Before jumping into the programming process, it’s important to understand what a keyless remote is and how it works. Essentially, a keyless remote allows you to interact with your vehicle without needing to physically insert a key. Instead of using a traditional metal key, your car’s electronic system communicates wirelessly with the remote, allowing you to lock, unlock, and sometimes even start your vehicle, all with the push of a button.

These remotes typically use a radio frequency to communicate with your car, sending a signal that’s encrypted for security. Most modern cars use transponder technology, which makes the system more secure and resistant to hacking or copying. This means that the remote must be properly programmed to your vehicle’s system to function correctly.

When Do You Need to Program a Keyless Remote?

There are several situations in which you might need to program your keyless remote:

Replacing a Lost or Damaged Remote: If you’ve lost your keyless remote or it’s no longer functioning properly, you’ll need to get a replacement. This may require programming the new remote to sync with your vehicle.

Adding a New Remote: If you’ve bought an additional keyless remote for your car (for a spouse, child, or other family member), you’ll need to program it so that it works with your vehicle.

Battery Replacement: Sometimes, replacing the battery in your remote can cause the programming to reset, meaning you’ll need to reprogram the remote for it to work again.

Changing or Resetting Vehicle Settings: Occasionally, vehicle settings or remotes can be reset or reprogrammed as part of regular maintenance, requiring you to program new or additional remotes.

How to Program Your Car’s Keyless Remote

Programming a keyless remote is easier than you might think, and in most cases, it can be done by following a few simple steps. The process varies slightly depending on the make and model of your car, but here’s a general overview of the steps involved:

Get Your New or Replacement Remote: Ensure that your remote is compatible with your car’s system. If you're not sure, you can check with your car's manufacturer or an authorized dealership. Some remotes require specific codes to be programmed.

Sit Inside Your Vehicle: For safety and security reasons, most cars require you to be inside the vehicle while programming the remote.

Insert the Key in the Ignition: Insert the key into the ignition and turn it to the "ON" position without starting the engine. For cars with push-to-start systems, you may need to press the start button without pressing the brake pedal.

Activate the Programming Mode: Depending on your car’s system, you’ll need to follow a sequence of steps to enter programming mode. This could involve turning the key on and off several times, or pressing certain buttons in a specific order. Refer to your vehicle’s manual for the exact steps, as the process can differ from one model to another.

Program the Remote: Once your car is in programming mode, you’ll need to press the button on your keyless remote that you want to program. Usually, you’ll hear a chime or see the lights flash, indicating that the remote has been successfully programmed. Some cars may require you to press the button several times to ensure proper synchronization.

Test the Remote: After programming, test the remote to make sure it works properly. Try locking and unlocking the doors or starting the engine. If everything works as expected, you’re done!

Exit Programming Mode: To finish the process, simply turn off the ignition and remove the key. This should exit programming mode. If you have additional remotes to program, repeat the steps above for each one.

What to Do if Programming Doesn’t Work

While programming a keyless remote is usually a straightforward process, there are instances where things don’t go as planned. If your remote isn’t syncing with your car after following the steps, here are a few troubleshooting tips:

  • Check the Battery: If the remote’s battery is dead or weak, it won’t transmit the signal to your car. Replace the battery and try programming again.
  • Verify the Compatibility: Make sure that the remote is compatible with your vehicle’s make, model, and year. Some vehicles require special remotes that can only be programmed by the manufacturer or an authorized locksmith.
  • Reset Your Vehicle’s System: In some cases, you might need to reset the car’s system to clear previous programming attempts. Check your owner’s manual or consult a professional for assistance.
  • Consult a Professional: If you continue to have issues, it might be time to visit a dealership or a certified locksmith. These professionals have the tools and experience to program the remote correctly and ensure everything works seamlessly.

Why Programming Your Keyless Remote Is Important

Programming your keyless remote is a simple but important task that helps ensure your car’s security and convenience. By understanding how the process works and what to do if things go wrong, you’ll be able to troubleshoot and solve any issues quickly. Whether you’re replacing a lost remote or adding a new one to your collection, knowing how to program your remote saves time and money compared to visiting a dealership or locksmith.

With the increased reliance on keyless remotes for unlocking and starting vehicles, it’s essential for every car owner to be familiar with this process. By keeping your remote in good working condition and knowing how to program it when necessary, you’ll enjoy a smoother, more efficient experience with your vehicle.

Related Posts

What You Need To Know About BMW  Swirl Flaps and How To Solve The Problem With Them

What You Need To Know About BMW  Swirl Flaps and How To Solve The Problem With Them

Swirl flaps are a BMW system that has been introduced to help burn the fuel mixture in the cylinder better due to the fact that diesel engines do not have throttle valves and it is not possible to adjust the air-fuel ratio. A diesel engine without vortex valves operates between a poor and a rich fuel mixture, because the only way to regulate it is through fuel injection. Design of the first generation swirl flaps that are made of made of metal. Unfortunately, swirl flaps are responsible for countless damaged engines and costly repairs due to design errors or metal fatigue. Once damaged, the cylinder sucks them in and causes great damage. This is how damaged valves damage the cylinder. Typical swirl flaps suction damage. The vortex valves are positioned in the inlet and are controlled by vacuum (DDE 4.0) or electrically (DDE5.0 / DDE6.4) by the engine ECU. Effects of malfunctioning valves: Swirl valves are stuck in open position: Deterioration of exhaust gas performance at lower speeds. Swirl valves are stuck in closed position: Approximate power loss of 10% at high engine speeds. How swirl flaps work: Performance characteristics: The vortex valves are in the closed position, at low engine speeds and small amounts of fuel injected (controlled by the ECU card). They open under the following conditions: coolant temperature <14 ° C OR * fuel quantity> 24 mg OR 2. engine speed 2250 rpm OR 3. inlet air temperature <-5 ° C. BMW and Pierburg have decided to produce diesel engines with metal vortex valves. The speed at which the pistons in the diesel engine operate is at least 60 rpm, so a sucked vortex valve will break and cause a number of damages inside the engine. In most cases, one or more pistons are severely damaged, as a bonus you get valves, in some cases a head or turbocharger. And this combination with a BMW engine is like a cumulative jackpot 🙂 In 2004, BMW began work on the problem and improved the design, however, a number of owners reported ongoing problems in this area. The solution to this problem is by removing the vortex valves and plugging, which does not affect the performance of the engine and at the same time, you can safely pass the exhaust test. Engines: M47 (136hp VP44 fuel pump) has no valves. M47N common rail engine (including M47N / M47TU / M47TUD20) (150hp. Face lift model from 2001 -) has valves. M57 engines (M57D) (525d & 187hp. 330d) cars with manual transmission do not have valves, but those with automatic have. M57N engines (M57TUD) (525d & 330d 204hp) have vortex valves. Ruined swirl flapss: The plugs that replace the vortex valves are easy to find on the internet, but you can also find them here on our website. Typical plugs: Disassembly of vortex valves: The vortex valves can be safely dismantled and in most cases if they are removed properly no loss of power is felt. Final list of models for which vortex valves are installed: Engine: M47N/M47TU/M47TUD20 Applications: * 110 kW (148 hp) and 330 N·m (243 lb·ft) o E46 320d 2001-2005 o E83 X3 2.0d (up to end of 2006) Engine: M47TU2D20 The engine was updated again in 2004 as the M47TU2D20. Still at 1995 cc, it produced more power across the range. Applications: * 120 kW (161 hp) and 340 N·m (251 lb·ft) E60/E61 520d E87 120d E90/E91 320d E83 X3 2.0d (end of 2006 onwards) Engine: M57/M57D25 M57D25 was introduced in 2000. Applications: * 166 PS (122 kW; 164 hp) at 4000 rpm, 350 N·m (260 lb·ft) at 2000-2500 rpm with a 4750 rpm redline, models: 2000-2003 E39 525d *Vehicles With Automatic Transmission ONLY* Engine: M57N/M57TU/M57TUD25 M57TUD25 was introduced in 2004. Applications: * 177 PS (130 kW; 175 hp) at 4000 rpm, 400 N·m (300 lb·ft) at 2000-2750 rpm models: E60/E61 525d Engine: M57/M57D30 M57D30, also called M57D29, was introduced in 1998. Applications: * 184 PS (135 kW; 181 hp)@4000, 390 N·m (290 lb·ft)@1750-3200 models: E39 530d *Vehicles With Automatic Transmission ONLY* E46 330d/330xd *Vehicles With Automatic Transmission ONLY* * 184 PS (135 kW; 181 hp)@4000, 410 N·m (300 lb·ft)@2000-3000 models: E38 730d *Vehicles With Automatic Transmission ONLY* E53 X5 3.0d * 193 PS (142 kW; 190 hp)@4000, 410 N·m (300 lb·ft)@1750-3000 models: E38 730d E39 530d Engine: M57N/M57TU/M57TUD30 M57TUD30 was introduced in 2002. It originally produced 160 kW (215 hp) at 4000 rpm and 500 N·m (370 lb·ft) at 2000-2750 rpm, but was tweaked for 150 kW (201 hp) at 4000 rpm and 410 N·m (300 lb·ft) at 1500-3250 rpm for 2003 and again for 200 kW (268 hp) at 4000 rpm and 560 N·m (410 lb·ft) at 2000-2250 rpm in 2004. Applications: * 204 PS (150 kW; 201 hp)@4000, 410 N·m (300 lb·ft)@1500-3250 models: E46 330d/330Cd/330xd E83 X3 3.0d * 218 PS (160 kW; 215 hp)@4000, 500 N·m (370 lb·ft)@2000-2750 models: E53 X5 3.0d E60/E61 530d/530xd E65 730d * 272 PS (200 kW; 268 hp)@4000, 560 N·m (410 lb·ft)@2000-2250 E60/E61 535d * 245 PS (180 kW; 242 hp)@4000, 500 N·m (370 lb·ft)@2000-2250 * 286 PS (210 kW; 282 hp)@4000, 580 N·m (430 lb·ft)@2000-2250 Engine: M57TU2D30 M57TU2D30 was introduced in 2007, making its debut in the facelifted E60 and E61. * M57TU2D30-UL: 197 PS (145 kW; 194 hp) * M57TU2D30-OL: 235 PS (173 kW; 232 hp)@4000, 500 N·m (370 lb·ft)@2000-2750 * M57TU2D30-TOP: 286 PS (210 kW; 282 hp), 580 N·m (430 lb·ft) Applications: * 197 PS (145 kW; 194 hp), 400 N·m (300 lb·ft) models: E90/E91/E92 325d E60/E61 525d/525xd * 231 PS (170 kW; 228 hp)@4000, 500 N·m (370 lb·ft)@2000-2750 models: E65 730d E90/E91 325d E90/E91 330d/330xd * 235 PS (173 kW; 232 hp) models: E60/E61, BMW E70, BMW E71 * 286 PS (210 kW; 282 hp), 580 N·m (430 lb·ft) models: E60/E61 535d E70 X5 3.0sd E71 X6 xDrive35d E83 X3 3.0sd E90/E91 335d The above models are listed for information only if you want to to make sure your engine has valves installed, please contact a competent person. Please note that the information described above is for informational purposes only and does not claim to be reliable. Mr-key.com is not responsible for any repair work you undertake that is related to the topic described in this article.

The Essential Car Parts Guide: Understanding Your Vehicle's Core Components

The Essential Car Parts Guide: Understanding Your Vehicle's Core Components

Unveiling the Anatomy of Your Car Your car is more than just a mode of transportation—it's a complex machine composed of various parts working in harmony to ensure smooth and safe driving. Understanding these essential car parts not only helps you appreciate your vehicle better but also empowers you to identify issues, perform basic maintenance, and communicate effectively with mechanics. In this guide, we’ll explore the key components that keep your car running and why they’re vital for optimal performance. 1. Engine: The Heart of Your Vehicle The engine is the powerhouse of your car, converting fuel into energy to propel the vehicle forward. There are various types of engines, including: Internal Combustion Engines (ICE): Common in most vehicles, using gasoline or diesel. Hybrid Engines: Combining a traditional engine with an electric motor for better efficiency. Electric Motors: Found in EVs, powered by rechargeable batteries. Key components within the engine include pistons, the crankshaft, and the timing belt. Regular maintenance like oil changes and timely inspections are crucial for keeping the engine in good condition. 2. Transmission: Changing Gears Made Easy The transmission system ensures that power from the engine is transferred to the wheels at the correct speed and torque. There are two main types of transmissions: Manual Transmission: Requires the driver to shift gears manually. Automatic Transmission: Shifts gears automatically, providing greater convenience. Proper transmission fluid levels are essential for smooth gear transitions and the longevity of the system. 3. Battery: Your Vehicle's Power Source The car battery supplies the electrical power needed to start the engine and operate various electrical systems, such as lights, wipers, and infotainment. Modern vehicles may also include auxiliary batteries for additional power needs. Maintenance Tip: Regularly check battery terminals for corrosion and ensure proper voltage levels, especially in extreme weather conditions. 4. Braking System: Your Lifeline on the Road The braking system ensures the vehicle slows down or stops when needed, making it a critical safety component. Key parts include: Brake Pads and Rotors: Convert kinetic energy into heat, slowing the car down. Brake Fluid: Transfers force from the brake pedal to the braking mechanism. Regular inspection of the braking system can prevent wear and ensure reliability. 5. Tires and Wheels: Where the Rubber Meets the Road Tires and wheels are vital for traction, handling, and overall vehicle stability. There are various types of tires designed for specific conditions, such as all-season, winter, and performance tires. Maintenance Tip: Regularly check tire pressure, alignment, and tread depth to ensure safe driving and optimal fuel efficiency. 6. Suspension System: Smoothing Out the Ride The suspension system absorbs shocks from uneven road surfaces, ensuring a smooth and stable ride. Key components include: Shock Absorbers: Reduce impact from road irregularities. Struts and Springs: Provide structural support and maintain balance. A well-maintained suspension system enhances comfort and handling. 7. Exhaust System: Keeping Emissions in Check The exhaust system directs harmful gases away from the engine and reduces emissions. Key components include the muffler, catalytic converter, and exhaust pipes. Environmental Note: A faulty exhaust system can increase emissions and negatively impact air quality. Regular checks are essential for compliance with emission standards. 8. Cooling System: Preventing Overheating The cooling system regulates the engine's temperature to prevent overheating. It includes components like the radiator, coolant, and thermostat. Maintenance Tip: Regularly check coolant levels and inspect hoses for leaks to ensure efficient cooling. 9. Fuel System: Delivering Energy to the Engine The fuel system stores and supplies fuel to the engine for combustion. Key parts include the fuel pump, injectors, and fuel tank. Efficiency Tip: Clean fuel injectors and replace the fuel filter as needed to maintain optimal fuel efficiency. 10. Electrical System: Powering Your Vehicle's Features From the headlights to the infotainment system, the electrical system powers numerous features in your car. It includes wiring, alternators, and fuses. Maintenance Tip: Inspect fuses and ensure the alternator is functioning properly to avoid electrical issues. Empowering Yourself Through Knowledge Understanding the essential parts of your car equips you with the knowledge to maintain your vehicle effectively and address issues proactively. By staying informed, you can extend the life of your car, save on repair costs, and ensure a safer driving experience. Whether you’re a car enthusiast or a regular driver, knowing your vehicle’s anatomy is the first step toward smarter car ownership.

Condensation Inside Motorcycle TFT Displays: Causes, Warning Signs & What It Really Means

Condensation Inside Motorcycle TFT Displays: Causes, Warning Signs & What It Really Means

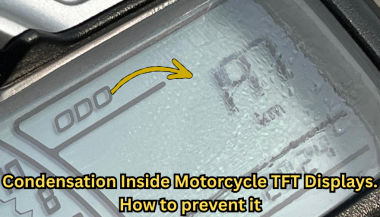
Every modern motorcycle rider has seen it. You park your bike after a cold morning ride, glance at the dashboard, and notice a faint haze forming behind the TFT screen. Maybe small droplets gather along the edges. Maybe the whole display looks fogged from the inside. That moisture is not cosmetic. It is water inside a sealed electronic unit — and it is the earliest visible warning of a problem that can destroy a component costing €700 to over €1,200 to replace. This guide explains exactly why condensation forms inside motorcycle TFT displays, which bikes are most affected, what it really means for your instrument cluster, and the one affordable upgrade that prevents the damage cycle before it starts. Why Motorcycle TFT Displays Get Condensation Inside A motorcycle TFT display is a sealed electronic module exposed to some of the harshest conditions any screen will ever face. Unlike your phone in a pocket, a motorcycle dashboard sits directly in the path of rain, road spray, temperature swings, UV radiation, and constant vibration. Condensation forms when warm, humid air trapped inside the display housing meets a cooler surface — the glass front panel. The moisture in that air turns to liquid droplets on the coldest point, which is almost always the inside face of the screen. Here is how moisture gets trapped in the first place. Thermal breathing. Every ride creates a heat cycle. The engine, direct sunlight, and the display's own backlight warm the air inside the housing. When the bike stops and cools, that air contracts and draws in fresh, humid outside air through micro-gaps in the seals. Over weeks and months, humidity accumulates inside the unit. Seal degradation. The rubber gaskets and adhesive bonds that seal a TFT housing are not permanent. UV exposure breaks down rubber. Vibration loosens adhesive joints. Temperature cycling causes materials to expand and contract at different rates, gradually opening pathways for water ingress. Micro-damage to the front surface. Stone chips, cleaning scratches, and pressure marks on the display face can create hairline cracks invisible to the naked eye. These become moisture entry points — especially in rain or when using a pressure washer. High-humidity environments. Riders in coastal areas, tropical climates, or northern European countries with persistent dampness face accelerated moisture ingress. A bike garaged in a humid environment without ventilation is particularly vulnerable. The result is always the same: water inside the display that the sealed housing cannot easily release. Which Motorcycles Are Most Affected Condensation inside TFT displays is not limited to one manufacturer. It has been documented across virtually every major brand using TFT instrument clusters. BMW — The R 1250 GS, R 1300 GS, S 1000 RR, F 850 GS, and F 900 R all use 6.5-inch or 10.25-inch TFT displays. These are high-quality units, but they sit in exposed positions — particularly on adventure models ridden in all weather conditions. OEM replacement for the 6.5-inch TFT runs around £1,200, and if the wiring loom is damaged during theft or failure, that figure can reach £3,000+. Yamaha — Models like the MT-09, MT-07, Tracer 9, and Ténéré 700 use TFT dashboards. Yamaha's displays are generally well-sealed, but the same thermal breathing cycle applies. Adventure and touring riders who cover high mileage in variable conditions report condensation after 2–3 seasons. Honda — The Africa Twin, CB650R, and CBR1000RR-R all run TFT clusters. The Africa Twin's display sits in a highly exposed cockpit position. Forum reports from owners confirm moisture ingress, especially after extended wet-weather riding. Triumph — The Tiger 900, Street Triple, and Speed Triple RS use TFT displays. Triumph's units are compact, but the same vulnerability to vibration-induced seal failure applies across the range. Kawasaki — The Z900, Ninja 1000SX, Versys 1000, and newer Z650 models all feature TFT dashboards. Like all manufacturers, Kawasaki's sealed units face the same environmental pressures. The pattern is clear: this is not a brand-specific defect. It is an inherent vulnerability of mounting sensitive display technology in one of the most hostile environments imaginable. The Warning Signs You Should Never Ignore Condensation inside a motorcycle TFT display is progressive. It starts small and escalates. Here is what each stage looks like — and what it means. Light fogging after a cold start. A thin mist on the inside of the screen that clears within 10–15 minutes of riding. This is the earliest sign. Moisture is present inside the housing but has not yet caused damage. At this stage, the problem is still manageable. Persistent edge condensation. Droplets that form along the bottom or side edges of the display and do not fully evaporate during a ride. This means moisture is accumulating faster than it can escape. The seals are compromised. Internal staining or water marks. Visible trails, spots, or discolouration behind the glass that remain even when the display is dry. This is mineral residue from evaporated water. It means moisture has been cycling inside the display repeatedly. The internal coatings and bonding layers are being attacked. Intermittent display issues. Flickering backlight, sections of the screen dimming unevenly, or the display briefly shutting off during a ride. These are early signs of electrical damage from moisture reaching the circuit board or flex connectors behind the panel. Dead pixels appearing alongside condensation. If you see pixel failure combined with any visible moisture, the display is in active degradation. The liquid crystal layer or its driver circuits are being damaged. This combination almost always leads to full failure. Complete display blackout. The screen powers on but shows nothing, or fails to power on at all. At this point, the TFT module is usually beyond repair and must be replaced entirely. The critical takeaway: condensation that clears quickly is a warning. Condensation that stays, stains, or coincides with display glitches means damage is already underway. What Condensation Actually Does to a TFT Display The fog itself is not the problem. The damage happens behind it. A motorcycle TFT display is a laminated stack of layers: a front glass or polycarbonate cover, a polarising film, the liquid crystal panel itself, LED backlighting, and a circuit board with drivers and connectors. All bonded together with adhesive and housed in a sealed plastic or metal frame. When moisture sits inside this assembly, several destructive processes begin simultaneously. Corrosion of electrical contacts. The flex cables and solder joints connecting the LCD panel to the main circuit board are extremely sensitive to moisture. Even trace amounts of water can cause oxidation, increasing resistance and eventually breaking the connection. This is how entire rows or columns of pixels fail at once. Delamination of optical layers. The adhesive bonds between the polariser, LCD panel, and backlight diffuser swell and weaken when exposed to moisture. This causes visible clouding, uneven brightness, and eventually permanent optical distortion. Mineral deposits on internal surfaces. Water that evaporates inside the display leaves behind dissolved minerals and contaminants. These deposits scatter light, reduce contrast, and cannot be cleaned without disassembling the unit — which is rarely possible without destroying it. Short circuits on the PCB. If enough moisture reaches the main circuit board, it can bridge traces and create short circuits. This can cause complete display failure, error codes, or even damage to the motorcycle's CAN bus communication system. A motorcycle TFT display is not designed to be serviced. It is a sealed, disposable module. Once moisture damage reaches the internal electronics, the only option is full replacement. How to Prevent Water Ingress in Motorcycle TFT Displays Before Damage Starts Prevention is not complicated. But it requires acting before symptoms appear — not after. Never use a pressure washer on the dashboard. High-pressure water jets force moisture past seals that can handle rain but not direct, concentrated spray. Wash the display area gently with a damp microfibre cloth and motorcycle-safe LCD cleaner. Avoid parking in direct sunlight for extended periods. Prolonged heat accelerates UV degradation of seals and adhesives. It also increases the temperature differential that drives the thermal breathing cycle. Use a cover or park in shade when possible. Store the bike in a ventilated, dry environment. A damp, unventilated garage is one of the worst places for a motorcycle with a TFT display. If humidity control is not possible, a small dehumidifier or silica gel packs placed near the bike can help. Inspect the display edges regularly. Look for any visible gap between the display housing and its frame, or any separation of the front glass from the body. Catching a seal failure early — before moisture accumulates — gives you the chance to act. Protect the display surface from physical damage. The front face of the TFT is the largest and most vulnerable entry point for moisture. A single stone chip or a scratch from an abrasive cloth can breach the surface coating and create a pathway for water. Preventing that surface damage is the single most effective thing you can do. The One Upgrade That Prevents Condensation Damage in Motorcycle TFT Displays A quality screen protector designed specifically for your motorcycle's TFT display is the most cost-effective protection available — by a wide margin. Here is what a properly fitted screen protector actually does. It creates a physical barrier against impact. Stone chips, gravel flicks, and minor impacts hit the protector instead of the display surface. This eliminates the micro-cracks that become moisture entry points. It shields the surface from UV radiation. UV is the primary cause of seal and adhesive degradation. A screen protector absorbs UV energy before it reaches the display housing, slowing the ageing process of the seals beneath. It prevents cleaning damage. Without a protector, wiping the TFT with a dirty cloth, gloves, or the wrong cleaning product can create fine scratches that compromise the surface. With a protector fitted, you can clean aggressively without risking the display itself. After a few years, replace the protector — the screen underneath stays pristine. It reduces direct water contact with the display edges. A well-fitted protector overlaps the display bezels slightly, redirecting water away from the most vulnerable seal points around the screen perimeter. The cost comparison makes the decision obvious. A screen protector costs between €10 and €25. A TFT display replacement costs €700 to €1,500 or more, depending on the motorcycle. That is a return on investment measured in thousands of percent. Riders who fit a screen protector on day one of ownership — before the first ride, before the first stone chip, before the first rain — give their TFT display the best possible chance of lasting the life of the motorcycle. What to Do If You Already Have Condensation If moisture is already visible inside your display, the situation is not necessarily hopeless — but your options depend on how far it has progressed. If you see light fogging only. Park the bike in a warm, dry, ventilated space. Run the engine and let the display heat up for 20–30 minutes to encourage evaporation. Some riders have had success placing a small silica gel packet near the display housing to draw out residual moisture. Fit a screen protector immediately to prevent further surface-level water entry. If the bike is under warranty. Contact your dealer. Condensation inside a sealed TFT display is a manufacturing defect in the seal or housing. Many manufacturers — including BMW and KTM — have replaced displays under warranty for this exact issue. Document the condensation with clear photographs before your appointment. If condensation has caused staining or pixel issues. At this stage, the damage is internal and typically irreversible without replacing the display module. Get a quote from your dealer, check whether aftermarket options exist for your model, and fit a screen protector to the new unit immediately to prevent the cycle repeating. FAQ Is condensation inside my motorcycle TFT display normal? A very light, temporary fog on a cold morning that clears within minutes can occur even in a properly sealed unit. However, persistent condensation, visible droplets, or any staining is not normal — it indicates a compromised seal and active moisture ingress. Can I fix condensation inside a motorcycle display myself? If it is only light fogging, gentle heat and dry storage may resolve it temporarily. However, the seals are already compromised, so it will likely return. Full repair requires resealing or replacing the display unit, which is not a realistic DIY job for most riders. Will condensation void my warranty? No. Condensation inside a sealed factory unit is a seal failure, not user damage. Most manufacturers honour warranty claims for moisture ingress, provided there is no evidence of physical impact or tampering. Always document the issue with photos. How much does it cost to replace a motorcycle TFT display? OEM replacement costs vary significantly. BMW TFT units typically cost £700–£1,200 for the part alone, plus fitting. Honda, Yamaha, Triumph, and Kawasaki displays range from €400–€900 depending on the model. Labour adds €100–€300. Does a screen protector actually prevent condensation? A screen protector does not fix existing condensation. What it does is prevent the surface damage — stone chips, scratches, UV degradation — that causes seals to fail and moisture to enter in the first place. It is the most effective preventive measure available. Should I fit a screen protector to a brand-new bike? Yes. Day one. Before the first ride. The TFT display is at its most vulnerable when new because the seals have not yet been tested, and any early surface damage will accelerate their failure. Protecting the screen from the start is the best insurance against a four-figure repair bill down the line. Does riding in rain damage a motorcycle TFT display? Rain alone should not damage a properly sealed TFT display. The issue is cumulative: repeated exposure to rain, spray, temperature cycling, and UV gradually degrades seals over time. A screen protector significantly slows this process by shielding the most exposed surface. Protect Your Display Before It Costs You Hundreds A motorcycle TFT display is one of the most expensive single components on a modern bike — and one of the most exposed. The damage from water ingress is progressive, often invisible until it is too late, and almost always irreversible. A screen protector fitted from day one is the simplest, cheapest, and most effective way to protect that investment. Browse precision-fit motorcycle TFT screen protectors for BMW, Yamaha, Honda, Triumph, Kawasaki, and more at mr-key.com.

5 Reasons Why Your Car Remote Isn’t Working and How to Fix It

5 Reasons Why Your Car Remote Isn’t Working and How to Fix It

In an age where convenience is king, keyless entry systems have revolutionized how we interact with our vehicles. Gone are the days of fumbling for physical keys—today’s drivers rely heavily on the sleek, compact functionality of car remotes. However, what happens when this modern convenience fails you? Few things are more frustrating than standing beside your car, repeatedly pressing your remote, only to be met with silence. Understanding why your car remote isn’t working can save you from unnecessary panic, costly repairs, and inconvenient lockouts. This comprehensive guide explores the five most common reasons your remote may malfunction and offers in-depth, actionable solutions to get you back on the road quickly. 1. Battery Depletion: The Silent Saboteur The number one reason for car remote failure is, unsurprisingly, a dead or depleted battery. Though seemingly small, the battery inside your remote plays a crucial role in its operation. Most key fobs use lithium coin batteries (commonly CR2025 or CR2032), known for their durability and longevity. But even these reliable power sources don’t last forever. Factors contributing to faster battery depletion include: Frequent use (especially for remote start and lock/unlock functions) Extreme temperature exposure (both heat and cold reduce battery life) Long periods of inactivity (leading to gradual discharge) Solution: Replacing your key fob battery is a simple, cost-effective fix. Always consult your vehicle’s manual to identify the correct battery type. When replacing, ensure the new battery is seated correctly to avoid poor contact. Proactively changing the battery every 1-2 years, even before it’s fully drained, can prevent sudden failures. 2. Signal Interference: The Invisible Obstacle Key fobs communicate with your vehicle via radio frequencies. However, various external factors can interfere with this communication. Living in urban environments, parking in underground garages, or being near large electronic devices (such as cell towers, Wi-Fi routers, or even other vehicles) can disrupt the signal between your remote and car. Solution: If you suspect signal interference: Move closer to your vehicle or try unlocking it from a different angle. Step away from potential sources of interference like electronic devices or heavy machinery. Hold the key fob higher or away from your body to improve signal transmission. While occasional interference is common, if the problem persists across multiple locations, consider resetting or reprogramming your fob. 3. Desynchronization: Losing Connection Sometimes, your key fob may lose synchronization with your vehicle’s receiver—especially after events like a battery change or extended periods of non-use. When this happens, the fob and vehicle are essentially "speaking different languages," resulting in non-responsiveness. Solution: Check your vehicle's manual, as many manufacturers provide step-by-step instructions to manually re-sync the fob. Typically, this involves a sequence like inserting and turning the ignition key, pressing specific buttons, or opening and closing the doors in a set pattern. If manual reprogramming fails, you may need assistance from a dealership or certified locksmith equipped with the necessary diagnostic tools. 4. Physical Damage: The Wear and Tear Factor Remote key fobs, despite their solid appearance, are not invincible. Everyday handling—dropping the remote, spilling liquids, or even rough storage—can cause internal components to malfunction. Moisture exposure, in particular, is a key offender, leading to corrosion or short-circuiting of the circuitry inside. Solution: Inspect your remote regularly for: Visible cracks, chips, or signs of wear Sticky buttons or unresponsive keys Water damage indicators If damage is evident, replacing the remote may be your best bet. For minor issues, cleaning the interior components (after carefully opening the casing) with a soft cloth and isopropyl alcohol can sometimes restore functionality. Consider investing in a protective cover to prevent future damage. 5. Vehicle Receiver Issues: The Hidden Problem While the key fob often gets the blame, sometimes the issue lies within your vehicle’s receiver system. If the receiver—which detects and processes the signal from your remote—is malfunctioning, your remote will appear useless regardless of its condition. Solution: One telltale sign of a faulty receiver is if multiple remotes fail to operate the car. In this case, the problem is likely internal. Diagnosing and fixing receiver issues typically requires professional assistance, either from a dealership or an experienced automotive technician equipped with specialized diagnostic tools. Global Context: Keyless Challenges Worldwide The rise of keyless systems isn't limited to one region—it’s a global phenomenon. However, as technology advances, so do the challenges. For instance, key signal cloning and relay attacks have become prevalent, particularly in Europe and North America, prompting manufacturers to enhance security measures continually. Understanding the basics of how your key fob works and its vulnerabilities can help protect against both everyday failures and more sophisticated threats. Stay Ahead of the Problem Modern car remotes offer unmatched convenience, but when they fail, the disruption can be significant. Whether it’s a dead battery, signal interference, synchronization glitch, physical damage, or vehicle receiver issue, knowing how to identify and fix the problem puts you in control. Take proactive steps—replace batteries regularly, handle your remote with care, and familiarize yourself with your vehicle’s reprogramming process. A small investment of time today could save you from major headaches tomorrow. Stay informed. Stay prepared. And keep your car remote working seamlessly, wherever the road takes you.

Chat with us