Post Name

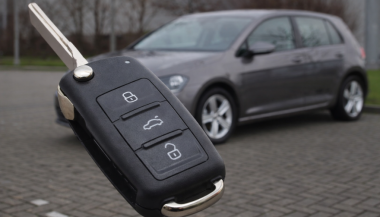
In an age where smartphones can locate us with pinpoint accuracy and lost luggage can be tracked halfway around the world, it’s easy to assume car keys are just as smart. But for many frustrated drivers, losing a car key feels like sending it into a black hole. The lack of a clear way to find them often leads to stress, wasted time, and sometimes costly replacements. So here’s the big question: Do car keys have GPS, and can they be tracked like other smart devices?

This article explains the technology behind key tracking, compares GPS with Bluetooth, and offers practical ways to find lost keys in a connected world.


The Truth About GPS in Car Keys

While GPS technology has become common in many consumer devices, the vast majority of car keys do not include built-in GPS. Even the most modern remote key fobs, which allow for keyless entry and push-button start, generally lack the components necessary for GPS functionality. These components include a satellite GPS receiver, a data transmission module, and a sustainable power source—none of which are typically found in a key fob. The design of a car key prioritizes compactness, cost-efficiency, and low energy usage. Adding GPS would not only increase manufacturing costs but also introduce battery life challenges. That’s why most manufacturers have opted against including GPS tracking in car keys.

GPS requires constant power and data transmission — something a small coin cell battery in a typical key fob can’t support." – Marcus Lee, Automotive Tech Analyst


How Can Car Keys Be Tracked?

Although your keys may not have GPS, there are other technologies that make it possible to track or locate them when they’re lost. These include Bluetooth trackers, crowdsourced networks, and GPS systems that track the vehicle instead of the key itself.

1. Bluetooth Trackers (Apple AirTag, Tile, Chipolo)

These small, attachable gadgets can be added to your keychain and linked to a mobile app. They rely on Bluetooth to provide location data when within a certain range. If your keys are somewhere nearby—like in your home or office—these trackers can play a sound or show you their last known position on a map. The range is generally up to 120 meters (400 feet), and battery life can last up to a year, making them a practical, low-maintenance option for most users.

2. Crowdsourced Networks (Find My, Tile Network)

If your Bluetooth tracker is out of range, some brands offer a smart workaround. Apple’s AirTag, for instance, uses the “Find My” network, which consists of millions of iPhones around the world. If someone with an Apple device passes near your lost keys, the location is anonymously and securely sent to your phone. This creates a global, decentralized tracking system that mimics GPS functionality without requiring satellites or cellular connections.

3. Car GPS Systems (Vehicle Only, Not the Key)

Some high-end cars offer integrated GPS systems, but these track the vehicle, not the keys. Brands like Tesla, BMW, and Mercedes-Benz allow owners to locate their car through mobile apps. If your keys are left inside the car, you may be able to find them by locating the vehicle. However, once the keys are removed, they cannot be tracked unless equipped with a separate Bluetooth tracker.


GPS vs Bluetooth: What’s the Difference?

To better understand why GPS isn’t commonly included in car keys, it’s useful to compare the two technologies:

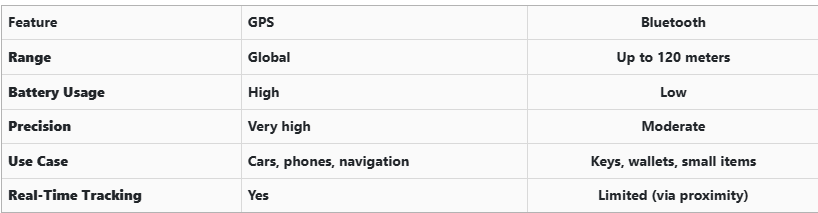
GPS provides global, real-time tracking with high precision, but it’s power-intensive and costly. Bluetooth, while more limited in range, is ideal for small items and short distances, offering a cost-effective solution for everyday use.


Global Perspectives on Key Tracking

Around the world, the adoption of key tracking technologies differs based on privacy laws, tech infrastructure, and consumer behavior. In Japan and South Korea, smart home and car integration are advanced, yet GPS-enabled keys are still not the norm. In many parts of Europe, particularly in countries like Germany, Bluetooth solutions are favored due to strict data privacy regulations. In contrast, the U.S. market has embraced personal tracking devices like Apple AirTag and Tile, making them increasingly common accessories. These differences highlight how technology adoption often reflects broader cultural and legal norms, as well as the balance between convenience and privacy.


Smart Tips to Keep Track of Your Keys

Whether your keys have advanced tech or not, you can take simple steps to avoid losing them. Attaching a Bluetooth tracker is a great first line of defense. Keeping your keys in a consistent, designated place at home reduces the chances of misplacement. Many tracking apps also offer “left behind” alerts, which notify you if you leave your keys behind when moving out of range. It's also smart to keep a spare key somewhere safe and consider going keyless if your next car allows it. Implementing a few of these habits can save you time, frustration, and the cost of replacing a lost key.


The Future of Key Tracking

While car keys may not have built-in GPS, technology continues to evolve with practical alternatives. Bluetooth trackers, supported by app alerts and community networks, already provide effective ways to find lost keys. As innovation progresses, we can expect even more seamless solutions, such as Ultra Wideband (UWB) technology and Internet of Things (IoT) integrations, to become mainstream.

As our tools become smarter, so must the way we use and manage them. With a little foresight and the right accessories, you'll never lose track of your keys again.

Related Posts

What to Do If You Lose Your Volkswagen Key?

What to Do If You Lose Your Volkswagen Key?

Losing a Volkswagen key is stressful. It usually happens at the worst possible moment—before work, during travel, or far from home. Modern VW keys are no longer simple pieces of metal. They combine electronics, immobiliser chips, and precision-cut blades. When a lost car key situation happens, knowing the right steps saves time, money, and frustration. This guide explains exactly what to do if you lose your VW key, how to secure your vehicle, and how to get a proper VW key replacement without unnecessary delays. Stay Calm and Check the Obvious First Before assuming your VW key is gone for good, pause. Keys are often misplaced, not stolen. Check: Jacket and trouser pockets Bags and backpacks Around the car, driveway, or parking area Home entry points and recent stops Many VW keys are lost nearby and found within minutes. If the key truly cannot be located, move to the next step. Secure Your Volkswagen Immediately If you suspect the key is lost in a public place, vehicle security becomes the priority. Modern Volkswagen keys communicate with the car via encrypted signals. While this offers protection, losing a key still creates risk. What to do: Lock the vehicle if possible Avoid leaving the car unattended for long periods Do not delay replacement if the key cannot be recovered The fewer active keys exist for your vehicle, the safer it remains. Identify What Type of VW Key You Lost Not all Volkswagen keys are the same. Knowing what you lost helps you choose the correct replacement. Common VW key types include: Mechanical keys (older VW models) Transponder keys (chip-based immobiliser keys) Remote flip keys Smart / proximity keys (keyless entry systems) You can usually identify your key type by: The year of the vehicle Whether it had buttons Whether the car starts with a traditional ignition or push-start This information ensures you order the correct VW key replacement. Why a Spare Volkswagen Key Matters More Than You Think Many VW owners only realise the importance of a spare after losing their only key. A spare key: Prevents vehicle immobilisation Reduces stress during travel Makes replacement faster and simpler Acts as a backup for emergencies Relying on a single key is one of the most common and avoidable mistakes VW drivers make. Replacing a Lost Volkswagen Key the Smart Way A VW key replacement does not always require the original key. At mr-key.com , you can order replacement Volkswagen keys, fobs, and key cases designed to match your exact model. Available solutions include: Replacement VW key shells and fobs New key blades cut to match your vehicle Keys cut from a photo of the original Keys cut from a code , where available This allows you to restore access even if the original key is completely lost. Important : Electronic keys may still require programming after cutting, depending on the model. How VW Keys Can Be Cut Without the Original Many drivers assume a missing key makes replacement impossible. That is not true. VW keys can often be cut: From a clear photo of the original key blade From a key code linked to the vehicle or lock This method restores the physical function of the key with high precision. It is especially useful when no spare key exists. More information on official VW security and immobiliser systems can be found on the Volkswagen website Protect Your Replacement VW Key Once you replace a lost VW key, protect it properly. Simple habits make a big difference: Use a protective key case Avoid placing keys loosely in bags or pockets Keep a spare key stored safely at home Small steps prevent repeat key loss—and repeat stress. Frequently Asked Questions Can I replace a Volkswagen key without the original? Yes. A VW key replacement is possible even without the original key. Keys can be cut from a photo or code, depending on the model. What should I do if I lose my only VW key? Secure the vehicle first. Then order a replacement key as soon as possible to avoid being locked out or immobilised. Are all VW keys the same? No. Volkswagen uses different key types depending on model and year, including mechanical, transponder, remote, and smart keys. Does a replacement VW key need programming? Some VW keys include electronic chips that require programming. Cutting the key restores physical access, while programming enables full functionality. Why is having a spare VW key important? A spare key saves time, stress, and complications if your main key is lost or damaged. For independent vehicle security standards and best practices, see guidance from recognised automotive organisations such as ADAC If you’ve lost your Volkswagen key or want to avoid future problems, explore VW key replacements , fobs , cases , and key cutting services at mr-key.com and secure your vehicle the smart way.

How to Program a Car Key: A Step-by-Step Guide

How to Program a Car Key: A Step-by-Step Guide

Lost Your Car Key Programming? Here's What to Do Have you ever lost your car keys or found yourself with a spare key that doesn’t start your vehicle? While the process of programming a car key might seem intimidating, it’s often simpler than you’d expect. In many cases, car owners can program keys themselves without needing a visit to a dealership. This guide walks you through the essentials of car key programming, helping you save time, effort, and potentially a significant amount of money. Understanding Car Key Programming: The Basics Car key programming is the process of syncing a key with a car's internal computer so it can communicate securely. Modern vehicles use transponder keys or smart keys equipped with chips that emit a unique signal. Without proper programming, these keys won’t function, even if they fit perfectly into the ignition. While older mechanical keys didn’t require programming, today’s advanced systems add a layer of security, reducing the risk of car theft. However, this added sophistication means that replacing or reprogramming a key is no longer as simple as cutting a piece of metal. Quick Tip: Check your vehicle’s owner manual to see if programming your car key is a DIY-friendly process, as some models allow self-programming, while others require professional tools. Step-by-Step Guide to Programming a Car Key Before starting, ensure you have all necessary tools and information: The vehicle’s owner manual. All keys that need programming, including the functional ones. Step 1: Access Programming Mode Start by sitting in the driver’s seat with all the doors closed. Insert the already functional key into the ignition and turn it to the “on” position (do not start the engine). Some vehicles require you to cycle the key between “on” and “off” positions a specific number of times to enter programming mode. Step 2: Add the New Key Once in programming mode, remove the functional key and quickly insert the new key into the ignition. Turn it to the “on” position. The vehicle’s security light may flash to indicate the key has been successfully programmed. Step 3: Test the Key After programming, remove the new key and test it to ensure it can start the car and unlock the doors. Note: Each car manufacturer has unique programming steps. Be sure to consult your owner’s manual or the manufacturer’s website for specific instructions. When Professional Help Is Needed While many vehicles allow for DIY key programming, others require specialized equipment or software that only dealerships or locksmiths can access. This is particularly true for luxury or high-end cars with advanced encryption and security features. If your DIY efforts fail, it’s best to seek help from a certified professional. Visiting a dealership is a reliable, albeit more expensive, option. Alternatively, professional locksmiths often provide programming services at a lower cost, making them a practical choice for many drivers. Costs and Considerations The cost of programming a car key varies significantly based on the vehicle’s make and model. For basic models, self-programming might cost nothing if you already have a functional key. However, professional programming can range from $50 to $300 or more, especially for smart keys or proximity fobs. To minimize costs: Have a spare key : Always keep a functional spare to simplify programming if a replacement is needed. Research costs : Call local locksmiths or dealerships to compare pricing. Empower Yourself with Knowledge Programming a car key doesn’t have to be a daunting task. With the right tools and information, many car owners can handle the process themselves, saving time and money. However, it’s essential to recognize when professional assistance is necessary, particularly for complex key systems. By understanding the basics of car key programming and following a step-by-step approach, you can ensure your vehicle remains secure and functional. So, whether it’s a spare key or a replacement, you now have the confidence to tackle the task or know where to turn for help.

The Real Cost of Replacing a Motorcycle TFT Display: Prices, Causes, and Hidden Costs

The Real Cost of Replacing a Motorcycle TFT Display: Prices, Causes, and Hidden Costs

Motorcycle TFT displays are no longer simple speedometers. They are high-resolution computers bonded to glass, sealed against weather, coded to the bike’s electronics, and integrated into safety systems. When a broken TFT display happens, the bill is rarely just “a screen.” Below is the most complete, Europe-focused breakdown of motorcycle display replacement cost you’ll find online—built for riders who are actively searching for replacement prices and real-world risks. What Actually Breaks When a TFT Display Fails A TFT failure is rarely cosmetic. Modern displays are laminated units. Damage spreads. Common failure modes Cracked outer glass → moisture ingress follows Dead pixels or pixel lines → panel failure, not fixable Water ingress / condensation → corrosion of PCB and connectors Sun delamination → layers separate, image fades or ghosts Complete blackout → power board or CAN communication fault Once moisture enters, replacement—not repair—is the only OEM-approved path. Motorcycle Display Replacement Cost (Europe, Real Numbers) These are OEM replacement ranges in Europe, excluding insurance, based on dealer parts pricing, labour, and required coding. Brand Typical TFT Replacement Cost (€) Yamaha €650 – €1,400 BMW €1,200 – €2,500 Honda €800 – €1,800 Triumph €900 – €2,000 Kawasaki €700 – €1,600 Important: These are not worst-case numbers. They are normal dealer outcomes once a display is declared faulty. Why TFT Replacement Is So Expensive 1. The screen is bonded, not modular You cannot replace “just the glass.” The LCD, digitizer, polarizer, and control board are sealed together. 2. Coding & pairing is often mandatory Many TFT units must be coded to the ECU / immobiliser . Without dealer software: Warning lights remain Ride modes may not function Service intervals can’t be reset This adds labour and eliminates cheap aftermarket options. 3. Dead pixels = full replacement Unlike TVs or phones, dead pixels on motorcycle TFTs are not serviceable . OEM policy treats this as a safety-critical component. 4. Water ingress escalates damage fast Condensation today becomes corrosion tomorrow. Displays that “still work” often fail weeks later. The Most Expensive Damage Types (Ranked) Water ingress / condensation Often invisible at first Leads to PCB corrosion Almost always ends in full replacement Dead pixels / pixel columns Caused by pressure, UV heat, or micro-fractures No repair path Cracked glass Immediate usability loss Allows moisture entry Sun delamination Common on bikes parked outdoors Progressive, irreversible Real-World Cost Example (BMW vs Yamaha) BMW adventure / sport models TFT unit: €1,500–€2,200 Coding & labour: €200–€400 Total: €1,700–€2,600 Yamaha mid-range models TFT unit: €700–€1,100 Labour: €100–€250 Total: €800–€1,350 Same problem. Vastly different outcomes. Why “Used” or eBay TFT Displays Are Risky Many riders try to save money this way. Most regret it. VIN or ECU mismatch Immobiliser conflicts No warranty Hidden moisture damage Dealer refusal to code A used TFT that fails after installation means paying twice . The Preventable Part: Surface Damage That Starts It All Most catastrophic failures start small: Fine scratches Stone impacts UV exposure Heat cycling Once the protective surface is compromised, water ingress and pixel failure follow . That’s why many riders choose hydrogel motorcycle screen protectors —they absorb impact, self-heal micro-scratches, and add a moisture barrier without affecting visibility. You can browse motorcycle screen protectors by brand and model here → Motorcycle TFT screen protectors for Yamaha, BMW, Honda, Triumph & Kawasaki . (Exact fit matters. Generic films do not.) What Dealers Rarely Warn You About Condensation voids goodwill claims Pixel defects worsen with time Sun damage is considered “wear” Even hairline cracks can invalidate warranty By the time you ask for a quote, the outcome is usually decided. FAQ — Motorcycle TFT Display Replacement How much does a motorcycle TFT display cost to replace? In Europe, expect €650 to €2,500+ , depending on brand, model, and coding requirements. Can dead pixels be repaired? No. Dead pixels mean full TFT replacement on modern motorcycles. Is condensation inside the display dangerous? Yes. Condensation indicates seal failure and usually leads to corrosion and total failure. Can I ride with a broken TFT display? Often no. Many bikes rely on the TFT for warnings, modes, and diagnostics. Does a screen protector really help? Yes—for scratch prevention, impact absorption, and moisture protection . It cannot fix damage, but it significantly reduces risk. Are aftermarket TFT displays a safe option? Rarely. Most lack proper integration, coding support, or durability. Protecting a €1,500 Part Costs a Fraction A motorcycle TFT display is one of the most expensive components on your bike that faces direct impact, UV exposure, heat, and water—every ride . If you want model-specific protection designed for your exact display shape, visit our shop at mr-key.com and choose the right motorcycle screen protector for your bike.

How to Install a Hydrogel Navigation Screen Protector

How to Install a Hydrogel Navigation Screen Protector

Nowadays car interiors rely heavily on touchscreens. Whether you drive a BMW 3 Series , VW Golf , Audi A4 , Mercedes A-Class , Peugeot 3008 , or Skoda Octavia , your infotainment display is the centre of navigation, settings, entertainment and safety features. But these screens are also fragile—prone to scratches , fingerprints , micro-abrasions , and glare . A hydrogel navigation screen protector is one of the best ways to protect your car touchscreen without affecting clarity or touch sensitivity. This guide shows you exactly how to install a hydrogel protector , step by step, with expert tips, mistakes to avoid, and a few insider tricks that most guides miss. What Is a Hydrogel Screen Protector? Hydrogel is a soft, self-healing, flexible material used widely in phone protection and now increasingly in automotive displays. Unlike tempered glass, it adapts to curved edges and eliminates small bubbles over time. For more technical background, you can read the scientific definition on hydrogels Hydrogel is ideal for infotainment screen protection because it: Reduces glare Absorbs micro-scratches Maintains full touch sensitivity Adapts to curved and angled car screens Self-heals small marks over 24–48 hours It’s especially useful for European cars where screens are large and glossy, such as: Mercedes MBUX screens (A-Class, C-Class, GLC) Volkswagen MIB systems (Golf, Passat, Tiguan) BMW iDrive displays (3 Series, X1, X3) Audi MMI touchscreens (A4, A3, Q5) Peugeot i-Cockpit models Renault Clio, Captur, Megane Skoda Octavia, Superb, Scala Curious which specific models benefit the most from hydrogel protection? Check out our full guide on which cars benefit most from hydrogel navigation protection . Before You Start: Essential Preparation Installing a hydrogel protector takes only a few minutes, but the preparation stage determines whether the final result looks factory-perfect . You Will Need Hydrogel screen protector Microfiber cloth Screen-cleaning wipe (wet & dry) Dust-removal sticker (optional but recommended) Small squeegee / card Choose the Right Environment Install the protector in: A dust-free space (car parked indoors is ideal) Soft lighting (so dust particles are visible) A still environment (no wind, no blowing air) Avoid doing it outside or while standing near open windows. Step-by-Step: How to Install a Hydrogel Navigation Screen Protector 1. Clean the Navigation Screen Thoroughly Use a wet wipe first, then a dry microfiber cloth. Focus on: Corners Edges Around the frame Any oily fingerprints Tip: Turn the screen off to see dust more easily. 2. Remove All Dust Particles Even one small dust speck can create a permanent bubble. Use: Dust-removal stickers A clean microfiber cloth Hold the screen at an angle and look under the light. If perfectionism matters anywhere, it’s here. 3. Peel the First Protective Layer Most hydrogel protectors have two layers . Peel Layer 1 halfway and align the protector with: Left and right edges Upper frame Any curved edges Do not peel it completely yet. 4. Align and Apply the Protector Once aligned: Press the top centre gently Slowly drag your finger downward Peel off the rest of Layer 1 as you go The film will naturally stick without much force. 5. Use the Squeegee to Push Out Air Work from centre outward , using firm but controlled pressure. Hydrogel is self-healing , so small micro-bubbles usually disappear within 24–48 hours . 6. Remove the Final Top Layer After application: Peel Layer 2 from one corner Pull slowly to avoid lifting the protector This reveals a glossy, clear surface below. 7. Allow 24 Hours for Full Adhesion Do not touch the screen too much during this period. Avoid: Heat exposure Cleaning sprays Aggressive pressing Hydrogel needs time to “settle” and self-heal. Common Mistakes to Avoid Even a perfect protector can be ruined by simple errors. Installing in a dusty environment Fibres, dust and hair easily get trapped. Touching the sticky side This leaves permanent marks. Rushing the alignment Hydrogel is flexible but not stretch-proof. Cleaning with alcohol after installation This can damage the outer coating. Installing on a hot screen Heat weakens adhesion and causes micro-bubbles. For a complete walkthrough , see our guide on how to protect your car’s navigation screen . Why Hydrogel Is Better Than Tempered Glass for Car Screens Tempered glass works well for smartphones—but not for car navigation screens. Hydrogel performs better because: It bends and adapts to curved displays It doesn’t create raised edges It avoids touchscreen sensitivity issues It self-heals micro-abrasions It provides better Anti-Glare performance If you want to see more in depth guide on why hydrogel protectors are better check out our guide on Hydrogel vs Tempered Glass Navigation Protectors Comparison FAQs 1. Does a hydrogel protector reduce screen sensitivity No. Hydrogel maintains full touch responsiveness because the material is soft and pressure-adaptive. 2. Can I reuse a hydrogel screen protector? No. Once removed, it cannot be reinstalled cleanly. 3. How long do micro-bubbles take to disappear? Usually 24–48 hours. Stubborn ones may take up to 72 hours if the screen is curved. 4. Will the protector affect brightness or clarity? High-quality hydrogel preserves original screen clarity. Matte versions reduce glare but may slightly soften reflections. 5. Is hydrogel safe for anti-reflective or coated screens? Yes. Hydrogel adhesive is gentle and does not damage coatings. If you want premium hydrogel protectors for BMW, Audi, Mercedes, VW, Peugeot, Renault, Skoda and more, explore our full selection today. Visit our shop at mr-key.com Related Guides Which cars benefit most from hydrogel navigation protection How to Protect Your Car’s Navigation Screen from Scratches,Glare & Fingerprints Hydrogel vs Tempered Glass Navigation Protectors Comparison

Chat with us