Post Name

In modern vehicles, the once simple car key has evolved into a sophisticated piece of technology. With built-in electronics, anti-theft features, and remote functions, today’s car key is part of a broader ecosystem designed for both convenience and security.

Yet with all this advancement comes confusion. Many drivers aren’t sure what terms like immobilizer, transponder chip, and key fob actually mean—or how they relate to one another.

This guide breaks down these components in detail, explains how they work together, and clarifies why it matters when you’re replacing, reprogramming, or troubleshooting your car key.

What Is an Immobilizer?

An immobilizer is an electronic security device installed in most modern cars. Its purpose is to prevent the engine from starting unless the correct key—specifically, the correct coded signal—is detected.

When you attempt to start your vehicle, the system searches for a signal from a registered transponder chip. If that signal is missing or incorrect, the immobilizer blocks the ignition system. This means the engine won’t crank or turn over, even if the physical key fits.

Immobilizers are embedded in the car’s engine control unit (ECU) and became standard in vehicles after the late 1990s in many countries, in response to rising car theft.

They offer a silent, invisible layer of protection against common theft techniques like hotwiring. Without the correct digital authentication, the car simply will not start.

What Is a Transponder Chip?

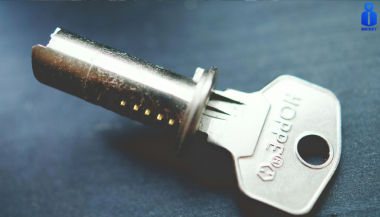
The transponder chip is a small electronic microchip located inside the car key or key fob. The word “transponder” is a combination of “transmitter” and “responder.” It is designed to emit a unique code that the car's immobilizer can recognize.

When you insert the key into the ignition or bring a key fob close to a push-start system, the chip sends a signal to the car’s ECU. If the code matches the one stored in the car’s database, the immobilizer disables itself and allows the engine to start.

Transponder chips are passive. They do not require a battery and are activated by electromagnetic energy from the ignition coil or receiver unit inside the vehicle.

Without a functioning or correctly programmed transponder chip, your car will not start—even if the metal key turns in the ignition.

What Is a Key Fob?

A key fob is the remote control device you carry that allows you to perform functions like locking or unlocking your car, opening the trunk, and activating panic alarms. In modern vehicles, key fobs may also control remote start or proximity-based unlocking features.

While key fobs often include a transponder chip inside them, they serve a different function. The key fob operates remote commands via short-range radio signals. The transponder chip, on the other hand, is responsible for enabling or disabling the engine.

Smart key fobs, found in many recent vehicles, don’t require insertion into the ignition. Instead, the car detects the fob nearby and permits the engine to start with a button press.

If your key fob battery dies, you might still be able to start the car manually if the transponder chip is present and recognized. Most fobs also have a hidden mechanical key inside, which can be used to unlock the door if the electronics fail.

How They Work Together

Although they are distinct components, the immobilizer, transponder chip, and key fob all work in harmony to secure and operate your vehicle.

The immobilizer controls whether the engine is allowed to start.

The transponder chip provides the digital identity that must be verified by the immobilizer.

The key fob provides wireless control of non-engine functions like locking, unlocking, and trunk access.

In most modern cars:

You approach the vehicle with the key fob.

The fob unlocks the doors.

When you start the vehicle, the transponder chip sends a signal to the immobilizer.

If the code matches, the engine is authorized to start.

If the code doesn’t match, or if the chip is missing or damaged, the engine remains disabled—even if the rest of the key’s functions work perfectly.

Why This Knowledge Matters

Understanding how your car key works is essential when:

Replacing a lost or broken key

Buying a spare or duplicate

Diagnosing why your car won’t start

Choosing between locksmith and dealership services

For example, if your key fob unlocks your car but won’t start it, the issue may lie with the transponder chip, not the battery. Conversely, if your fob doesn’t lock or unlock the car remotely, the chip may still be functional, and the issue could simply be a dead battery.

Replacing a key without properly programming the transponder chip will result in a non-starting vehicle, even if the key physically fits and the remote works.

For reliable replacement keys, fobs, batteries, and accessories, visit our Car Key Collection.

Car keys are no longer just mechanical tools. They’re complex, multi-function devices that combine security, convenience, and connectivity. By understanding the role of the immobilizer, transponder chip, and key fob, you’ll not only protect your vehicle better, but also avoid costly mistakes when dealing with repairs or replacements.

Whether you’re troubleshooting a non-starting car or simply trying to replace a damaged key, knowing the difference between these three elements gives you the clarity and confidence to take the right action.

Related Posts

How Hot Weather Can Damage Your Car Key Fob – And What You Can Do About It

How Hot Weather Can Damage Your Car Key Fob – And What You Can Do About It

When you think about how hot weather affects your vehicle, your first thoughts might go to the engine, the tires, or maybe even the air conditioning. But there’s one small, essential part of your daily driving routine that’s often overlooked — your car key fob. It might seem like a tough little device, but the truth is, it’s far more sensitive than it looks. If you’ve ever left your key fob on the dashboard, in a hot glove box, or even inside your pocket during a heatwave, you may have already caused damage without realizing it. Car key fobs are built with delicate electronics, plastic shells, and lithium coin batteries — all of which are vulnerable to extreme temperatures. In this article, you’ll learn how hot weather affects each part of your key fob, how to spot the early signs of damage, and most importantly, what you can do to protect it. Taking just a few simple steps can save you from the cost and inconvenience of a non-functioning remote, especially when you least expect it. The Plastic Shell: First to Feel the Heat One of the first things to suffer from heat exposure is the plastic casing that protects your key fob. While it’s designed to withstand everyday use — being dropped, tossed in a bag, or handled frequently — it’s not built to survive hours in a baking-hot car. The interior temperature of a parked vehicle can soar past 60 or even 70 degrees Celsius on a sunny day, especially if the key is sitting directly in sunlight. Over time, this level of heat can soften the plastic, causing it to warp, bend, or even split at the seams. You may start to notice that your key doesn’t close as tightly as it used to, or the buttons may feel soft and spongy instead of firm. Cracks might appear along the sides, or parts of the shell may become discolored. While this might seem like a cosmetic issue at first, it has serious implications — a compromised shell allows moisture, dust, and debris to enter the fob, putting the internal electronics at risk. If your key fob’s shell is already showing signs of wear, especially after a hot summer, it’s time to consider replacing the casing before the damage gets worse. Battery Breakdown: How Heat Drains Power Inside your key fob, there’s usually a small lithium battery — typically a CR2032 coin cell. These batteries are reliable under normal conditions, but they don’t respond well to high temperatures. In fact, exposure to extreme heat can accelerate chemical breakdown inside the battery, leading to faster discharge and a shorter overall lifespan. What’s worse, in severe cases, the battery can swell or leak, which can damage the internal components of your fob permanently. If you’ve ever noticed your key fob suddenly stops working or becomes unreliable during the summer, there’s a good chance the battery is struggling under heat stress. The signal may become weaker, you might have to press buttons multiple times, or the remote might stop responding altogether. Replacing the battery is a quick and inexpensive fix, but it’s important to recognize that battery issues are often just the first symptom of deeper heat-related problems. Internal Electronics: Silent Victims of the Heat While the shell and battery are easier to see and replace, the most serious damage often happens silently — deep inside the electronic circuit board. This board, often referred to as the platine, is responsible for all communication between your key and your vehicle. It’s a compact, delicate system of soldered connections and microchips, and unfortunately, it’s not designed to cope with repeated thermal stress. When your key fob is exposed to fluctuating high temperatures, the constant expansion and contraction of materials can loosen solder joints or weaken connections. Moisture that gets trapped inside the shell during humid summer months can accelerate corrosion, especially if the casing is already cracked or loose. The damage might not be immediate, but over time you may find that your key fob becomes unpredictable — sometimes it works, other times it doesn’t, and eventually, it might stop working completely. What You Can Do to Prevent Heat Damage The good news is that most heat-related damage to key fobs is preventable with just a little care and awareness. First, never leave your key fob inside a parked car for extended periods, especially not in direct sunlight. It’s easy to toss your keys into the cup holder or leave them on the dashboard while you run errands, but those few minutes can expose them to dangerous levels of heat. Instead, keep your keys on you or store them in a shaded, temperature-controlled area. If you’re regularly in hot environments — such as driving in warm climates or working outdoors — consider investing in a protective silicone or leather cover. These not only shield the shell from heat exposure but also provide added protection against drops and dirt. You should also make it a habit to replace your battery once a year, even if it seems to be working fine. Batteries weakened by heat can fail suddenly, and a fresh cell ensures your key fob keeps working when you need it most. Finally, if your key fob’s shell is visibly worn or loose, replace it immediately. Many online stores, including Mr Key, offer affordable replacement shells that are easy to install and give your remote a like-new feel. Don’t wait for the damage to reach the internal electronics — by then, repair options are limited and usually more expensive. Protect Your Key, Protect Your Drive Your car key fob might be small, but it plays a huge role in your daily routine. From unlocking doors to starting your engine, it’s a modern convenience we all depend on — until it stops working. And while many drivers are careful with their car’s mechanical systems, few think twice about leaving their key fob in the heat. Now that you know how much damage summer temperatures can cause, you can take the steps needed to protect your key before it’s too late. If you’re looking for high-quality key shell replacements, batteries like the CR2032, or even complete key fobs compatible with your vehicle, Mr Key has you covered. Our online shop offers trusted parts for Peugeot, Citroën, Nissan, Suzuki, Fiat, and more — all designed to help you repair and maintain your car keys quickly and affordably.

Condensation Inside Motorcycle TFT Displays: Causes, Warning Signs & What It Really Means

Condensation Inside Motorcycle TFT Displays: Causes, Warning Signs & What It Really Means

Every modern motorcycle rider has seen it. You park your bike after a cold morning ride, glance at the dashboard, and notice a faint haze forming behind the TFT screen. Maybe small droplets gather along the edges. Maybe the whole display looks fogged from the inside. That moisture is not cosmetic. It is water inside a sealed electronic unit — and it is the earliest visible warning of a problem that can destroy a component costing €700 to over €1,200 to replace. This guide explains exactly why condensation forms inside motorcycle TFT displays, which bikes are most affected, what it really means for your instrument cluster, and the one affordable upgrade that prevents the damage cycle before it starts. Why Motorcycle TFT Displays Get Condensation Inside A motorcycle TFT display is a sealed electronic module exposed to some of the harshest conditions any screen will ever face. Unlike your phone in a pocket, a motorcycle dashboard sits directly in the path of rain, road spray, temperature swings, UV radiation, and constant vibration. Condensation forms when warm, humid air trapped inside the display housing meets a cooler surface — the glass front panel. The moisture in that air turns to liquid droplets on the coldest point, which is almost always the inside face of the screen. Here is how moisture gets trapped in the first place. Thermal breathing. Every ride creates a heat cycle. The engine, direct sunlight, and the display's own backlight warm the air inside the housing. When the bike stops and cools, that air contracts and draws in fresh, humid outside air through micro-gaps in the seals. Over weeks and months, humidity accumulates inside the unit. Seal degradation. The rubber gaskets and adhesive bonds that seal a TFT housing are not permanent. UV exposure breaks down rubber. Vibration loosens adhesive joints. Temperature cycling causes materials to expand and contract at different rates, gradually opening pathways for water ingress. Micro-damage to the front surface. Stone chips, cleaning scratches, and pressure marks on the display face can create hairline cracks invisible to the naked eye. These become moisture entry points — especially in rain or when using a pressure washer. High-humidity environments. Riders in coastal areas, tropical climates, or northern European countries with persistent dampness face accelerated moisture ingress. A bike garaged in a humid environment without ventilation is particularly vulnerable. The result is always the same: water inside the display that the sealed housing cannot easily release. Which Motorcycles Are Most Affected Condensation inside TFT displays is not limited to one manufacturer. It has been documented across virtually every major brand using TFT instrument clusters. BMW — The R 1250 GS, R 1300 GS, S 1000 RR, F 850 GS, and F 900 R all use 6.5-inch or 10.25-inch TFT displays. These are high-quality units, but they sit in exposed positions — particularly on adventure models ridden in all weather conditions. OEM replacement for the 6.5-inch TFT runs around £1,200, and if the wiring loom is damaged during theft or failure, that figure can reach £3,000+. Yamaha — Models like the MT-09, MT-07, Tracer 9, and Ténéré 700 use TFT dashboards. Yamaha's displays are generally well-sealed, but the same thermal breathing cycle applies. Adventure and touring riders who cover high mileage in variable conditions report condensation after 2–3 seasons. Honda — The Africa Twin, CB650R, and CBR1000RR-R all run TFT clusters. The Africa Twin's display sits in a highly exposed cockpit position. Forum reports from owners confirm moisture ingress, especially after extended wet-weather riding. Triumph — The Tiger 900, Street Triple, and Speed Triple RS use TFT displays. Triumph's units are compact, but the same vulnerability to vibration-induced seal failure applies across the range. Kawasaki — The Z900, Ninja 1000SX, Versys 1000, and newer Z650 models all feature TFT dashboards. Like all manufacturers, Kawasaki's sealed units face the same environmental pressures. The pattern is clear: this is not a brand-specific defect. It is an inherent vulnerability of mounting sensitive display technology in one of the most hostile environments imaginable. The Warning Signs You Should Never Ignore Condensation inside a motorcycle TFT display is progressive. It starts small and escalates. Here is what each stage looks like — and what it means. Light fogging after a cold start. A thin mist on the inside of the screen that clears within 10–15 minutes of riding. This is the earliest sign. Moisture is present inside the housing but has not yet caused damage. At this stage, the problem is still manageable. Persistent edge condensation. Droplets that form along the bottom or side edges of the display and do not fully evaporate during a ride. This means moisture is accumulating faster than it can escape. The seals are compromised. Internal staining or water marks. Visible trails, spots, or discolouration behind the glass that remain even when the display is dry. This is mineral residue from evaporated water. It means moisture has been cycling inside the display repeatedly. The internal coatings and bonding layers are being attacked. Intermittent display issues. Flickering backlight, sections of the screen dimming unevenly, or the display briefly shutting off during a ride. These are early signs of electrical damage from moisture reaching the circuit board or flex connectors behind the panel. Dead pixels appearing alongside condensation. If you see pixel failure combined with any visible moisture, the display is in active degradation. The liquid crystal layer or its driver circuits are being damaged. This combination almost always leads to full failure. Complete display blackout. The screen powers on but shows nothing, or fails to power on at all. At this point, the TFT module is usually beyond repair and must be replaced entirely. The critical takeaway: condensation that clears quickly is a warning. Condensation that stays, stains, or coincides with display glitches means damage is already underway. What Condensation Actually Does to a TFT Display The fog itself is not the problem. The damage happens behind it. A motorcycle TFT display is a laminated stack of layers: a front glass or polycarbonate cover, a polarising film, the liquid crystal panel itself, LED backlighting, and a circuit board with drivers and connectors. All bonded together with adhesive and housed in a sealed plastic or metal frame. When moisture sits inside this assembly, several destructive processes begin simultaneously. Corrosion of electrical contacts. The flex cables and solder joints connecting the LCD panel to the main circuit board are extremely sensitive to moisture. Even trace amounts of water can cause oxidation, increasing resistance and eventually breaking the connection. This is how entire rows or columns of pixels fail at once. Delamination of optical layers. The adhesive bonds between the polariser, LCD panel, and backlight diffuser swell and weaken when exposed to moisture. This causes visible clouding, uneven brightness, and eventually permanent optical distortion. Mineral deposits on internal surfaces. Water that evaporates inside the display leaves behind dissolved minerals and contaminants. These deposits scatter light, reduce contrast, and cannot be cleaned without disassembling the unit — which is rarely possible without destroying it. Short circuits on the PCB. If enough moisture reaches the main circuit board, it can bridge traces and create short circuits. This can cause complete display failure, error codes, or even damage to the motorcycle's CAN bus communication system. A motorcycle TFT display is not designed to be serviced. It is a sealed, disposable module. Once moisture damage reaches the internal electronics, the only option is full replacement. How to Prevent Water Ingress in Motorcycle TFT Displays Before Damage Starts Prevention is not complicated. But it requires acting before symptoms appear — not after. Never use a pressure washer on the dashboard. High-pressure water jets force moisture past seals that can handle rain but not direct, concentrated spray. Wash the display area gently with a damp microfibre cloth and motorcycle-safe LCD cleaner. Avoid parking in direct sunlight for extended periods. Prolonged heat accelerates UV degradation of seals and adhesives. It also increases the temperature differential that drives the thermal breathing cycle. Use a cover or park in shade when possible. Store the bike in a ventilated, dry environment. A damp, unventilated garage is one of the worst places for a motorcycle with a TFT display. If humidity control is not possible, a small dehumidifier or silica gel packs placed near the bike can help. Inspect the display edges regularly. Look for any visible gap between the display housing and its frame, or any separation of the front glass from the body. Catching a seal failure early — before moisture accumulates — gives you the chance to act. Protect the display surface from physical damage. The front face of the TFT is the largest and most vulnerable entry point for moisture. A single stone chip or a scratch from an abrasive cloth can breach the surface coating and create a pathway for water. Preventing that surface damage is the single most effective thing you can do. The One Upgrade That Prevents Condensation Damage in Motorcycle TFT Displays A quality screen protector designed specifically for your motorcycle's TFT display is the most cost-effective protection available — by a wide margin. Here is what a properly fitted screen protector actually does. It creates a physical barrier against impact. Stone chips, gravel flicks, and minor impacts hit the protector instead of the display surface. This eliminates the micro-cracks that become moisture entry points. It shields the surface from UV radiation. UV is the primary cause of seal and adhesive degradation. A screen protector absorbs UV energy before it reaches the display housing, slowing the ageing process of the seals beneath. It prevents cleaning damage. Without a protector, wiping the TFT with a dirty cloth, gloves, or the wrong cleaning product can create fine scratches that compromise the surface. With a protector fitted, you can clean aggressively without risking the display itself. After a few years, replace the protector — the screen underneath stays pristine. It reduces direct water contact with the display edges. A well-fitted protector overlaps the display bezels slightly, redirecting water away from the most vulnerable seal points around the screen perimeter. The cost comparison makes the decision obvious. A screen protector costs between €10 and €25. A TFT display replacement costs €700 to €1,500 or more, depending on the motorcycle. That is a return on investment measured in thousands of percent. Riders who fit a screen protector on day one of ownership — before the first ride, before the first stone chip, before the first rain — give their TFT display the best possible chance of lasting the life of the motorcycle. What to Do If You Already Have Condensation If moisture is already visible inside your display, the situation is not necessarily hopeless — but your options depend on how far it has progressed. If you see light fogging only. Park the bike in a warm, dry, ventilated space. Run the engine and let the display heat up for 20–30 minutes to encourage evaporation. Some riders have had success placing a small silica gel packet near the display housing to draw out residual moisture. Fit a screen protector immediately to prevent further surface-level water entry. If the bike is under warranty. Contact your dealer. Condensation inside a sealed TFT display is a manufacturing defect in the seal or housing. Many manufacturers — including BMW and KTM — have replaced displays under warranty for this exact issue. Document the condensation with clear photographs before your appointment. If condensation has caused staining or pixel issues. At this stage, the damage is internal and typically irreversible without replacing the display module. Get a quote from your dealer, check whether aftermarket options exist for your model, and fit a screen protector to the new unit immediately to prevent the cycle repeating. FAQ Is condensation inside my motorcycle TFT display normal? A very light, temporary fog on a cold morning that clears within minutes can occur even in a properly sealed unit. However, persistent condensation, visible droplets, or any staining is not normal — it indicates a compromised seal and active moisture ingress. Can I fix condensation inside a motorcycle display myself? If it is only light fogging, gentle heat and dry storage may resolve it temporarily. However, the seals are already compromised, so it will likely return. Full repair requires resealing or replacing the display unit, which is not a realistic DIY job for most riders. Will condensation void my warranty? No. Condensation inside a sealed factory unit is a seal failure, not user damage. Most manufacturers honour warranty claims for moisture ingress, provided there is no evidence of physical impact or tampering. Always document the issue with photos. How much does it cost to replace a motorcycle TFT display? OEM replacement costs vary significantly. BMW TFT units typically cost £700–£1,200 for the part alone, plus fitting. Honda, Yamaha, Triumph, and Kawasaki displays range from €400–€900 depending on the model. Labour adds €100–€300. Does a screen protector actually prevent condensation? A screen protector does not fix existing condensation. What it does is prevent the surface damage — stone chips, scratches, UV degradation — that causes seals to fail and moisture to enter in the first place. It is the most effective preventive measure available. Should I fit a screen protector to a brand-new bike? Yes. Day one. Before the first ride. The TFT display is at its most vulnerable when new because the seals have not yet been tested, and any early surface damage will accelerate their failure. Protecting the screen from the start is the best insurance against a four-figure repair bill down the line. Does riding in rain damage a motorcycle TFT display? Rain alone should not damage a properly sealed TFT display. The issue is cumulative: repeated exposure to rain, spray, temperature cycling, and UV gradually degrades seals over time. A screen protector significantly slows this process by shielding the most exposed surface. Protect Your Display Before It Costs You Hundreds A motorcycle TFT display is one of the most expensive single components on a modern bike — and one of the most exposed. The damage from water ingress is progressive, often invisible until it is too late, and almost always irreversible. A screen protector fitted from day one is the simplest, cheapest, and most effective way to protect that investment. Browse precision-fit motorcycle TFT screen protectors for BMW, Yamaha, Honda, Triumph, Kawasaki, and more at mr-key.com.

Can a Locksmith Cut a Key from a Photo or Code?

Can a Locksmith Cut a Key from a Photo or Code?

Short answer: yes— for many keys, a locksmith can cut accurately from a photo or a code . The details depend on the key type, the quality of the image/data. Key cutting from code vs from photo By code (most precise). A key code (often printed on locks, key tags, or documentation) translates into a series of cut depths called the bitting . On a code machine, a locksmith dials those depths and cuts a new key without the original present . This is the preferred method for many utility keys (e.g., caravan, retro auto, e-bike battery, furniture, mailboxes, ATVs, roof racks, towbars), but also for car keys. By photo (works in many cases). From a clear, square-on image, a trained technician can decode the cut depths and reproduce the bitting. Research has shown keys can be recreated from ordinary or telephoto shots if the profile and scale are known. This is why publishing close-ups of your keys is discouraged. When a photo is “good enough” If you’re ordering car keys cut by photo or utility keys by photo , expect guidelines like: Flat, well-lit, high-resolution image; key blade perfectly side-on. Ruler/coin in frame for scale; entire blade visible, shoulder to tip. For double-sided/laser keys, shots of both sides. Keyway/profile identification (brand/series). Automotive: cutting from photo or code—plus programming Cutting the blade is only step one for modern cars. Since the late 1990s, most vehicles have immobilisers ; the key’s transponder chip must be recognised or the engine won’t start. In practice: Get the correct blank and cut it (photo or code). Program the transponder/remote (OBD or on-board procedures), or pair a proximity fob. Test mechanical operation and ignition start. Main points UK readers should know: Immobiliser/transponder tech became standard in the mid-1990s; without a programmed chip, a correctly cut key usually won’t start the car. A key code specific to your vehicle lets a locksmith/dealer cut precisely without an original; some guides explain where owners can find it. Utility keys we commonly see cut by code If you have the key code , these are routinely cut accurately online: Retro automobile keys (classic patterns; often stamped codes). Caravan & motorhome key s (e.g., ZADI, FAP/FAWO—codes on barrels). E-bike battery keys (e.g., ABUS/AXA series). Furniture, mailboxes keys (office furniture, cam locks). ATV/quad ignition and compartment keys. Roof racks (e.g., Thule N*** series). Towbars (e.g., Westfalia/Brink code series). For these categories, supplying the printed code (from the lock face, key head, manual, or tag) usually yields the fastest, most reliable result compared to photos. Accuracy expectations & limitations What typically works well Flat cylinder keys with standard depth systems (common utility keys). Many car blades (including laser/sidewinder) if the image is clean and scaled. Keys where the lock/brand series is known and the bitting can be derived . What may be restricted or not feasible from a photo Patented/restricted keyways (require authorised proof and controlled blanks). Highly worn, bent, or obscured keys in photos. Complex security keys that need factory or authorised dealer processes. Car keys where programming tokens, PINs, or security codes are required. For security and consumer protection in the UK, look for MLA-approved locksmiths and insist on identity/ownership checks for sensitive work. Real-world risk: why photos can be enough Academic work and well-reported incidents show that key geometry can be decoded from images at surprising distances. Media have covered expensive lock replacements after keys appeared on camera, underlining the practical risk of sharing key images online. Keep your keys out of frame. What an online order typically requires For car keys (photo or code): Vehicle make/model/year, blade type, and VIN if needed for code retrieval. Clear photos (both sides). Programming method: mobile visit, on-site, or mail-in ECU/fob (varies by model). Expect additional steps for remote locking and proximity systems. For utility keys (cut by code): The code from the lock face or original key (e.g., N123 , Z **). Brand or system (Thule, Zadi, Westfalia, etc.). Quantity and turnaround needs (next-day options often available). Speed and success rates By code : fastest and most consistent for; minimal adjustment needed. By photo : slightly more validation and back-and-forth; still accurate when images meet spec. Why choose an online key cutting service like MR-KEY Unlike traditional emergency locksmiths who mainly handle urgent lockouts, MR-KEY specialises in precision key cutting from photos or codes — ideal when you’re not locked out but need an exact replacement or spare . Through our online platform, you can: Order from anywhere in the UK — simply upload a clear photo or enter your key code. Get fast, expert cutting using professional decoding software and calibrated machines. Receive your key by post , ready to use or, for vehicles, to be programmed locally. With MR-KEY, you save the cost and time of a mobile visit while still getting locksmith-level precision. Each key is verified before dispatch to ensure perfect fitting and reliable operation. FAQs Can a locksmith cut a car key from a photo? Often yes, the blade can be cut from a high-quality photo , but modern cars also need transponder/immobiliser programming before the engine will start. Is cutting by code more accurate than using a photo? For most utility keys , yes . A verified key code maps to exact cut depths, making the process highly repeatable and quick. Can someone copy my key from a social media photo? It’s technically possible; public cases and research have shown keys can be decoded from images . Avoid posting close-ups of keys online. What’s the difference between “key cutting,” “key replacement,” and an “emergency locksmith”? Key cutting : the physical milling of a blade (by code/copy/photo). Key replacement : end-to-end service supplying a working key/fob (cutting + programming if needed). Emergency locksmith : rapid response for lockouts or urgent access/security issues. Order your new key today at mr-key.com — fast, accurate, and cut by professionals from your photo or code.

How to Know If Your Car Key Has a Hidden Transponder Chip

How to Know If Your Car Key Has a Hidden Transponder Chip

Modern car keys are more than just simple tools to unlock doors—they're powerful components of your vehicle’s security system. Hidden inside many keys is a small yet crucial piece of technology known as a transponder chip . But how can you tell if your car key has one? Whether you’ve lost your key, are looking to replace it, or simply want to understand your vehicle better, knowing if your key contains a transponder chip is essential. This guide will explain what a transponder is, why it matters, and how you can easily check if your key is equipped with one. What Is a Transponder Chip? A transponder chip, short for "transmitter + responder," is a small electronic microchip embedded inside the plastic head of the car key or within a smart key fob. When you insert the key into the ignition—or have it nearby in a push-button start system—the chip emits a unique signal. The vehicle’s onboard computer must recognize this signal before it will allow the engine to start. Without the correct signal, even if the key physically fits into the ignition, the car won’t move. Transponders have been a game-changer in reducing car theft, and today, nearly all vehicles produced after the late 1990s are equipped with them. Learn more about how modern keys work and find replacement options in our car keys collection. Why It’s Critical to Know If Your Key Has a Chip If your key has a hidden transponder chip, replacing it is more complicated than simply cutting a new metal key. You will need a key that not only matches the cut but also includes the correct programming to communicate with your car’s immobilizer system. Failing to recognize this can lead to frustration, extra dealership fees, or even being stranded. Moreover, understanding your key's technology helps you make smarter choices when buying a spare, upgrading your security setup, or troubleshooting ignition issues. How to Check If Your Car Key Has a Transponder Chip Fortunately, you don’t need expensive equipment to find out. Start by considering the age of your vehicle: if your car was manufactured after 1995 (in Europe) or 1998 (in the USA), chances are very high it uses a transponder system. Next, examine the physical key. Keys with large, bulky plastic heads usually house a chip inside. In contrast, purely metallic keys without plastic parts tend to belong to older, non-transponder vehicles. You can also perform a simple foil test. Wrap the head of your key in aluminum foil and try to start the car. Since foil blocks radio frequencies, if the car refuses to start, it’s likely that a transponder chip is present. If you want absolute certainty, consult your vehicle’s manual or speak with a professional locksmith. Many locksmiths use specialized tools to detect whether a chip exists. For additional technical explanation, you can refer to this guide on how immobilizer systems work. What Happens If the Transponder Signal Is Missing? If you try to start your car without the proper transponder signal, the immobilizer system kicks in. Most vehicles will either not crank at all or crank without allowing the engine to fire. Some models will display a warning light on the dashboard, often shaped like a padlock or a car with a key icon. Without a valid transponder signal, you won't be going anywhere—no matter how new or well-cut the key is. Can You Program a Transponder Key Yourself? Depending on the make and model of your car, some basic keys can be programmed at home—especially if you already have one working key available. However, many newer vehicles require professional diagnostic tools connected directly to the car’s computer to program keys securely. Attempting DIY programming on these systems without the right knowledge can lock your car’s immobilizer and lead to expensive repairs. Always consult your car’s manual or seek professional help before attempting any programming yourself. Knowledge = Protection Understanding whether your car key contains a hidden transponder chip isn’t just a fun fact—it's essential for protecting your vehicle and saving yourself time, money, and hassle. Whether you're planning to replace a worn-out key, add a backup, or upgrade your security, knowing what’s inside your key helps you make better, safer decisions. If you ever need a spare key, a battery replacement, or advice on key maintenance, you can explore more in our online store at Mr Key . Remember: a smart driver is a secure driver. Stay informed, stay prepared, and you'll always stay one step ahead.

Chat with us