Post Name


Swirl flaps are a BMW system that has been introduced to help burn the fuel mixture in the cylinder better due to the fact that diesel engines do not have throttle valves and it is not possible to adjust the air-fuel ratio. A diesel engine without vortex valves operates between a poor and a rich fuel mixture, because the only way to regulate it is through fuel injection.

Design of the first generation swirl flaps that are made of made of metal.
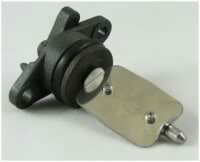


Unfortunately, swirl flaps are responsible for countless damaged engines and costly repairs due to design errors or metal fatigue. Once damaged, the cylinder sucks them in and causes great damage.

This is how damaged valves damage the cylinder.
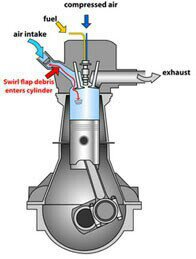


Typical swirl flaps  suction damage.


The vortex valves are positioned in the inlet and are controlled by vacuum (DDE 4.0) or electrically (DDE5.0 / DDE6.4) by the engine ECU.

Effects of malfunctioning valves:

  • Swirl valves are  stuck in open position: Deterioration of exhaust gas performance at lower speeds.
  • Swirl valves are stuck in closed position: Approximate power loss of 10% at high engine speeds.

How swirl flaps work:


Performance characteristics:

The vortex valves are in the closed position, at low engine speeds and small amounts of fuel injected (controlled by the ECU card).

They open under the following conditions:

  1. coolant temperature <14 ° C OR * fuel quantity> 24 mg OR
    2. engine speed 2250 rpm OR
    3. inlet air temperature <-5 ° C.

BMW and Pierburg have decided to produce diesel engines with metal vortex valves. The speed at which the pistons in the diesel engine operate is at least 60 rpm, so a sucked vortex valve will break and cause a number of damages inside the engine.

In most cases, one or more pistons are severely damaged, as a bonus you get valves, in some cases a head or turbocharger. And this combination with a BMW engine is like a cumulative jackpot  🙂

In 2004, BMW began work on the problem and improved the design, however, a number of owners reported ongoing problems in this area.

The solution to this problem is by removing the vortex valves and plugging, which does not affect the performance of the engine and at the same time, you can safely pass the exhaust test.

Engines:

M47 (136hp VP44 fuel pump) has no valves.

M47N common rail engine (including M47N / M47TU / M47TUD20) (150hp. Face lift model from 2001 -) has valves.

M57 engines (M57D) (525d & 187hp. 330d) cars with manual transmission do not have valves, but those with automatic have.

M57N engines (M57TUD) (525d & 330d 204hp) have vortex valves.

Ruined swirl flapss:


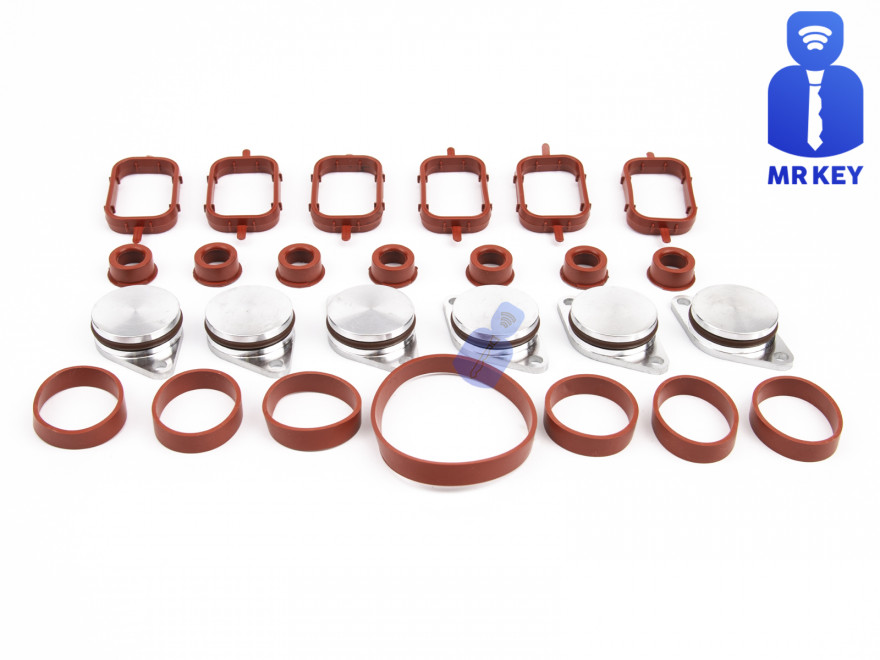
The plugs that replace the vortex valves are easy to find on the internet, but you can also find them here on our website.

Typical plugs:

Disassembly of vortex valves:


The vortex valves can be safely dismantled and in most cases if they are  removed properly no loss of power is felt.

Final list of models for which vortex valves are installed:

Engine: M47N/M47TU/M47TUD20

Applications:

* 110 kW (148 hp) and 330 N·m (243 lb·ft)

o E46 320d 2001-2005

o E83 X3 2.0d (up to end of 2006)

Engine: M47TU2D20

The engine was updated again in 2004 as the M47TU2D20. Still at 1995 cc, it produced more power across the range.

Applications:

* 120 kW (161 hp) and 340 N·m (251 lb·ft)

E60/E61 520d

E87 120d

E90/E91 320d

E83 X3 2.0d (end of 2006 onwards)

Engine: M57/M57D25

M57D25 was introduced in 2000.

Applications:

* 166 PS (122 kW; 164 hp) at 4000 rpm, 350 N·m (260 lb·ft) at 2000-2500 rpm with a 4750 rpm redline, models:

2000-2003 E39 525d *Vehicles With Automatic Transmission ONLY*

Engine: M57N/M57TU/M57TUD25

M57TUD25 was introduced in 2004.

Applications:

* 177 PS (130 kW; 175 hp) at 4000 rpm, 400 N·m (300 lb·ft) at 2000-2750 rpm models:

E60/E61 525d

Engine: M57/M57D30

M57D30, also called M57D29, was introduced in 1998.

Applications:

* 184 PS (135 kW; 181 hp)@4000, 390 N·m (290 lb·ft)@1750-3200 models:

E39 530d *Vehicles With Automatic Transmission ONLY*

E46 330d/330xd *Vehicles With Automatic Transmission ONLY*

* 184 PS (135 kW; 181 hp)@4000, 410 N·m (300 lb·ft)@2000-3000 models:

E38 730d *Vehicles With Automatic Transmission ONLY*

E53 X5 3.0d

* 193 PS (142 kW; 190 hp)@4000, 410 N·m (300 lb·ft)@1750-3000 models:

E38 730d

E39 530d

Engine: M57N/M57TU/M57TUD30

M57TUD30 was introduced in 2002. It originally produced 160 kW (215 hp) at 4000 rpm and 500 N·m (370 lb·ft) at 2000-2750 rpm, but was tweaked for 150 kW (201 hp) at 4000 rpm and 410 N·m (300 lb·ft) at 1500-3250 rpm for 2003 and again for 200 kW (268 hp) at 4000 rpm and 560 N·m (410 lb·ft) at 2000-2250 rpm in 2004.

Applications:

* 204 PS (150 kW; 201 hp)@4000, 410 N·m (300 lb·ft)@1500-3250 models:

E46 330d/330Cd/330xd

E83 X3 3.0d

* 218 PS (160 kW; 215 hp)@4000, 500 N·m (370 lb·ft)@2000-2750 models:

E53 X5 3.0d

E60/E61 530d/530xd

E65 730d

* 272 PS (200 kW; 268 hp)@4000, 560 N·m (410 lb·ft)@2000-2250

E60/E61 535d

* 245 PS (180 kW; 242 hp)@4000, 500 N·m (370 lb·ft)@2000-2250

* 286 PS (210 kW; 282 hp)@4000, 580 N·m (430 lb·ft)@2000-2250

Engine: M57TU2D30

M57TU2D30 was introduced in 2007, making its debut in the facelifted E60 and E61.

* M57TU2D30-UL: 197 PS (145 kW; 194 hp)

* M57TU2D30-OL: 235 PS (173 kW; 232 hp)@4000, 500 N·m (370 lb·ft)@2000-2750

* M57TU2D30-TOP: 286 PS (210 kW; 282 hp), 580 N·m (430 lb·ft)

Applications:

* 197 PS (145 kW; 194 hp), 400 N·m (300 lb·ft) models:

E90/E91/E92 325d

E60/E61 525d/525xd

* 231 PS (170 kW; 228 hp)@4000, 500 N·m (370 lb·ft)@2000-2750 models:

E65 730d

E90/E91 325d

E90/E91 330d/330xd

* 235 PS (173 kW; 232 hp) models:

E60/E61, BMW E70, BMW E71

* 286 PS (210 kW; 282 hp), 580 N·m (430 lb·ft) models:

E60/E61 535d

E70 X5 3.0sd

E71 X6 xDrive35d

E83 X3 3.0sd

E90/E91 335d

The above models are listed for information only if you want to to make sure your engine has valves installed, please contact a competent person.

Please note that the information described above is for informational purposes only and does not claim to be reliable. Mr-key.com is not responsible for any repair work you undertake that is related to the topic described in this article.

Related Posts

The Fascinating History of Car Safety Features: How Far We’ve Come to Keep You Safe

The Fascinating History of Car Safety Features: How Far We’ve Come to Keep You Safe

When you think about cars, what comes to mind? Speed, design, or maybe the feeling of freedom when you hit the open road? But there’s one crucial aspect of driving that you might not think about as much—safety. Cars today are safer than ever, thanks to decades of innovations and advancements. But how did we get here? Let’s dive into the history of car safety features and see just how far we’ve come to protect you and your loved ones on the road. The Early Days: A Lack of Safety Awareness Back in the early 1900s, cars were viewed as luxury items and status symbols. Safety wasn’t really a concern. Cars had no seat belts, no airbags, and certainly no crumple zones. People focused more on making vehicles go faster and look better than on keeping passengers safe. In those days, accidents were far more dangerous, often leading to severe injuries or fatalities. It wasn’t until the rise of car ownership in the 1920s and 1930s that people began to notice just how dangerous cars could be. The growing number of vehicles on the road led to more accidents, and the need for safety features became evident. The Invention of Seat Belts: The First Major Breakthrough Seat belts were one of the first car safety features to be introduced. But they didn’t become standard right away. In fact, the idea of a seat belt first appeared in the late 19th century, designed for use in airplanes, not cars. It wasn’t until the 1950s that the seat belt began to find its way into automobiles, thanks to Swedish engineer Nils Bohlin, who designed the three-point seat belt in 1959. Bohlin’s invention, which you still use today, was a game-changer. It saved countless lives and reduced serious injuries in crashes. Volvo was the first company to introduce the three-point seat belt in their vehicles, and soon after, other manufacturers followed suit. Airbags: A Revolutionary Step Forward As seat belts became more common, automakers started looking for additional ways to protect drivers and passengers. Enter the airbag. The airbag was initially developed in the 1950s, but it took decades of refinement before it became a standard feature in cars. The first production car equipped with an airbag was the 1973 Oldsmobile Toronado, but it wasn’t until the 1990s that airbags became widely available. Today, airbags are a critical component of vehicle safety systems, with front, side, and even curtain airbags designed to protect you from all angles in a crash. Alongside seat belts, airbags are now seen as one of the most effective life-saving technologies in modern vehicles. Crumple Zones: Protecting You in a Collision Crumple zones are another innovation that may not be immediately obvious, but they play a huge role in keeping you safe. In the event of a crash, crumple zones are designed to absorb and dissipate energy, reducing the force transferred to passengers. Introduced in the 1950s by Mercedes-Benz, crumple zones help reduce the impact of a collision by sacrificing the car’s body to protect the occupants. Today, crumple zones are standard in virtually every car, and their design continues to evolve, improving crash safety with each new model year. Anti-lock Brakes: Helping You Keep Control The introduction of anti-lock braking systems (ABS) in the 1970s was another massive leap forward in car safety. ABS prevents the wheels from locking up during braking, which helps maintain steering control during an emergency stop. This system is especially useful on slippery surfaces like rain-soaked or icy roads. Before ABS, sudden braking could lead to skidding, causing drivers to lose control of their vehicles. ABS has significantly reduced the number of accidents caused by loss of control and has become a staple of modern driving safety. Electronic Stability Control: The Technology That Saves Lives Electronic Stability Control (ESC) was a groundbreaking safety feature that hit the market in the 1990s. ESC helps you maintain control of your car during skids or oversteering by automatically applying brakes to individual wheels. Studies have shown that ESC can reduce the risk of a fatal crash by as much as 50%. In fact, the National Highway Traffic Safety Administration (NHTSA) now mandates that all cars sold in the United States come equipped with ESC. This technology has proven to be especially helpful in preventing rollovers, which are among the most dangerous types of accidents. The Future of Car Safety: What’s Next? Car safety features have come a long way, but we’re not done yet. The future of vehicle safety lies in advanced driver-assistance systems (ADAS), which use sensors, cameras, and radar to detect potential hazards and prevent accidents before they happen. Some of the technologies that are becoming increasingly common include lane departure warnings, automatic emergency braking, and adaptive cruise control. And let’s not forget the promise of self-driving cars, which could drastically reduce accidents caused by human error, which accounts for the majority of crashes today. The Importance of Car Safety As we look back on the history of car safety features, it’s incredible to see how far we’ve come. From the early days of no seat belts or airbags to today’s cutting-edge technology, the automotive industry has made safety a top priority. The next time you get behind the wheel, take a moment to appreciate all the safety features designed to protect you. Whether it’s a simple seat belt or a high-tech stability control system, these innovations have made driving safer for everyone. And remember, no matter how advanced your car’s safety systems are, the best protection is still responsible driving. Stay alert, drive safely, and always buckle up!

The Journey of Car Keys: From Metal to Modern Tech

The Journey of Car Keys: From Metal to Modern Tech

Car keys have come a long way from simple metal tools to advanced digital systems. This evolution reflects the advancements in automotive security, convenience, and technology. Understanding the history of car keys gives you a better appreciation of the tools you use to unlock, start, and secure your vehicle. Here’s a look at how car keys have transformed over the years. 1. The Humble Beginnings: Metal Keys The story of car keys began with simple, unassuming metal keys designed to manually lock and unlock car doors. How They Worked: These keys were physical tools that matched a mechanical lock’s configuration. Challenges: Lost keys or broken locks often required professional locksmiths for replacements or repairs. Impact: Metal keys, while functional, offered little in terms of advanced security or convenience. Though basic, these keys laid the groundwork for innovations to come. 2. Entering the Electronic Era: Remote Keys The next big leap in car key evolution came with the introduction of remote keys in the 1980s. These keys added a layer of convenience and functionality. Features: Remote locking and unlocking. Panic buttons for emergencies. Integration with car alarms for added security. Advantages: No more fumbling for locks in the dark; a simple press of a button provided instant access. Drawbacks: Batteries needed frequent replacement, and repairs were more complex than with traditional metal keys. Remote keys quickly became a standard feature for modern vehicles. 3. The Smart Key Revolution By the late 1990s and early 2000s, smart keys emerged, transforming how you interacted with your car. How They Worked: These key fobs used radio signals to communicate with your car, allowing for keyless entry and push-button starts. Benefits: Enhanced security with encrypted signals. Increased convenience with no need to insert a key into the ignition. Sophisticated design and compact form factors. Limitations: These keys are expensive to replace and require professional programming. Smart keys brought unparalleled convenience but also increased the need for specialized services in case of loss or damage. 4. Integration with Smartphones: Digital Keys In recent years, car key technology has embraced the smartphone revolution, allowing you to unlock and start your car using your mobile device. Features: App-based controls for locking, unlocking, and starting your car. Sharing access with family or friends via the app. Enhanced security with biometric verification like fingerprints or face recognition. Advantages: No physical key needed, making it harder to lose or forget. Considerations: Dependence on phone battery life and app reliability. Digital keys represent the cutting edge of car key technology, blending convenience with advanced security features. 5. Biometric Car Keys: The Future of Security Biometric keys are poised to redefine vehicle access with unmatched security and personalization. How They Work: These systems rely on fingerprint or facial recognition to verify the user’s identity. Benefits: Impossible to replicate or hack. Fully personalized access. Enhanced theft protection. Challenges: High development costs and limited availability in mainstream vehicles. Biometric keys are still in their infancy but hint at a future where cars are more secure than ever. 6. Why Understanding Key Evolution Matters Knowing how car keys have evolved helps you make informed decisions when it’s time to replace or upgrade. Cost Considerations: From simple metal keys to advanced digital systems, replacement costs vary significantly. Security Features: Understanding the security features of your key can help you prevent theft and unauthorized access. Convenience: Opt for a system that matches your lifestyle, whether it’s a traditional key or an app-based digital solution. The more you know, the better equipped you are to choose the right key for your vehicle. Pro Tips for Key Replacement and Maintenance Backup Keys: Always keep a spare key in a safe location. Battery Checks: Replace key fob batteries regularly to avoid sudden malfunctions. Professional Help: Seek professional assistance for programming smart or digital keys. Protect Your Keys: Use a key cover to prevent wear and tear. Proper maintenance ensures your car key remains functional and reliable for years to come. From the simplicity of metal keys to the sophistication of biometric access, car key technology continues to evolve. Each advancement brings greater security, convenience, and innovation, making life easier for car owners like you. Whether you’re replacing a key or exploring the latest tech, understanding this evolution helps you stay ahead in the world of automotive technology.

Removing Keys from Locks: A Comprehensive Guide

Removing Keys from Locks: A Comprehensive Guide

Removing a key from a lock may seem simple, but it can become tricky when dealing with stuck or broken keys. Whether you're dealing with a standard lock, padlock, or vehicle ignition, understanding the correct techniques can save you from damage and frustration. This guide will walk you through the essential steps for removing keys from various types of locks, offering practical advice and tips to ensure a smooth process. Common Scenarios and Challenges Keys can become stuck or difficult to remove for several reasons, including misalignment, wear and tear, or damage to the key or lock. Additionally, environmental factors like temperature changes can cause metals to expand or contract, making key removal more challenging. Recognizing the cause of the issue is the first step in effectively addressing it. Basic Techniques for Key Removal Gentle Wiggle and Pull: The first technique to try is a gentle wiggle and pull. Hold the key firmly and move it slightly up and down or side to side while pulling gently. This method works well if the key is simply stuck due to misalignment. Lubrication: If the key is difficult to remove, applying a small amount of graphite powder or a silicone-based lubricant into the keyhole can help. Avoid using oil-based lubricants, as they can attract dirt and grime, potentially worsening the problem. Tapping the Lock: For stubborn cases, lightly tapping the lock with a hammer while gently pulling the key can help dislodge it. This method is effective when the key is stuck due to debris or minor misalignments within the lock. Advanced Techniques for Stuck Keys Using a Key Extractor: If the key is broken off inside the lock, a key extractor tool can be very effective. Insert the tool into the keyhole, hook the broken key piece, and pull it out carefully. This method requires patience and a steady hand. Pliers and Tweezers: If part of the key is still protruding, you can use needle-nose pliers or tweezers to grip and pull the key out. Be careful not to apply too much force, as this can push the key further into the lock or damage the lock mechanism. Heat Application: In cold weather, metal contracts, which can cause the key to get stuck. Gently heating the key with a hairdryer or warm cloth can expand the metal slightly, making it easier to remove. However, avoid using an open flame, as it can damage the lock or key. Preventing Key Stuck Issues Prevention is always better than cure. Here are some tips to prevent keys from getting stuck in the future: Regular Maintenance: Keep your locks and keys clean and well-lubricated with appropriate materials. Regularly inspect for wear and tear, and replace any damaged keys or locks. Use Duplicate Keys: If you notice a key becoming difficult to use, have a duplicate made before it breaks or becomes stuck. This will save you the hassle of dealing with a stuck key. Avoid Excessive Force: Never force a key into a lock. If it doesn’t turn easily, stop and inspect both the key and the lock for damage or obstruction. When to Call a Professional While many stuck key issues can be resolved with the techniques mentioned above, there are times when professional assistance is necessary. If you’ve tried all the methods and the key remains stuck, or if you’re dealing with a high-security lock, it’s best to contact a professional locksmith. They have the tools and expertise to safely remove the key without damaging the lock or key further. Dealing with a stuck key can be frustrating, but understanding the proper techniques can save you time and prevent damage. From basic wiggling and lubrication to more advanced methods like using a key extractor, there are various approaches depending on the severity of the situation. Regular maintenance and careful handling can help prevent these issues from occurring in the first place. When in doubt, don’t hesitate to seek professional help to ensure your lock and key remain in good working condition.

How to Remove or Change a Roof Rack Lock Barrel Easily

How to Remove or Change a Roof Rack Lock Barrel Easily

Changing or removing the lock barrel on your roof rack may seem like a daunting task, but it’s actually simpler than you might think. Whether you need a replacement due to a lost key, wear and tear, or just want to swap out an old lock for a new one, following the right steps can make the process hassle-free. This guide will walk you through everything you need to know about handling a roof rack lock barrel with ease. Why You Might Need to Change a Roof Rack Lock Barrel ? There are several reasons why you may want to replace or remove your roof rack lock barrel: Lost Key : If you've misplaced the key, replacing the lock barrel is often the most practical solution. Upgrading the Lock : Maybe you want a more secure lock for added peace of mind. Routine Maintenance : Over time, lock barrels can wear down, making it harder to insert or turn the key. Uniformity : If you've recently changed your car key, you may want to match your roof rack lock with it. Knowing why you’re changing the lock barrel will help you determine the steps you need to follow. What You’ll Need Before you start, gather these essential tools and items: Replacement Lock Barrel : Ensure it’s compatible with your roof rack model. Master Key or Removal Key : Often required to remove the old lock barrel. New Key : The key that corresponds to the replacement lock barrel. Flathead Screwdriver : To gently pry and release certain parts if needed. Step-by-Step Guide to Removing a Roof Rack Lock Barrel Removing a lock barrel from your roof rack doesn’t require extensive mechanical skills. Just follow these straightforward steps: 1. Locate the Lock Barrel The lock barrel is usually situated in the center or side of the roof rack. Look for the small lock with the keyhole, as this is where you'll be inserting the master or removal key. 2. Insert the Master Key or Removal Key If you have a master or removal key, insert it into the lock. This is often a universal key provided by the lock manufacturer specifically for removing lock barrels. Once it’s inserted, turn the key slightly to unlock the barrel. Tip: If you don’t have a removal key, contact a professional or see if you can order one specifically for your model. 3. Pull the Lock Barrel Out With the removal key still in place, gently pull the lock barrel out. If it’s resistant, try wiggling it slightly while pulling. Avoid forcing it, as this could damage the lock or roof rack. In some cases, you may need a flathead screwdriver to help pry it out, but be careful not to scratch the surrounding area. 4. Check the Casing After removing the lock barrel, inspect the casing where the barrel was installed. Make sure it’s clean and free of debris. Any dirt or rust could interfere with the new lock barrel, so it’s a good idea to clean this area before proceeding. Installing the New Lock Barrel Once the old barrel is removed, you’re ready to install the new one. Here’s how: 1. Align the New Lock Barrel Take your new lock barrel and align it with the casing where the old one was. Most barrels are designed to fit in only one direction, so make sure you align it properly to avoid jamming. 2. Insert the New Barrel Push the new lock barrel into the casing until it clicks into place. This might require a bit of pressure, but it should fit snugly without needing excessive force. 3. Test the New Key After installing the new lock barrel, insert the new key and turn it to ensure it’s working smoothly. The key should turn easily and lock securely. This step verifies that the new lock is properly aligned and functional. Common Challenges and Solutions While changing a roof rack lock barrel is generally straightforward, you might encounter some challenges. Here’s how to troubleshoot common issues: Stuck Barrel : If the old barrel is stuck, apply a lubricant like WD-40 around the lock to help loosen it. No Removal Key : If you don’t have a master or removal key, consider reaching out to a locksmith or checking if the manufacturer offers a replacement. Barrel Won’t Fit : Ensure you’ve purchased a compatible lock barrel. Even slight differences in design can prevent it from fitting properly. Tips for Maintaining Your Roof Rack Lock To keep your new lock barrel in good condition and prevent the need for frequent replacements, consider these maintenance tips: Regular Cleaning : Dirt and grime can accumulate inside the lock over time, making it harder to operate. Clean the lock regularly to prevent this. Use Lubricant : Apply a small amount of lubricant inside the lock barrel periodically to keep the key turning smoothly. Protect from Rust : If your roof rack is exposed to rain and humidity, use a protective cover or shield to keep moisture out of the lock barrel. Check Key Fit : Avoid using a damaged or bent key, as this can wear out the lock barrel more quickly. When to Seek Professional Help In some cases, removing or replacing a roof rack lock barrel might require assistance from a professional: Lost or Damaged Keys : If both your main key and master key are lost or damaged, a professional can help retrieve or replace the lock barrel. Damaged Lock Mechanism : If the lock itself is damaged or jammed, forcing it can make things worse. A professional locksmith can safely remove and replace it. Replacing or removing a roof rack lock barrel is an affordable and manageable task for most car owners. By following the right steps and keeping up with regular maintenance, you can ensure your roof rack lock stays functional and secure. Whether you’re upgrading for security or replacing a worn-out lock, a new lock barrel can make all the difference in keeping your roof rack safe. Effortless Key Replacement for a Variety of Locks Order 2x Union Keys FT Series, custom-cut to your original key code, for a hassle-free replacement. Compatible with a range of locks, including those from Aston Martin, Jaguar, Land Rover, and more, these keys are perfect for classic cars, caravans, petrol caps, roof racks, and truck canopies. Simply find your lock code (e.g., FT101-FT360) on the lock face and enjoy fast delivery of high-quality spare keys.

Chat with us