Post Name

Your car key is one of those things you don’t really think about — until it breaks. Whether it’s the worn-out buttons, a cracked shell, or a battery that gives up at the worst possible moment, an aging car key can cause more than just annoyance. But here's the good news: you can restore your key to like-new condition easily, affordably, and from the comfort of your home.

In this complete guide, we’ll show you how to choose the right replacement key shell for your car and why the Panasonic CR2032 battery is a trusted choice to keep your key fob performing reliably.


Part 1: How to Choose the Right Car Key Shell

Think of your key shell as a protective layer. It shields the sensitive electronics inside — the buttons, circuit board, and transponder chip — all of which are essential to operating your vehicle. When the case begins to wear down or fall apart, it’s time to replace it.

1. Know Your Car's Make, Model, and Year

Key shells are made to fit specific car models and years. For instance:

Flip key shells for Opel are commonly used on models from 2010 to 2024.

Audi smart key shells are dependent on the platform code (like A3 8Y or A4 B9).

Consult your owner's manual or use a compatibility tool like this one to confirm fitment.

2. Match the Key Blade

Blades come in various formats like HU162, VA2, or HU100. Even a slight variation in shape or groove pattern can render the key useless in your ignition or door locks. Carefully compare the blade on your current key to the one listed for any replacement shell.

3. Button Layout and Functionality

Make sure the number and positioning of buttons on the replacement shell matches your original. If not, the rubber pads may not line up with the contact points on your key’s circuit board, making the buttons unresponsive.

4. Interior Design and Compatibility

The outside might look the same, but inside layouts often differ. Ensure that your circuit board, battery slot, and chip all fit securely inside the new shell. Misalignment can cause rattling, failure to start the car, or buttons that don’t function correctly.

5. Material Quality

Avoid very cheap replacements with thin plastic and soft rubber. A good quality shell should be durable, with solid construction and tactile buttons that don't wear out quickly. For example, this Opel flip key shell combines strength with excellent fit.


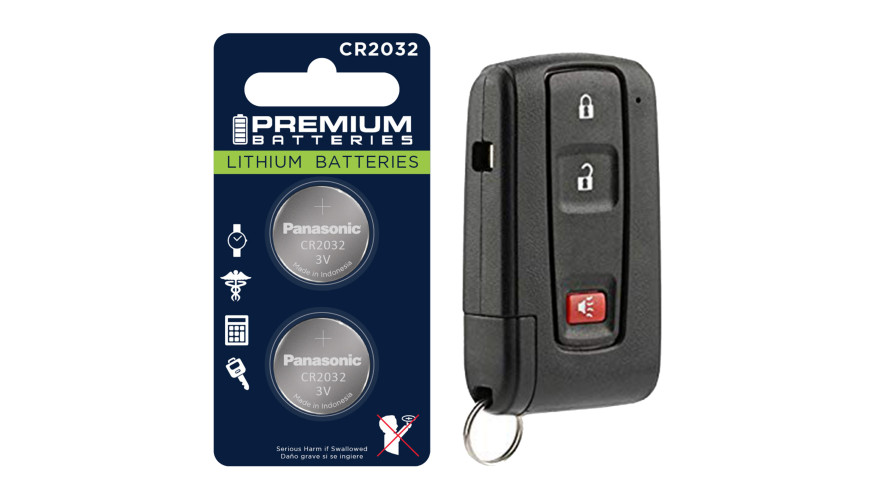
Part 2: Why We Recommend Panasonic CR2032 Batteries

When your key fob starts failing — maybe the range drops or it takes multiple presses to unlock — chances are the battery is low. Many car owners replace the shell without considering the battery, only to find the problem persists.

Understanding the CR2032

The CR2032 is a 3-volt lithium coin battery, commonly used in remote keys and small electronic devices. It’s compact, stable, and specifically suited for low-power, long-term applications.

What Makes Panasonic CR2032 Stand Out?

Panasonic’s version of the CR2032 is known for its consistency and reliability. It offers:

A stable voltage output, ensuring your key communicates with your car effectively

Longer life compared to many generic brands

Resistance to leaks, which protects internal circuits from corrosion

Choosing a battery from a trusted manufacturer can save you from unexpected failures, especially in colder climates where battery performance matters most. We recommend the Panasonic CR2032 battery for its excellent balance of performance and reliability.


Refreshing Your Car Key: A Practical Approach

If your car key is showing signs of age, it's usually best to replace both the shell and the battery. The process is simple:

Open the old shell carefully, using a flat tool if needed.

Remove the circuit board, chip, and battery.

Clean the components gently with a dry brush.

Place them into the new shell, ensuring alignment.

Insert a fresh CR2032 battery.

Close and secure the new shell.

After completing these steps, your key should be more responsive, look better, and feel sturdier in your hand.

Related Posts

Removing Keys from Locks: A Comprehensive Guide

Removing Keys from Locks: A Comprehensive Guide

Removing a key from a lock may seem simple, but it can become tricky when dealing with stuck or broken keys. Whether you're dealing with a standard lock, padlock, or vehicle ignition, understanding the correct techniques can save you from damage and frustration. This guide will walk you through the essential steps for removing keys from various types of locks, offering practical advice and tips to ensure a smooth process. Common Scenarios and Challenges Keys can become stuck or difficult to remove for several reasons, including misalignment, wear and tear, or damage to the key or lock. Additionally, environmental factors like temperature changes can cause metals to expand or contract, making key removal more challenging. Recognizing the cause of the issue is the first step in effectively addressing it. Basic Techniques for Key Removal Gentle Wiggle and Pull: The first technique to try is a gentle wiggle and pull. Hold the key firmly and move it slightly up and down or side to side while pulling gently. This method works well if the key is simply stuck due to misalignment. Lubrication: If the key is difficult to remove, applying a small amount of graphite powder or a silicone-based lubricant into the keyhole can help. Avoid using oil-based lubricants, as they can attract dirt and grime, potentially worsening the problem. Tapping the Lock: For stubborn cases, lightly tapping the lock with a hammer while gently pulling the key can help dislodge it. This method is effective when the key is stuck due to debris or minor misalignments within the lock. Advanced Techniques for Stuck Keys Using a Key Extractor: If the key is broken off inside the lock, a key extractor tool can be very effective. Insert the tool into the keyhole, hook the broken key piece, and pull it out carefully. This method requires patience and a steady hand. Pliers and Tweezers: If part of the key is still protruding, you can use needle-nose pliers or tweezers to grip and pull the key out. Be careful not to apply too much force, as this can push the key further into the lock or damage the lock mechanism. Heat Application: In cold weather, metal contracts, which can cause the key to get stuck. Gently heating the key with a hairdryer or warm cloth can expand the metal slightly, making it easier to remove. However, avoid using an open flame, as it can damage the lock or key. Preventing Key Stuck Issues Prevention is always better than cure. Here are some tips to prevent keys from getting stuck in the future: Regular Maintenance: Keep your locks and keys clean and well-lubricated with appropriate materials. Regularly inspect for wear and tear, and replace any damaged keys or locks. Use Duplicate Keys: If you notice a key becoming difficult to use, have a duplicate made before it breaks or becomes stuck. This will save you the hassle of dealing with a stuck key. Avoid Excessive Force: Never force a key into a lock. If it doesn’t turn easily, stop and inspect both the key and the lock for damage or obstruction. When to Call a Professional While many stuck key issues can be resolved with the techniques mentioned above, there are times when professional assistance is necessary. If you’ve tried all the methods and the key remains stuck, or if you’re dealing with a high-security lock, it’s best to contact a professional locksmith. They have the tools and expertise to safely remove the key without damaging the lock or key further. Dealing with a stuck key can be frustrating, but understanding the proper techniques can save you time and prevent damage. From basic wiggling and lubrication to more advanced methods like using a key extractor, there are various approaches depending on the severity of the situation. Regular maintenance and careful handling can help prevent these issues from occurring in the first place. When in doubt, don’t hesitate to seek professional help to ensure your lock and key remain in good working condition.

How to Maintain and Extend the Life of Your Car Keys

How to Maintain and Extend the Life of Your Car Keys

Your car keys are more than just tools to unlock and start your vehicle—they’re essential components for your car's convenience and security. Taking proper care of them can prevent unexpected failures and ensure they last for years. Here are seven easy and practical tips to help you keep your car keys in the best condition possible. 1. Keep Your Keys Clean and Dry Why It Matters: Moisture and dirt are the biggest enemies of car keys, particularly electronic fobs. Exposure to these elements can cause internal corrosion and failure. How to Do It: Avoid Moisture: Keep your keys away from water, rain, and high humidity. If they accidentally get wet, dry them immediately with a soft, absorbent cloth. Regular Cleaning: Gently wipe your keys with a clean cloth to remove dirt and dust. For crevices around buttons, use a cotton swab to clean hard-to-reach areas. 2. Handle Your Keys with Care Why It Matters: Dropping, tossing, or mishandling your keys can cause physical damage or misalign internal components, rendering them unusable. How to Do It: Avoid Drops: Be mindful when handling your keys. Attach them to a lanyard or key holder for better grip and to reduce accidental drops. Use a Protective Key Cover: A well-fitted key cover adds an extra layer of protection against scratches, drops, and general wear and tear. Plus, they’re available in various styles to match your preferences. 3. Replace Key Fob Batteries on Time Why It Matters: A weak battery can lead to your car key fob failing to work when you need it most, leaving you stranded or locked out. How to Do It: Watch for Warning Signs: If your key fob’s range decreases or requires multiple presses to function, the battery is likely weak and needs replacement. Replace Properly: Follow your car’s manual for step-by-step instructions on changing the battery. Using the correct battery type ensures reliable performance. 4. Protect Your Keys from Extreme Temperatures Why It Matters: Excessive heat or cold can harm the electronic components inside your key fob or damage the metal of traditional keys. How to Do It: Avoid Direct Sunlight and Heat: Don’t leave your keys exposed to the sun on your dashboard or near heaters. Extreme heat can warp materials and damage internal circuits. Keep Away from Freezing Temperatures: In colder months, avoid leaving your keys in your car or outside for prolonged periods, as freezing conditions can impact their functionality. 5. Rotate and Use Spare Keys Why It Matters: Spare keys can deteriorate if left unused for long periods. Regularly using them ensures they remain functional and ready in emergencies. How to Do It: Alternate Keys: Use your spare key occasionally to keep it in good working condition. This prevents any surprises when you actually need it. Safe Storage: Store spare keys in a dry, cool place, away from moisture, heat, or any magnetic devices that could interfere with their programming. 6. Avoid Overloading Your Keychain Why It Matters: A heavy keychain might seem harmless, but the extra weight can wear down your car’s ignition switch or damage your key over time. How to Do It: Limit What You Carry: Stick to the essentials—remove unnecessary keys, charms, or heavy accessories. Use Lightweight Keychains: Choose minimalistic and lightweight keychains to prevent undue stress on the ignition and the key itself. 7. Regularly Inspect for Wear and Tear Why It Matters: Keys, especially those with buttons or electronic components, can show signs of wear over time. Early detection helps avoid complete failure. How to Do It: Look for Physical Damage: Check for cracks, faded buttons, or scratches that might affect functionality. Seek Professional Help: If you notice significant wear or damage, consult a professional locksmith or dealership for repairs or replacement. Ignoring issues could lead to bigger, costlier problems down the line. Why Car Key Maintenance is Worth Your Effort Properly maintaining your car keys ensures they stay reliable, functional, and secure for years to come. Whether it’s a traditional key or a modern electronic fob, these small actions can save you from costly replacements or inconvenient malfunctions. Taking care of your keys isn’t just about preventing problems—it’s also about convenience, peace of mind, and getting the most out of your vehicle’s features. By following these simple tips, you’ll keep your car keys in top shape and avoid the stress of unexpected failures.

What You Need To Know About BMW  Swirl Flaps and How To Solve The Problem With Them

What You Need To Know About BMW  Swirl Flaps and How To Solve The Problem With Them

Swirl flaps are a BMW system that has been introduced to help burn the fuel mixture in the cylinder better due to the fact that diesel engines do not have throttle valves and it is not possible to adjust the air-fuel ratio. A diesel engine without vortex valves operates between a poor and a rich fuel mixture, because the only way to regulate it is through fuel injection. Design of the first generation swirl flaps that are made of made of metal. Unfortunately, swirl flaps are responsible for countless damaged engines and costly repairs due to design errors or metal fatigue. Once damaged, the cylinder sucks them in and causes great damage. This is how damaged valves damage the cylinder. Typical swirl flaps suction damage. The vortex valves are positioned in the inlet and are controlled by vacuum (DDE 4.0) or electrically (DDE5.0 / DDE6.4) by the engine ECU. Effects of malfunctioning valves: Swirl valves are stuck in open position: Deterioration of exhaust gas performance at lower speeds. Swirl valves are stuck in closed position: Approximate power loss of 10% at high engine speeds. How swirl flaps work: Performance characteristics: The vortex valves are in the closed position, at low engine speeds and small amounts of fuel injected (controlled by the ECU card). They open under the following conditions: coolant temperature <14 ° C OR * fuel quantity> 24 mg OR 2. engine speed 2250 rpm OR 3. inlet air temperature <-5 ° C. BMW and Pierburg have decided to produce diesel engines with metal vortex valves. The speed at which the pistons in the diesel engine operate is at least 60 rpm, so a sucked vortex valve will break and cause a number of damages inside the engine. In most cases, one or more pistons are severely damaged, as a bonus you get valves, in some cases a head or turbocharger. And this combination with a BMW engine is like a cumulative jackpot 🙂 In 2004, BMW began work on the problem and improved the design, however, a number of owners reported ongoing problems in this area. The solution to this problem is by removing the vortex valves and plugging, which does not affect the performance of the engine and at the same time, you can safely pass the exhaust test. Engines: M47 (136hp VP44 fuel pump) has no valves. M47N common rail engine (including M47N / M47TU / M47TUD20) (150hp. Face lift model from 2001 -) has valves. M57 engines (M57D) (525d & 187hp. 330d) cars with manual transmission do not have valves, but those with automatic have. M57N engines (M57TUD) (525d & 330d 204hp) have vortex valves. Ruined swirl flapss: The plugs that replace the vortex valves are easy to find on the internet, but you can also find them here on our website. Typical plugs: Disassembly of vortex valves: The vortex valves can be safely dismantled and in most cases if they are removed properly no loss of power is felt. Final list of models for which vortex valves are installed: Engine: M47N/M47TU/M47TUD20 Applications: * 110 kW (148 hp) and 330 N·m (243 lb·ft) o E46 320d 2001-2005 o E83 X3 2.0d (up to end of 2006) Engine: M47TU2D20 The engine was updated again in 2004 as the M47TU2D20. Still at 1995 cc, it produced more power across the range. Applications: * 120 kW (161 hp) and 340 N·m (251 lb·ft) E60/E61 520d E87 120d E90/E91 320d E83 X3 2.0d (end of 2006 onwards) Engine: M57/M57D25 M57D25 was introduced in 2000. Applications: * 166 PS (122 kW; 164 hp) at 4000 rpm, 350 N·m (260 lb·ft) at 2000-2500 rpm with a 4750 rpm redline, models: 2000-2003 E39 525d *Vehicles With Automatic Transmission ONLY* Engine: M57N/M57TU/M57TUD25 M57TUD25 was introduced in 2004. Applications: * 177 PS (130 kW; 175 hp) at 4000 rpm, 400 N·m (300 lb·ft) at 2000-2750 rpm models: E60/E61 525d Engine: M57/M57D30 M57D30, also called M57D29, was introduced in 1998. Applications: * 184 PS (135 kW; 181 hp)@4000, 390 N·m (290 lb·ft)@1750-3200 models: E39 530d *Vehicles With Automatic Transmission ONLY* E46 330d/330xd *Vehicles With Automatic Transmission ONLY* * 184 PS (135 kW; 181 hp)@4000, 410 N·m (300 lb·ft)@2000-3000 models: E38 730d *Vehicles With Automatic Transmission ONLY* E53 X5 3.0d * 193 PS (142 kW; 190 hp)@4000, 410 N·m (300 lb·ft)@1750-3000 models: E38 730d E39 530d Engine: M57N/M57TU/M57TUD30 M57TUD30 was introduced in 2002. It originally produced 160 kW (215 hp) at 4000 rpm and 500 N·m (370 lb·ft) at 2000-2750 rpm, but was tweaked for 150 kW (201 hp) at 4000 rpm and 410 N·m (300 lb·ft) at 1500-3250 rpm for 2003 and again for 200 kW (268 hp) at 4000 rpm and 560 N·m (410 lb·ft) at 2000-2250 rpm in 2004. Applications: * 204 PS (150 kW; 201 hp)@4000, 410 N·m (300 lb·ft)@1500-3250 models: E46 330d/330Cd/330xd E83 X3 3.0d * 218 PS (160 kW; 215 hp)@4000, 500 N·m (370 lb·ft)@2000-2750 models: E53 X5 3.0d E60/E61 530d/530xd E65 730d * 272 PS (200 kW; 268 hp)@4000, 560 N·m (410 lb·ft)@2000-2250 E60/E61 535d * 245 PS (180 kW; 242 hp)@4000, 500 N·m (370 lb·ft)@2000-2250 * 286 PS (210 kW; 282 hp)@4000, 580 N·m (430 lb·ft)@2000-2250 Engine: M57TU2D30 M57TU2D30 was introduced in 2007, making its debut in the facelifted E60 and E61. * M57TU2D30-UL: 197 PS (145 kW; 194 hp) * M57TU2D30-OL: 235 PS (173 kW; 232 hp)@4000, 500 N·m (370 lb·ft)@2000-2750 * M57TU2D30-TOP: 286 PS (210 kW; 282 hp), 580 N·m (430 lb·ft) Applications: * 197 PS (145 kW; 194 hp), 400 N·m (300 lb·ft) models: E90/E91/E92 325d E60/E61 525d/525xd * 231 PS (170 kW; 228 hp)@4000, 500 N·m (370 lb·ft)@2000-2750 models: E65 730d E90/E91 325d E90/E91 330d/330xd * 235 PS (173 kW; 232 hp) models: E60/E61, BMW E70, BMW E71 * 286 PS (210 kW; 282 hp), 580 N·m (430 lb·ft) models: E60/E61 535d E70 X5 3.0sd E71 X6 xDrive35d E83 X3 3.0sd E90/E91 335d The above models are listed for information only if you want to to make sure your engine has valves installed, please contact a competent person. Please note that the information described above is for informational purposes only and does not claim to be reliable. Mr-key.com is not responsible for any repair work you undertake that is related to the topic described in this article.

DIY Guide: How to Program or Sync Your Car Key Fob at Home

DIY Guide: How to Program or Sync Your Car Key Fob at Home

Programming a car key fob doesn’t always require a trip to the dealership or an expensive diagnostic tool. In many cases, you can program or resync your key fob at home—saving both time and money. Whether you’ve just replaced the battery, changed the shell, or purchased a new key fob entirely, this guide will walk you through the basics of syncing it with your vehicle. Why Program Your Key Fob? Key fobs are integral to modern car access and ignition systems. When you replace or reset your key, the vehicle and fob must reestablish communication. Without syncing, features like remote locking, trunk release, or even engine start may stop functioning. This synchronization process ensures your key fob and vehicle are electronically paired and communicate securely. Without it, even a new battery or case won’t make your remote functional again. Can You Program It Yourself? The answer depends largely on the make and model of your vehicle. Older vehicles with basic remote key fobs often support manual onboard programming that doesn’t require specialized equipment. These procedures typically involve inserting the key into the ignition, turning it in a specific sequence, and pressing buttons on the fob within a certain time frame. It’s a simple process, and many car owners are surprised at how effective these methods can be. In contrast, modern vehicles with smart keys or keyless entry systems usually require advanced programming tools. These keys often contain transponders that must be linked to the car’s electronic control unit, a task typically performed by dealerships or professional auto locksmiths. Still, if you own a basic Opel, Peugeot, or Citroën model, there’s a good chance you can complete the task yourself at home. How Onboard Programming Works If your vehicle supports onboard programming, the steps are often straightforward. While the exact process may vary depending on the model, the general method includes entering the vehicle, turning the ignition on and off several times, and pressing a button on the remote to complete pairing. You may receive confirmation through a dashboard light flash or an audible chime, indicating that the key fob is now synced. Take note, though: some vehicles require all remotes to be programmed in the same session, so if you have multiple key fobs, have them all with you before starting. If the procedure doesn’t work, don’t be discouraged—it may simply mean your car requires a more advanced programming approach. When Should You Call a Professional? Not all keys can be programmed at home. Smart keys, proximity sensors, and certain immobilizer systems are designed with enhanced security that requires proprietary equipment to program. If your vehicle doesn’t respond to onboard programming or your key fob is completely unresponsive, it’s best to seek assistance from a certified locksmith or dealership. Trying to force the programming process can sometimes cause more harm than good. If you’re unsure, always verify the requirements in your car’s manual or consult a trusted technician. Essential Tips for Success To avoid frustration, start with the basics: always use a fresh battery from a trusted brand such as Panasonic CR2032 . Clean the internal contacts and handle the circuit board carefully to prevent static damage. Don’t rush—take the time to follow steps precisely and test functionality before fully reassembling the key. When replacing the key shell, make sure it's compatible with your exact model and that the key blade, transponder chip, and electronics are properly seated. With a bit of patience and the right information, programming your car key fob at home can be a practical and satisfying DIY fix. For basic vehicles, it’s a task you can handle in minutes—saving the cost and hassle of dealership appointments. Understanding your vehicle’s requirements and using reliable parts makes all the difference. Whether you're refreshing an old key with a new case or pairing a new remote to your car, the ability to program it yourself puts control back in your hands. For a full selection of batteries, shells, and compatible accessories, visit mr-key.com .

Chat with us