Post Name

When it comes to vehicle security, the type of car key you use is crucial. Car keys have evolved dramatically over the years, and today, two main types are commonly available: smart keys and mechanical keys. Each type offers distinct advantages and drawbacks, depending on your preferences, security needs, and budget. In this article, we’ll explore the differences between these two types of keys, their pros and cons, and help you determine which one is best for your vehicle’s security.

Understanding Smart Car Keys

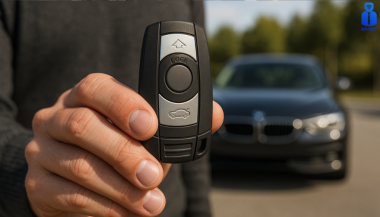
Smart car keys, often referred to as key fobs, have become the standard for most new vehicles. These advanced keys operate using radio frequency identification (RFID) technology, which allows the key to communicate wirelessly with your car. The interaction between the car and the key is based on encrypted signals, enhancing both convenience and security.

Key Features of Smart Car Keys:

  • Keyless Entry: One of the most convenient features of smart keys is keyless entry. With this technology, you don’t have to physically insert a key into the lock to open your car. Instead, the key fob transmits a signal to the car’s receiver, unlocking the doors automatically when you approach. This feature is especially useful when your hands are full or during inclement weather.
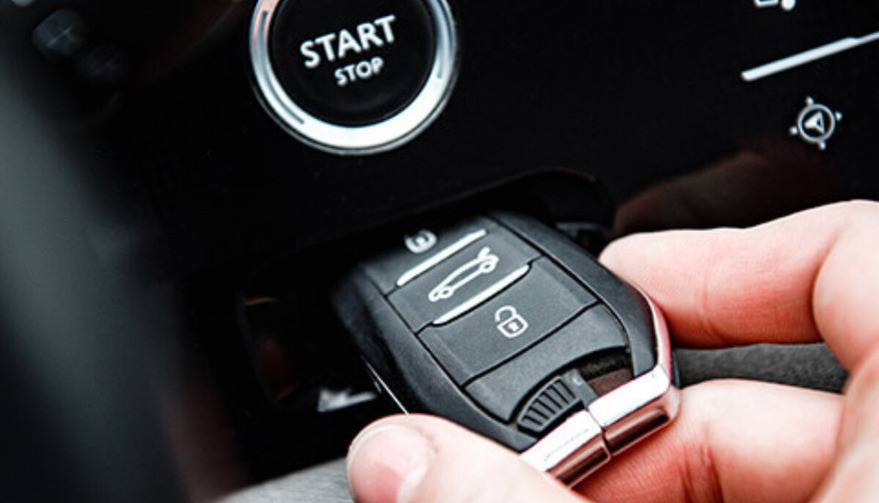
  • Push-to-Start Ignition: Many modern vehicles with smart keys feature a push-to-start ignition system. With this technology, you can start your car simply by pressing a button, provided that the key fob is inside the vehicle. No need to insert a key into the ignition, making the process quicker and easier.
  • Enhanced Security Features: Smart keys are designed to improve vehicle security. They utilize encrypted signals that are difficult to replicate or hack. Modern key fobs often come with rolling codes, meaning the signal changes each time the key is used, making it nearly impossible for thieves to copy the key’s signal. Additionally, many smart keys are equipped with proximity sensors that automatically lock the doors when the key is a certain distance away, reducing the risk of theft.
  • Convenience and Customization: Some smart car keys allow for extra features, such as memory settings for seat adjustments, climate control, and even personalized preferences like music playlists. This adds a layer of comfort and convenience to your driving experience.

Drawbacks of Smart Car Keys:

While smart keys offer numerous benefits, they come with a few challenges:

  • Battery Dependence: Smart keys rely on batteries, both within the key fob and sometimes within the car itself. If the battery in your key fob dies, you might find yourself locked out of your vehicle or unable to start it. Fortunately, many vehicles allow you to use a backup mechanical key that is hidden inside the fob itself. However, the reliance on batteries can still be a disadvantage.
  • Cost: Replacing a lost or damaged smart key can be expensive, particularly if it involves reprogramming or replacing the vehicle’s security system. Smart keys are generally more costly than mechanical keys, so the price of a replacement key can put a strain on your budget.
  • Vulnerability to Hacking: Although modern smart keys are designed to be secure, they are not completely immune to theft. Sophisticated thieves have developed methods of intercepting and cloning key fob signals. While this is still a relatively rare occurrence, it’s important to be aware of the potential risks and take extra precautions to protect your key fob.
  • Vulnerability to Water and Extreme Conditions: Smart keys are sensitive to water damage, which makes them less suitable for activities like surfing, open-water swimming, or even heavy rain exposure. Unlike mechanical keys, which are more resistant to environmental factors, electronic key fobs can malfunction if exposed to water or extreme weather conditions. This can leave you stranded or necessitate an expensive replacement.

Understanding Mechanical Car Keys

Mechanical car keys, also known as traditional metal keys, have been in use for over a century. These keys work through a physical mechanism: when inserted into the ignition, they turn to engage the engine. While they are less common in modern vehicles, mechanical keys are still widely used, particularly in older cars or more budget-friendly models.

Key Features of Mechanical Car Keys:

  • Simplicity and Reliability: One of the main advantages of mechanical keys is their simplicity. Unlike smart keys, mechanical keys don’t rely on electronics or batteries, making them highly reliable, especially in situations where technology might fail. Whether it’s a long road trip or a cold winter morning, you can always count on your mechanical key to work.
  • Affordability: Mechanical keys are far less expensive to produce and replace than electronic keys. If you lose your key, getting a replacement is typically much cheaper. For those on a budget, mechanical keys are a practical option for car security.
  • No Risk of Signal Interception: Mechanical keys don’t use radio signals, which means they can’t be intercepted or hacked in the same way smart keys can. There’s no risk of someone remotely copying your key’s signal to gain access to your vehicle.
  • Durability: Mechanical keys are often made from durable materials, which means they can last for many years if properly cared for. They don’t require regular battery replacements and are resistant to the kind of wear and tear that might affect electronic systems.
  • Suitable for Adventures: Mechanical keys are an excellent choice for outdoor enthusiasts and adventurers. Since they are resistant to water damage, they’re ideal for activities where you might get wet, such as hiking in the rain, kayaking, or camping by a lake. Their durability ensures they’ll keep working even in rugged or wet conditions.

Drawbacks of Mechanical Car Keys:

While mechanical keys have their merits, they also come with limitations:

  • Lack of Convenience: Unlike smart keys, mechanical keys require manual operation. You need to physically insert the key into the door and ignition, which may be less convenient, especially when you’re in a hurry or carrying items.
  • Security Risks: While mechanical keys can’t be hacked, they are more easily duplicated. If someone gets a hold of your key, they can make a copy, which could put your vehicle at risk. Additionally, older mechanical key systems don’t have the advanced security features found in modern smart keys.
  • No Keyless Entry or Push-Start Features: Mechanical keys lack keyless entry and push-to-start ignition, which can make your car less convenient to use. In addition, you won’t have access to any of the advanced features offered by smart keys, such as memory settings or remote start.

 When deciding between a smart or mechanical car key, the best choice depends on your individual needs, preferences, and security concerns.

  • If you prioritize convenience and advanced security, a smart key might be the right choice for you. Features like keyless entry, push-to-start ignition, and superior encryption provide a higher level of comfort and safety. If you have a newer vehicle or enjoy the latest technology, a smart key will enhance your driving experience.
  • If you value simplicity, reliability, and cost-effectiveness, a mechanical key may be the better option. It’s a great choice for older vehicles, drivers on a budget, or those who don’t need the added complexity of modern electronic systems. Mechanical keys are also ideal for people who want a straightforward, low-maintenance solution to car access.

Regardless of which type of key you choose, it’s important to maintain backups and ensure that your keys are properly cared for. If you opt for a smart key, remember to replace the batteries regularly and store the key in a safe place to prevent loss or theft. If you use a mechanical key, consider having a spare made to avoid being locked out of your vehicle in case of misplacement.

For ultimate peace of mind, having both types of keys can be a smart investment—offering the convenience of advanced features alongside the reliability of a traditional backup. Together, they ensure you’re prepared for any situation while adding an extra layer of security.

Related Posts

Why Your Motorcycle TFT Display Needs a Screen Protector (Before It’s Too Late)

Why Your Motorcycle TFT Display Needs a Screen Protector (Before It’s Too Late)

Modern motorcycles are smarter, more connected, and more expensive than ever. At the center of that evolution sits the TFT display—your bike’s digital command hub. Speed, revs, riding modes, navigation, calls, warnings. One exposed surface controls it all. And it’s far more vulnerable than most riders realise. A motorcycle screen protector isn’t an accessory. It’s preventive maintenance. Ignore it, and you’re gambling with one of the most expensive components on your bike. The Hidden Weak Point on Modern Motorcycles Motorcycle manufacturers invest heavily in engines, frames, and electronics. But the TFT display? It’s still a thin, exposed panel, mounted directly in the line of fire. Unlike a phone, it: Lives outdoors 24/7 Takes direct UV exposure Gets hit by dust, sand, insects, and road debris Is cleaned repeatedly—often incorrectly A single mistake is enough to leave permanent damage. TFT Displays Scratch Far Easier Than You Think Most motorcycle TFT screens are plastic-based or plastic-coated , not hardened glass like premium smartphones. That matters. Plastic scratches: From dust particles wiped across the surface From dry cloths or paper towels From jacket zippers or gloves Even from “careful” cleaning at fuel stops Once scratched, there is no polish, no fix, no reset . The damage is permanent. A motorcycle display protector absorbs this damage instead of the screen itself. Sunlight Is Quietly Destroying Your Display UV exposure doesn’t crack screens overnight. It does something worse. It slowly: Fades colours Reduces contrast Creates uneven patches Permanently dulls brightness After a few summers, the display that once looked sharp now looks tired—especially when riding in direct sunlight. A quality bike screen protector acts as a UV barrier, preserving clarity and colour accuracy for years. Glare Isn’t Just Annoying. It’s Dangerous. A washed-out screen at speed isn’t just inconvenient. It means: Missed warning lights Hard-to-read navigation prompts Delayed reaction times In bright sun, an unprotected TFT can become a mirror. Screen protectors designed for motorcycles reduce reflections and glare, improving readability in real-world riding conditions—not showroom lighting. Cleaning Your Screen Is Probably Damaging It Most riders clean their TFT displays the same way they clean helmets or windscreens. That’s a mistake. Common causes of micro-scratches: Dry wiping Paper towels Window cleaners Cloths contaminated with dust Over time, these tiny marks add up. The screen becomes hazy. Night riding gets worse. Contrast drops. A motorcycle screen protector takes that abuse instead—so you can replace the protector, not the display. The Real Cost of a Damaged Motorcycle TFT Display Here’s what many riders discover too late. Replacing a TFT display typically costs: €800–€1,200 for the part Labour and coding often extra In many cases, the bike must go to an authorised dealer Insurance often won’t cover cosmetic damage. Scratches don’t qualify as “failure.” A screen protector costs a fraction of that—and eliminates the risk entirely. Resale Value Takes a Direct Hit Buyers notice screens immediately. A scratched or faded TFT display: Signals neglect Raises questions about overall maintenance Lowers perceived value Even if the bike is mechanically perfect, a damaged display can knock hundreds off resale or trade-in value. Protecting the screen protects the bike’s future value. Why Motorcycle Displays Are More Vulnerable Than Phones It’s tempting to compare TFT displays to smartphones. That comparison fails. Motorcycle screens: Are permanently exposed to the elements Experience constant vibration Are cleaned in uncontrolled environments Sit at steep angles that catch sunlight They endure more abuse in one riding season than most phones do in five years. A dedicated motorcycle display protector is designed for exactly these conditions. Screen Protectors Don’t Affect Touch or Visibility A common myth: screen protectors reduce clarity or touch response. High-quality motorcycle screen protectors are: Ultra-thin Optically clear Designed for glove interaction Precisely cut for each display shape Once installed, most riders forget it’s even there—until it saves the screen. Installation Is Easier Than You Expect Modern protectors are made for DIY installation. Typically: No liquids required No permanent adhesives No tools beyond what’s included With careful alignment, installation takes minutes—and protects the display for years. Who Should Use a Motorcycle Screen Protector? Short answer: every rider. Especially if you: Park outdoors Ride in bright sun Tour long distances Use navigation or Bluetooth features Plan to keep or resell the bike If your motorcycle has a TFT display, it’s already at risk. FAQ Do motorcycle TFT displays scratch easily? Yes. Most TFT displays use plastic-based surfaces that scratch far more easily than smartphone glass—often from normal cleaning alone. Can a scratched motorcycle display be repaired? No. Scratches are permanent. The only true fix is replacing the entire display unit. How much does it cost to replace a motorcycle TFT screen? Replacement typically costs between €800 and €1,200, excluding labour and dealer programming. Does a screen protector affect brightness or touch sensitivity? No. Quality protectors are optically clear and maintain full touch responsiveness. Is a motorcycle screen protector worth it? Considering the replacement cost of a TFT display, a screen protector is one of the highest-value protective upgrades you can make. Can I remove or replace the protector later? Yes. Screen protectors are removable and replaceable without damaging the original display. Protect the Most Expensive Screen on Your Bike Your motorcycle’s TFT display is essential, fragile, and costly to replace. Damage doesn’t announce itself. It accumulates quietly—scratch by scratch, fade by fade—until it’s too late. Visit our shop at mr-key.com to explore our motorcycle screen protectors and protect your display before the damage becomes permanent.

Guide to Identifying and Replacing Your Keys

Guide to Identifying and Replacing Your Keys

Losing your keys can be a frustrating experience, but identifying the right replacement doesn't have to be. Whether you've lost a house key, a car key, or a key to a padlock or cabinet, understanding how to identify the key you need is crucial. This guide will walk you through the process of identifying your keys, ensuring you find the right replacement quickly and efficiently. The Importance of Key Identification Before diving into how to replace a lost key, it’s important to understand why key identification is critical. Keys come in a variety of shapes, sizes, and designs, each tailored to specific types of locks. Identifying your key correctly will save time, money, and frustration. For example, car keys often include transponder chips that need to be programmed to your vehicle, while house keys may have specific patterns that fit only one brand of lock. Step 1: Check for Key Codes and Markings The first step in identifying your key is to look for any codes or markings. These can be found on the key itself or sometimes on the lock. Key codes are often a series of letters and numbers that indicate the specific model or cut of the key. If you still have the original key, examine it closely for these codes. If not, check the lock for any inscriptions that might offer clues. Key codes are essential, particularly for high-security keys or specialized keys such as those used in commercial settings. For car keys, this code might also be found in the vehicle’s manual or on a key tag provided at the time of purchase. Step 2: Determine the Key Type Next, determine the type of key you need. Different keys serve different purposes: House Keys: Typically flat with unique grooves along the edge, these are used in residential locks. Car Keys: These may include electronic transponders and are often more complex. Padlock Keys: Usually smaller, these keys have a unique profile that fits the specific lock. Cabinet or Locker Keys: These are often smaller and may be specific to a brand or lock type. Identifying the correct key type is important because it narrows down your options when searching for a replacement. Step 3: Identify the Lock Brand If you cannot find a key code, identifying the lock brand is the next best step. The brand name is usually stamped somewhere on the lock or key. Knowing the brand will help you narrow down the options for finding a replacement key. For example, many house keys are cut to fit specific brands like Yale or Schlage. Car keys, on the other hand, are usually specific to the car manufacturer. Knowing the brand is especially useful when you need to replace a key without an original to reference. Step 4: Examine the Key Profile The profile of the key refers to the unique cuts, grooves, and ridges along its blade. This profile is what allows the key to operate a specific lock. When identifying your key, compare the profile of your key to those available through online resources or in-store at key-cutting services. If you have a high-security key, it may have a more complex profile that is difficult to replicate. In such cases, it’s best to consult a professional locksmith or the lock manufacturer for an exact match. Step 5: Utilize Online Resources There are many online resources available to help you identify and replace your lost key. Websites often offer key identification tools where you can input details such as key codes, lock brands, and key types to find a match. Additionally, many online stores specialize in replacement keys, offering a wide selection based on the information you provide. Step 6: Contact the Manufacturer If you're still having trouble identifying your key, contacting the lock or car manufacturer can be extremely helpful. Provide them with any details you have about the lock or key, and they can often guide you to the right replacement. For car keys, your vehicle identification number (VIN) can often be used by the dealership to cut a new key or program a replacement transponder key. Step 7: Professional Locksmith Assistance When all else fails, a professional locksmith is your best bet. Locksmiths have the tools and expertise to identify and replicate nearly any type of key. They can also assist with programming transponder keys for cars or creating master keys for complex locking systems. Losing a key doesn't have to be a stressful experience if you know how to identify and replace it effectively. By following these steps—checking for key codes, determining the key type, identifying the lock brand, examining the key profile, using online resources, and seeking professional help—you can ensure that you find the right replacement quickly and efficiently. Proper key identification is the first step toward restoring access and ensuring security.

How to Remove or Change a Roof Rack Lock Barrel Easily

How to Remove or Change a Roof Rack Lock Barrel Easily

Changing or removing the lock barrel on your roof rack may seem like a daunting task, but it’s actually simpler than you might think. Whether you need a replacement due to a lost key, wear and tear, or just want to swap out an old lock for a new one, following the right steps can make the process hassle-free. This guide will walk you through everything you need to know about handling a roof rack lock barrel with ease. Why You Might Need to Change a Roof Rack Lock Barrel ? There are several reasons why you may want to replace or remove your roof rack lock barrel: Lost Key : If you've misplaced the key, replacing the lock barrel is often the most practical solution. Upgrading the Lock : Maybe you want a more secure lock for added peace of mind. Routine Maintenance : Over time, lock barrels can wear down, making it harder to insert or turn the key. Uniformity : If you've recently changed your car key, you may want to match your roof rack lock with it. Knowing why you’re changing the lock barrel will help you determine the steps you need to follow. What You’ll Need Before you start, gather these essential tools and items: Replacement Lock Barrel : Ensure it’s compatible with your roof rack model. Master Key or Removal Key : Often required to remove the old lock barrel. New Key : The key that corresponds to the replacement lock barrel. Flathead Screwdriver : To gently pry and release certain parts if needed. Step-by-Step Guide to Removing a Roof Rack Lock Barrel Removing a lock barrel from your roof rack doesn’t require extensive mechanical skills. Just follow these straightforward steps: 1. Locate the Lock Barrel The lock barrel is usually situated in the center or side of the roof rack. Look for the small lock with the keyhole, as this is where you'll be inserting the master or removal key. 2. Insert the Master Key or Removal Key If you have a master or removal key, insert it into the lock. This is often a universal key provided by the lock manufacturer specifically for removing lock barrels. Once it’s inserted, turn the key slightly to unlock the barrel. Tip: If you don’t have a removal key, contact a professional or see if you can order one specifically for your model. 3. Pull the Lock Barrel Out With the removal key still in place, gently pull the lock barrel out. If it’s resistant, try wiggling it slightly while pulling. Avoid forcing it, as this could damage the lock or roof rack. In some cases, you may need a flathead screwdriver to help pry it out, but be careful not to scratch the surrounding area. 4. Check the Casing After removing the lock barrel, inspect the casing where the barrel was installed. Make sure it’s clean and free of debris. Any dirt or rust could interfere with the new lock barrel, so it’s a good idea to clean this area before proceeding. Installing the New Lock Barrel Once the old barrel is removed, you’re ready to install the new one. Here’s how: 1. Align the New Lock Barrel Take your new lock barrel and align it with the casing where the old one was. Most barrels are designed to fit in only one direction, so make sure you align it properly to avoid jamming. 2. Insert the New Barrel Push the new lock barrel into the casing until it clicks into place. This might require a bit of pressure, but it should fit snugly without needing excessive force. 3. Test the New Key After installing the new lock barrel, insert the new key and turn it to ensure it’s working smoothly. The key should turn easily and lock securely. This step verifies that the new lock is properly aligned and functional. Common Challenges and Solutions While changing a roof rack lock barrel is generally straightforward, you might encounter some challenges. Here’s how to troubleshoot common issues: Stuck Barrel : If the old barrel is stuck, apply a lubricant like WD-40 around the lock to help loosen it. No Removal Key : If you don’t have a master or removal key, consider reaching out to a locksmith or checking if the manufacturer offers a replacement. Barrel Won’t Fit : Ensure you’ve purchased a compatible lock barrel. Even slight differences in design can prevent it from fitting properly. Tips for Maintaining Your Roof Rack Lock To keep your new lock barrel in good condition and prevent the need for frequent replacements, consider these maintenance tips: Regular Cleaning : Dirt and grime can accumulate inside the lock over time, making it harder to operate. Clean the lock regularly to prevent this. Use Lubricant : Apply a small amount of lubricant inside the lock barrel periodically to keep the key turning smoothly. Protect from Rust : If your roof rack is exposed to rain and humidity, use a protective cover or shield to keep moisture out of the lock barrel. Check Key Fit : Avoid using a damaged or bent key, as this can wear out the lock barrel more quickly. When to Seek Professional Help In some cases, removing or replacing a roof rack lock barrel might require assistance from a professional: Lost or Damaged Keys : If both your main key and master key are lost or damaged, a professional can help retrieve or replace the lock barrel. Damaged Lock Mechanism : If the lock itself is damaged or jammed, forcing it can make things worse. A professional locksmith can safely remove and replace it. Replacing or removing a roof rack lock barrel is an affordable and manageable task for most car owners. By following the right steps and keeping up with regular maintenance, you can ensure your roof rack lock stays functional and secure. Whether you’re upgrading for security or replacing a worn-out lock, a new lock barrel can make all the difference in keeping your roof rack safe. Effortless Key Replacement for a Variety of Locks Order 2x Union Keys FT Series, custom-cut to your original key code, for a hassle-free replacement. Compatible with a range of locks, including those from Aston Martin, Jaguar, Land Rover, and more, these keys are perfect for classic cars, caravans, petrol caps, roof racks, and truck canopies. Simply find your lock code (e.g., FT101-FT360) on the lock face and enjoy fast delivery of high-quality spare keys.

Effortlessly Ordering Multiple Replacement Car Keys: A Step-by-Step Guide

Effortlessly Ordering Multiple Replacement Car Keys: A Step-by-Step Guide

As a car owner, managing multiple key replacements can be daunting. Fortunately, there's a streamlined method to order several keys simultaneously using a CSV file. Here's how you can simplify the process: 1. Prepare Your Key List Create a Spreadsheet: Use software like Microsoft Excel to list your key codes. Enter Details: In Column A, input each key code; in Column B, specify the quantity needed. Avoid Headers: Start directly with your data; do not include column titles. 2. Save as CSV Choose CSV Format: When saving, select 'CSV (Comma delimited)' from the 'Save as type' dropdown. Ensure Correct Format: Avoid other CSV formats to prevent compatibility issues. 3. Upload Your CSV File Access Your Account: Log into your trade account on the key replacement website. Navigate to Product Page: Find the specific key product you need. Upload CSV: Click the 'Upload a CSV' button above the key number entry field and select your file. Wait for Processing: Large files may take time to upload; remain on the page until completion. 4. Complete Your Order Add to Basket: Once uploaded, click 'Add to basket.' Proceed to Checkout: Follow the standard payment process to finalize your order. Important Considerations Separate Files for Different Keys: If ordering various key types or series, create individual CSV files for each. Trade Account Requirement: This feature is typically available to trade account holders; ensure you have the necessary access. By following these steps, you can efficiently manage bulk key replacements, saving time and ensuring accuracy.

Chat with us